
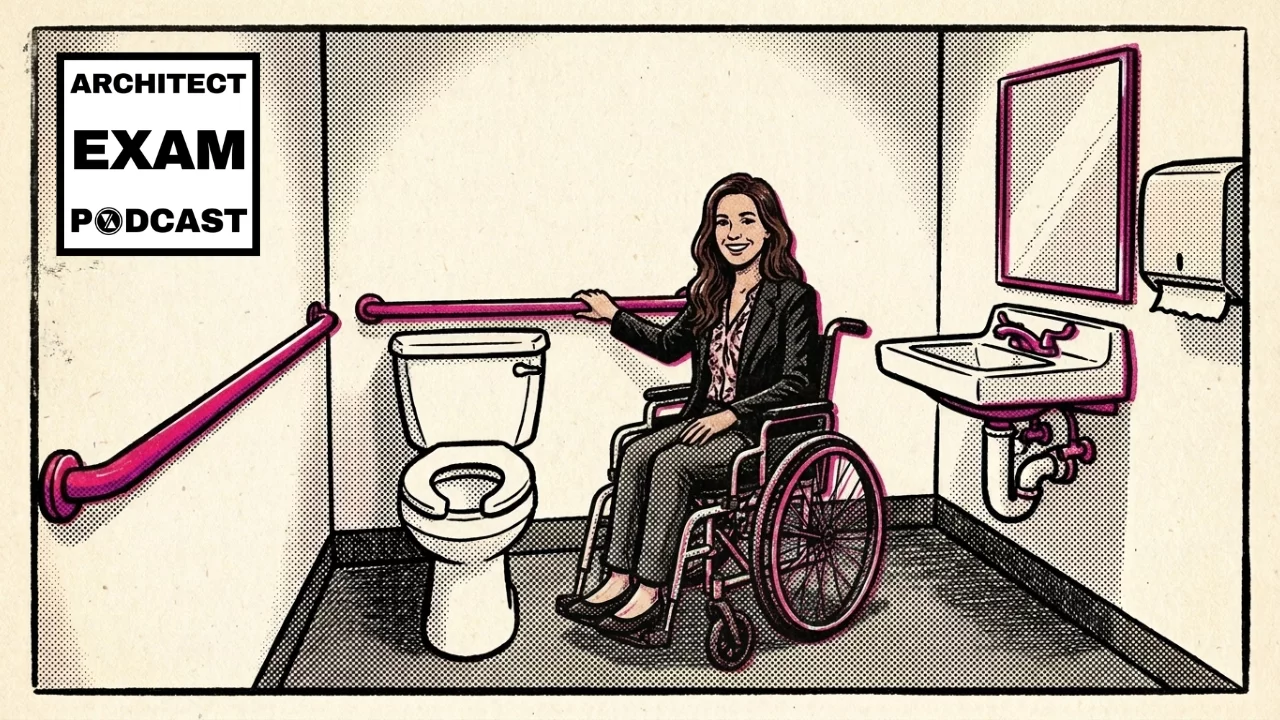

An ADA bathroom layout requires specific dimensions for turning space, toilet clearance, grab bar placement, sink height, and fixture reach ranges. But the numbers only make sense when you understand the physical experience behind them: how someone in a wheelchair actually transfers onto a toilet, why the rear grab bar is offset instead of centered, and what happens when a cabinet blocks the knee clearance under a sink. This guide walks through every ADA restroom dimension and explains why each one exists.
This post is for educational purposes only. Always check your local building code and verify requirements with your jurisdiction. When ADA and your local code disagree, follow the stricter requirement. ADA covers public accommodations. Residential accessibility falls under the Fair Housing Act, a different law with different requirements.
This podcast is also available on YouTube, Spotify, and Apple Podcasts.
If you haven’t read our breakdown of ADA door clearance, that post covers doors, ramps, corridors, and the accessible route. This episode picks up where that one left off: inside the restroom.
Why ADA Restrooms Matter
Going to the restroom is something most people do without thinking. You walk in, you do your thing, you walk out. It’s automatic.
In a wheelchair, every step of that process becomes a challenge you have to plan and physically execute.
During Emily’s wheelchair day, the restroom was the hardest part of the entire experience. And it wasn’t just one thing. It was everything stacked on top of each other.
First, getting through the restroom door while managing the door swing. Then backing into the stall because there’s no room to turn around inside. Then reaching behind to pull the stall door closed and lock it, which meant twisting her whole body in a way that almost tipped her out of the chair. Then positioning next to the toilet. And then the hard part: grabbing the grab bar, hoping it felt solid, and using nothing but upper body strength to lift and slide onto the seat.
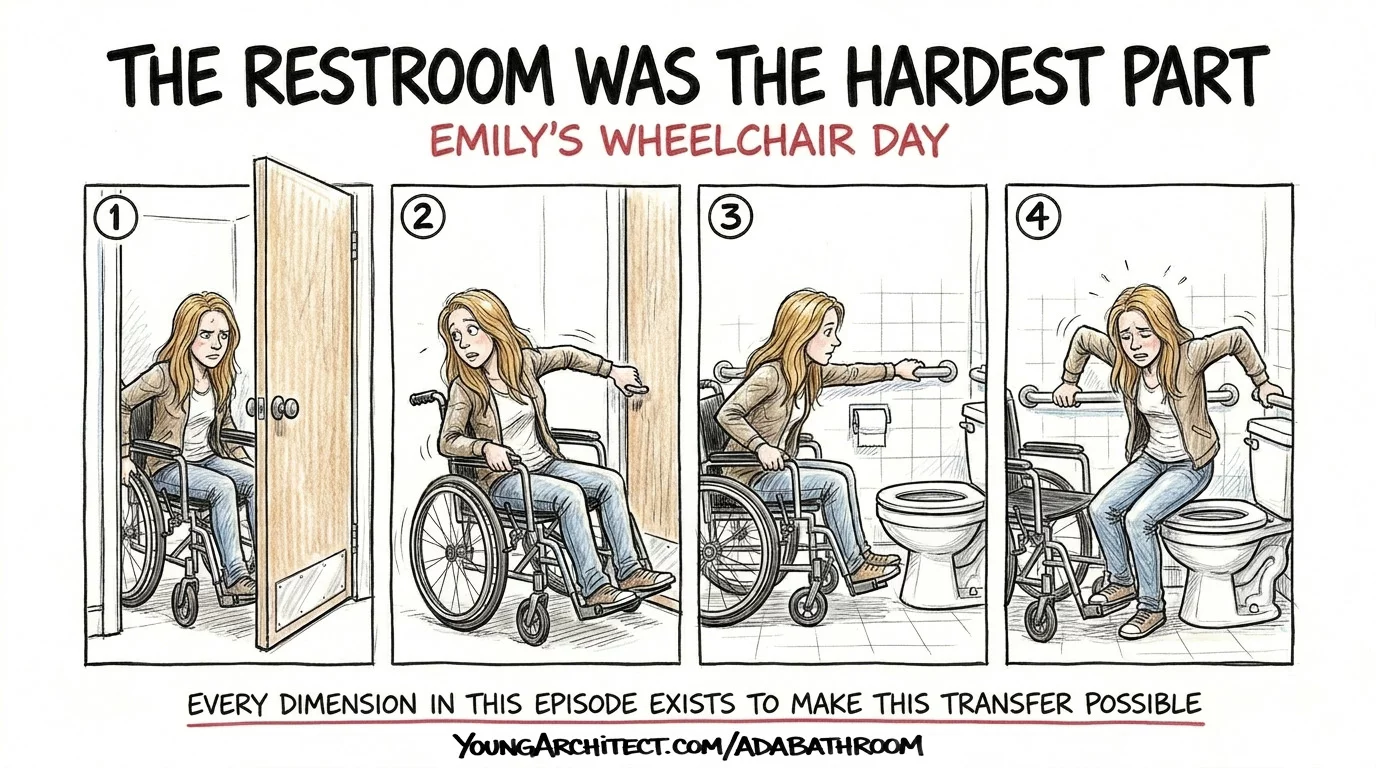
A restroom is where someone is alone. No assistant. No help button. If the design doesn’t work, nobody is there to bail you out.
That day changed how Emily approaches every restroom she designs. She stopped thinking about restrooms as a collection of clearances and started thinking about them as a physical experience that someone has to navigate alone.
In 2D, everything looks clean and simple. In real life, it’s a physical negotiation with every surface in that room.
ADA Bathroom Turning Space
The first thing you need in any accessible restroom is enough room to turn around.
A wheelchair needs a circle that’s 60 inches across to make a full turn. That’s 5 feet of open floor, measured as a diameter, not a radius. If you can’t fit a full circle, the T-shaped turning space works as an alternative. That’s a 60-inch square with 36-inch arms and base that lets someone do a three-point turn.
Federal ADA says 60 inches. But ICC A117.1, which is what your local building code actually adopts, increased the turning space to 67 inches for new construction to accommodate larger modern wheelchairs and power chairs. If you’re designing new work, check which standard your jurisdiction enforces. A 60-inch circle that passes the federal number can still fail under the newer ICC criteria.
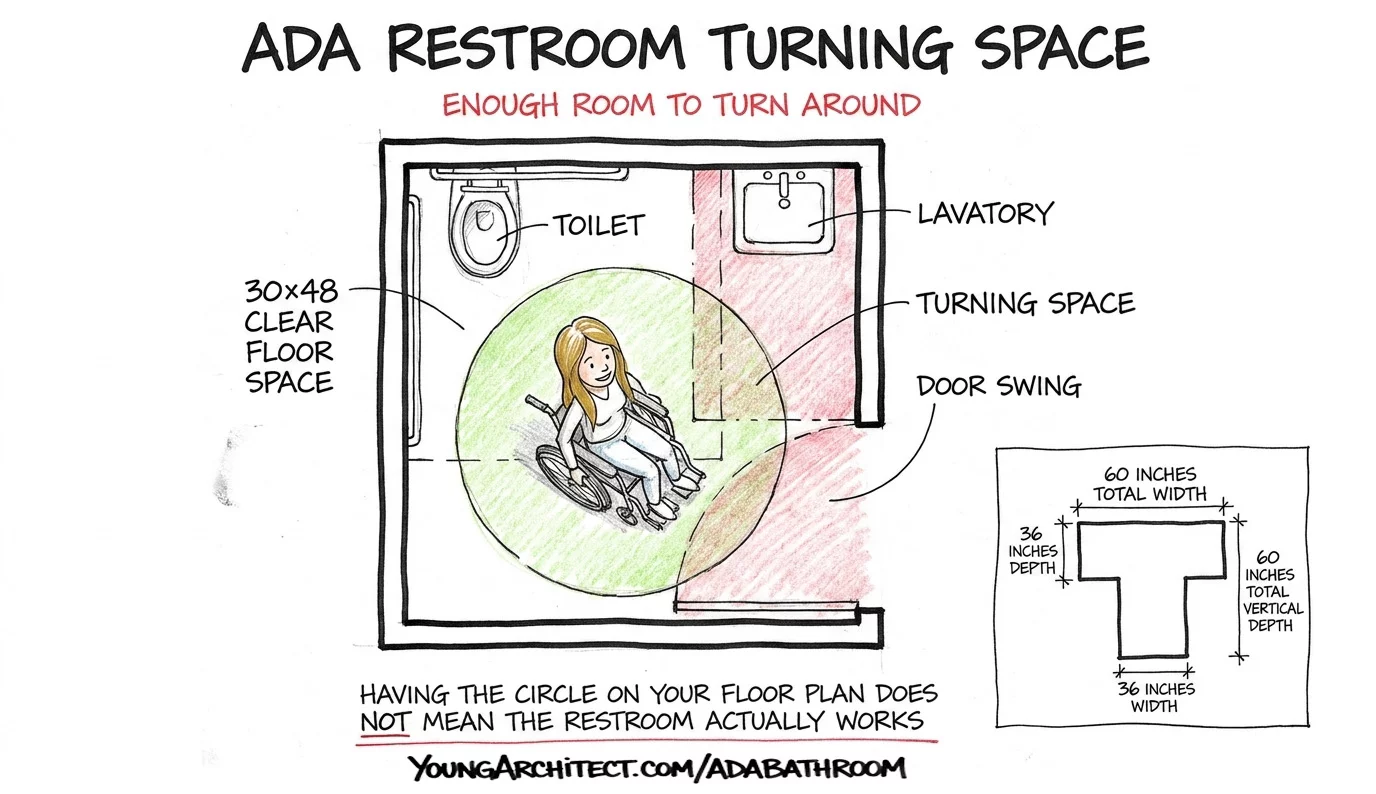
One of the most common design failures is the inward-swinging door in single-user restrooms. A door that swings inward forces a wheelchair user to do a complicated physical dance just to clear the door’s path so it can close behind them.
The code does allow the door swing to overlap the turning circle in single-user toilet rooms. But the door cannot swing into the clear floor space required at any fixture unless a completely clear 30-by-48-inch area remains beyond the arc of the door swing. If the wheelchair has to sit in the space the door needs to close, the user is trapped.
And each fixture in the restroom needs its own clear floor space. Those fixture clearances can sometimes overlap each other, but the conditions are specific. The same spatial logic that applies to restroom turning space also applies to means of egress design, where every element in the path needs to work as part of an unbroken chain.
Having the turning circle on your floor plan does not mean the restroom actually works. The circle tells you there’s room to spin. It doesn’t tell you whether someone can actually get from the door to the toilet to the sink and back out.
NCARB’s published objectives for PPD and PDD reference accessibility and building code compliance, and this is exactly the kind of spatial reasoning those objectives point toward.
ADA Toilet Clearance and Transfer
This is the section that changes how you think about restroom design. Because every dimension here exists to make one specific physical action possible: the transfer.
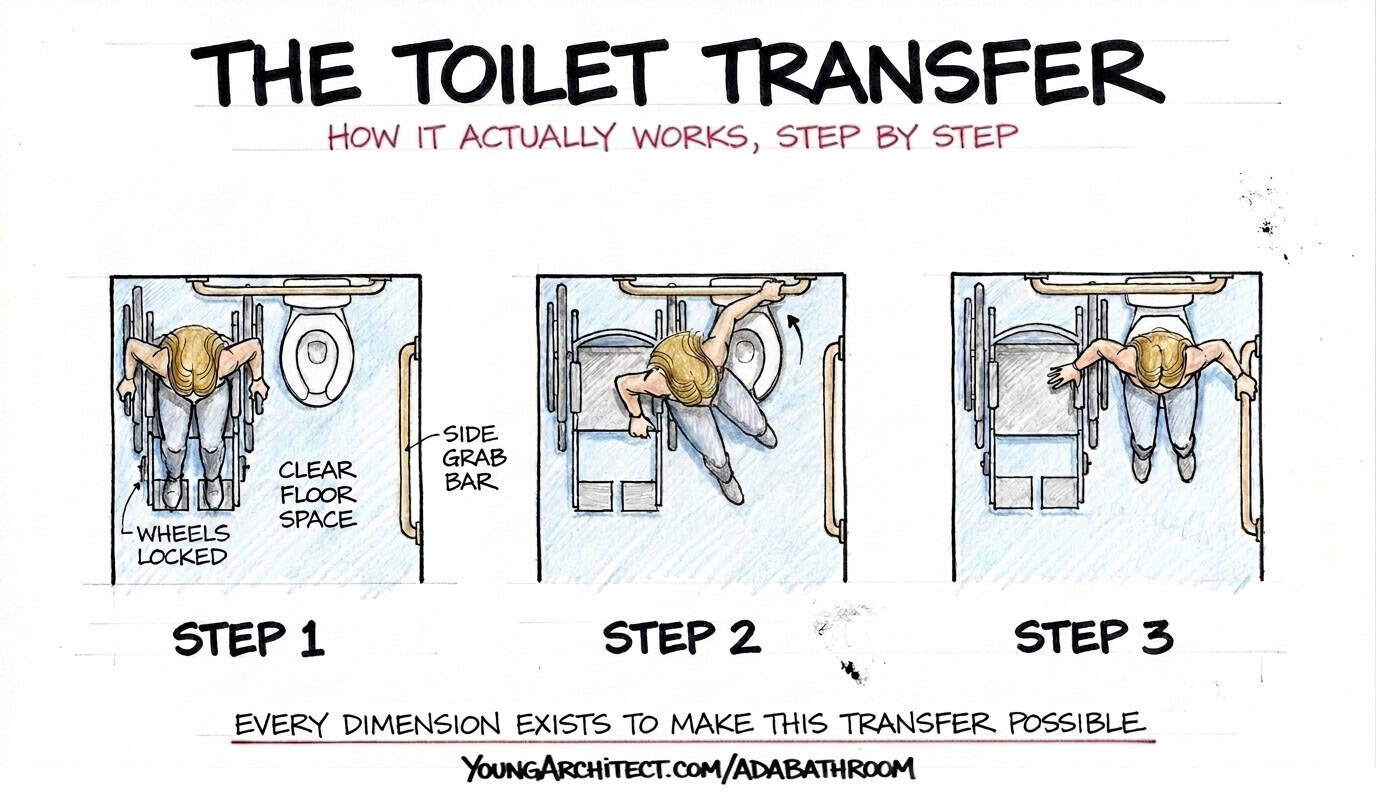
Let me walk you through how it actually works first, and then the numbers will make a lot more sense.
- The person in the wheelchair rolls up next to the toilet and parks parallel to it
- They lock their wheels
- They reach over with one hand and grab the side grab bar
- With the other hand, they grab the rear grab bar
- They use their upper body strength to lift themselves up and slide sideways onto the seat
That’s a side transfer. And there’s really no other way to do it. You need enough space for an entire wheelchair right next to the toilet, or the transfer simply can’t happen.
So now the dimensions make sense.
ADA toilet height needs to be between 17 and 19 inches to the top of the seat. That range exists because it needs to be roughly the same height as a wheelchair seat. If the toilet is too high or too low, the user is transferring uphill or downhill, which makes an already difficult move even harder.
The centerline of the toilet sits 16 to 18 inches from the side wall. That distance matters because if the toilet is too close to the wall, the person’s shoulder slams into it during the transfer. Too far away, and they lose the leverage they need from the grab bar.
The clear floor space on the side of the toilet is where the wheelchair actually parks. That’s the transfer zone. Without it, the whole process falls apart.
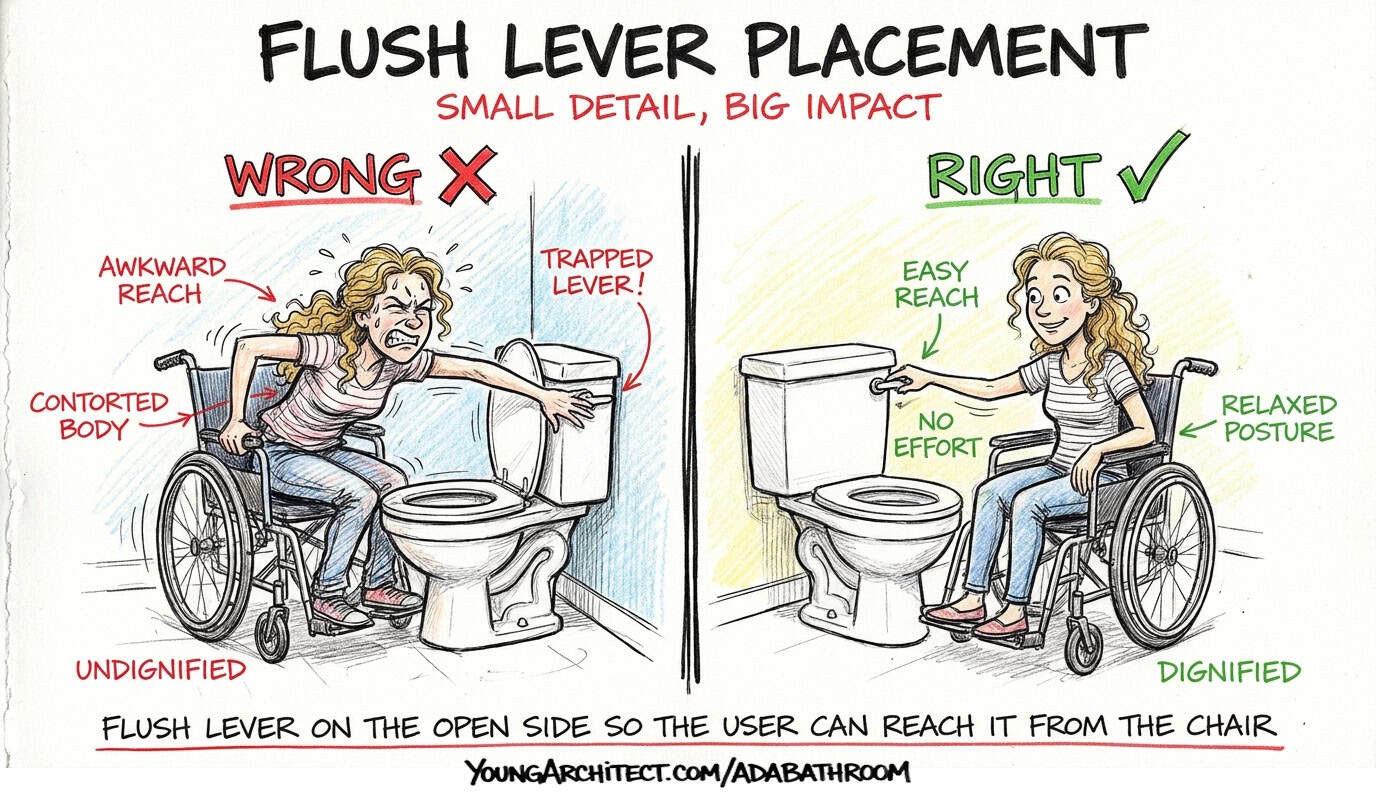
One more small detail with a big impact. The flush lever has to be on the open side of the toilet, not the wall side. If you’re in a wheelchair parked next to the toilet, the last thing you want to do is lean your entire body over the bowl to reach a handle trapped against the wall. Putting the lever on the open side means you can reach it from the chair without contorting yourself.
During Emily’s wheelchair day, the clearance between the toilet and the stall wall felt tight. The grab bar she was relying on to hold her full body weight had a little flex to it. That is not a feeling you want when you’re halfway between a wheelchair and a toilet with nothing else holding you up.
For the full set of toilet room clearance diagrams, the U.S. Access Board’s guide to toilet rooms has every layout configuration with dimensions.
ADA Grab Bar Placement
Grab bars are not towel racks. They’re structural support that someone’s entire body weight depends on.
The side grab bar needs to be at least 42 inches long. It starts close to the back wall, no more than 12 inches from the rear wall, because that’s where the transfer begins. And it extends forward at least 54 inches from the rear wall so you have support through the full range of the movement.
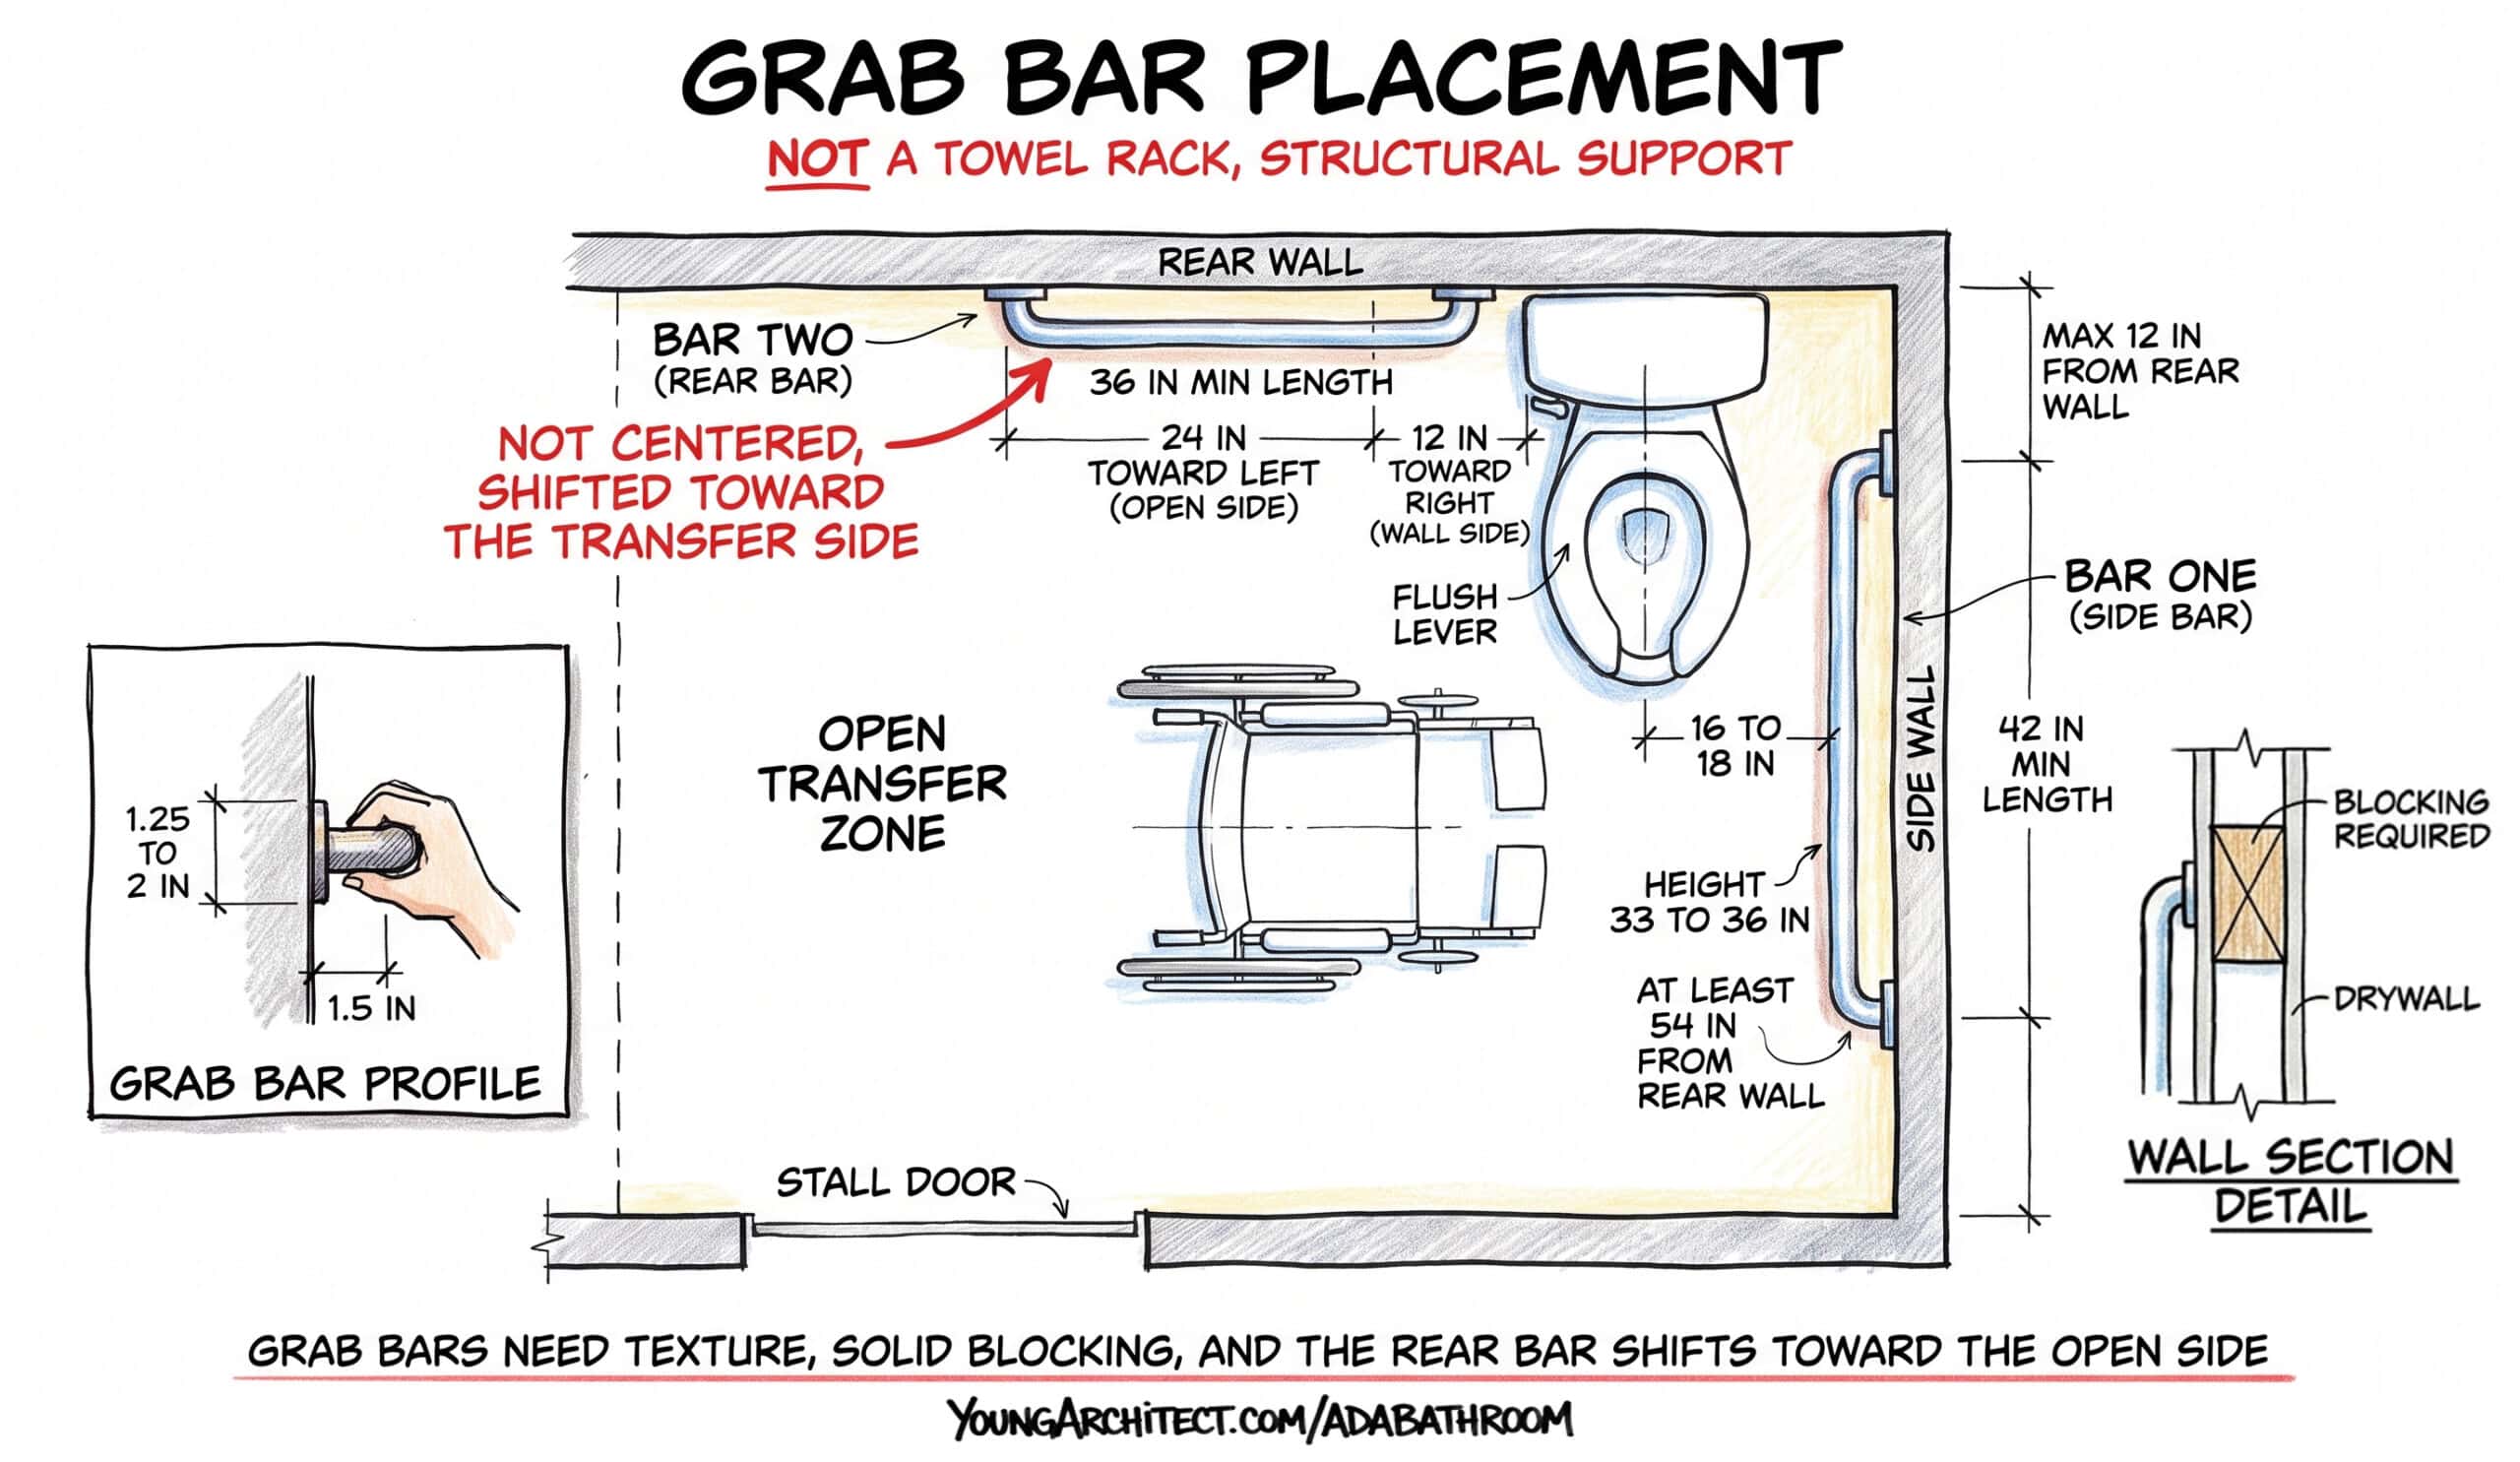
The rear grab bar sits behind the toilet and needs to be at least 36 inches long. But here’s a detail that trips a lot of people up.
The rear bar is NOT centered behind the toilet. It’s shifted toward the open side, the transfer side.
Why? Because that’s where you need the most leverage. When you’re reaching back to grab the rear bar during a transfer, your hand needs to find it on the side where the wheelchair is parked. If the bar is perfectly centered, the transfer side comes up short and you’re reaching for something that isn’t there. The bar shifts 12 inches from the centerline toward the wall side and 24 inches from the centerline toward the open side. That offset is one of the most commonly misunderstood details in ADA restroom design.
Both bars mount at 33 to 36 inches above the floor.
The bar itself needs to be between 1.25 and 2 inches in diameter, which is the range that allows a full hand grip. Too thin and it’s hard to hold. Too thick and your fingers can’t wrap all the way around it.
And just like handrails, you need at least 1.5 inches of clearance between the bar and the wall so your fingers can get behind it.
Two things from real-world experience that don’t always show up on the drawings.
Surface matters. Grab bars need texture. Smooth polished chrome looks beautiful. But when someone’s hands are wet or sweating from the effort of a transfer, smooth metal gets slippery. And slippery is dangerous when your full body weight is on the line.
What’s behind the wall matters just as much as what’s on it. The grab bar has to support someone’s full body weight as they lower and lift themselves on and off the toilet. If the bar is mounted to drywall with toggle bolts, it’s going to rip right out of the wall the first time someone puts real force on it. The wall needs solid blocking at every grab bar location, coordinated with the framing contractor and shown on the framing drawings early. Not discovered during punch list when the drywall is already hung. This is the kind of detail that gets verified through the submittal review process, where shop drawings confirm the blocking locations before the walls go up.
ADA Ambulatory Stall Requirements
This one gets overlooked, but it’s required and it serves a different population than the wheelchair-accessible stall.
An ambulatory accessible stall is a narrower stall with grab bars on both sides. It’s designed for people who can walk but need support. Someone using a cane. Someone recovering from knee surgery. Someone with balance issues. They don’t need a full wheelchair-sized stall, but they need something to hold onto on both sides while they lower and raise themselves.
Here’s the trigger you need to know. Ambulatory accessible stalls are required when a restroom has 6 or more total water closets and urinals combined. Below that count, you won’t see them. But the moment a restroom hits 6, the requirement kicks in.
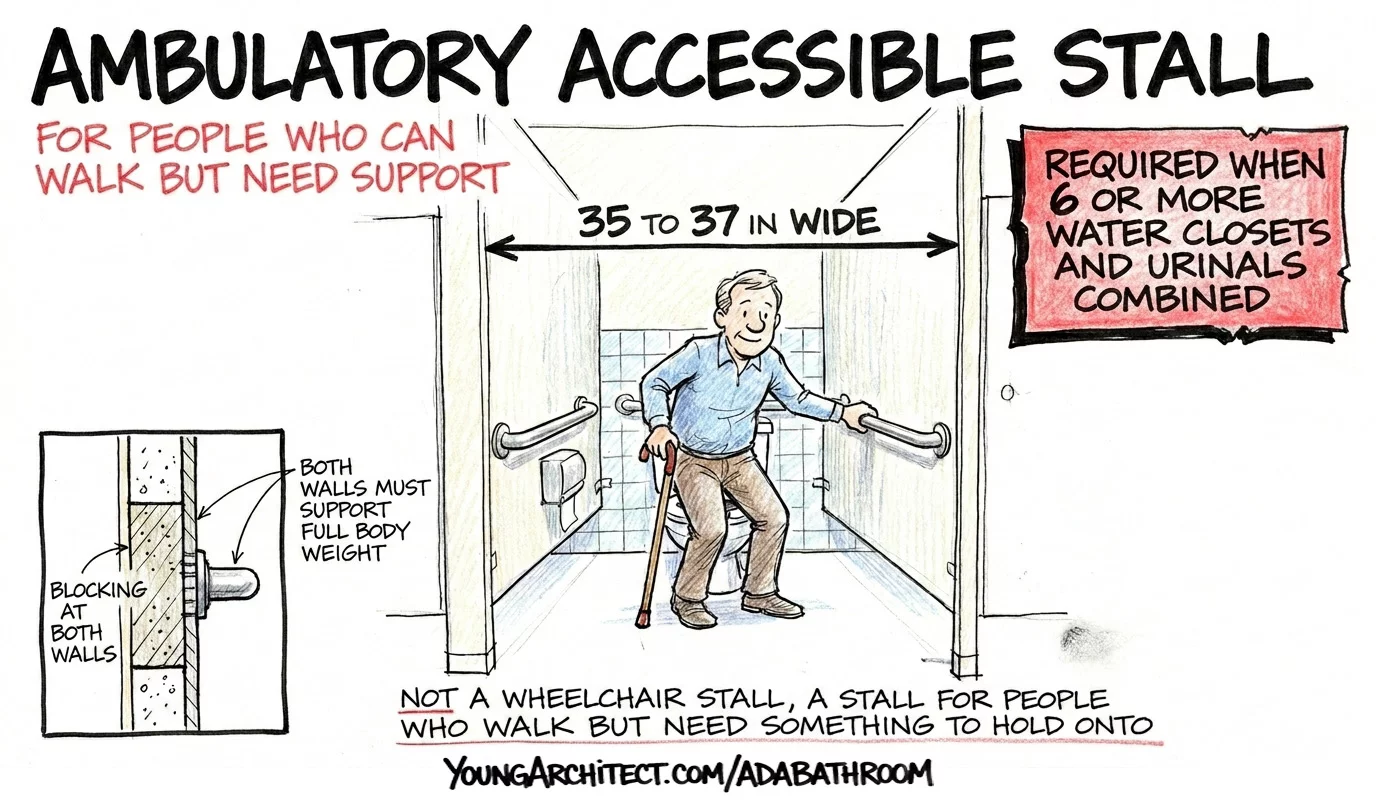
The same blocking requirement applies here. Both walls need to support grab bars that will bear someone’s full body weight. If you’re specifying a stall partition system, make sure the partition type can accept blocking and handle the load.
ADA Sink Height and Clearance
You’ve made it through the stall. Now you need to wash your hands. And the sink has its own set of requirements designed around one idea: a wheelchair user needs to be able to roll up close enough to actually reach the water.
The ADA sink height can’t be higher than 34 inches above the floor at the rim.
Underneath the sink, there needs to be enough room for someone’s knees and wheelchair to slide under the basin. That means at least 27 inches of height, 30 inches of width, and between 11 and 25 inches of depth. That open space is what makes the sink usable from a seated position.
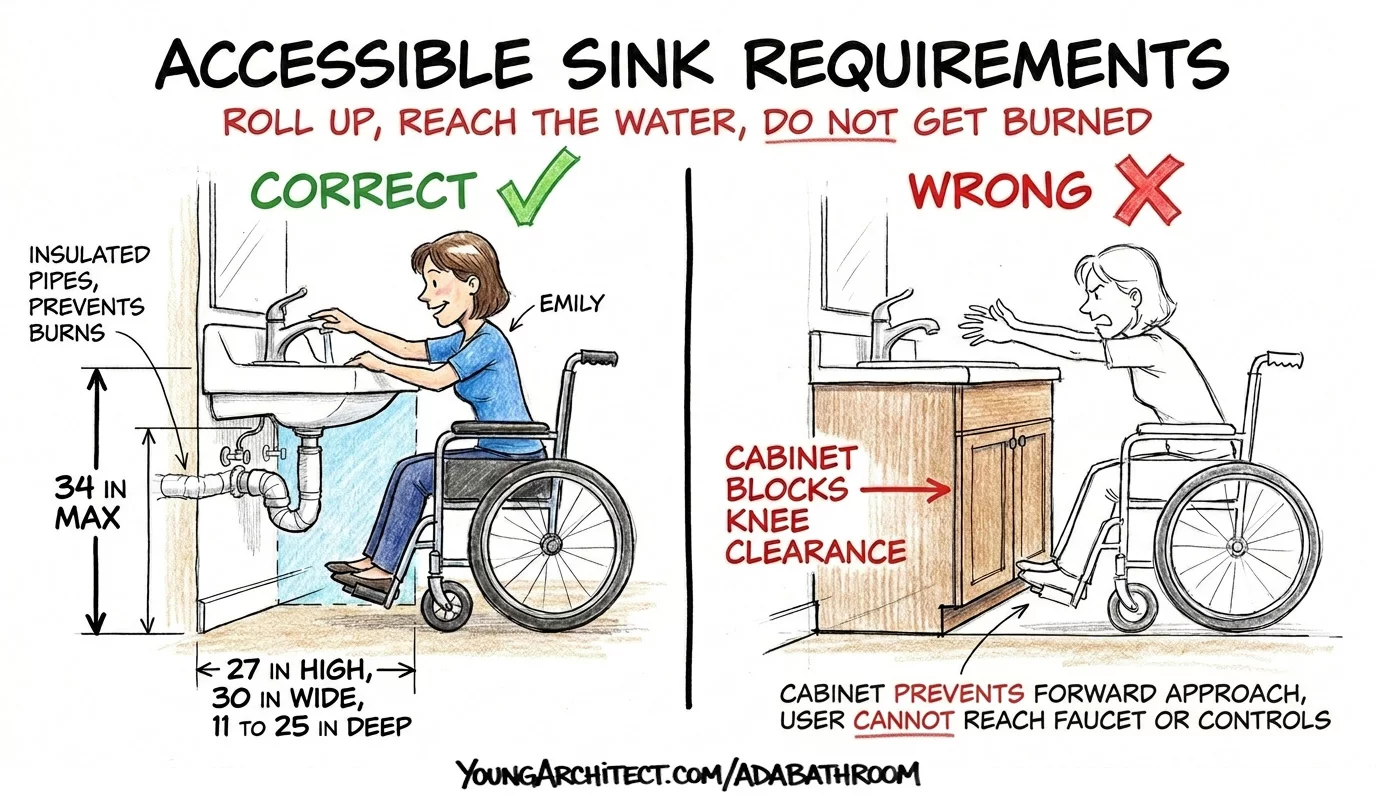
And this is exactly why cabinets under sinks violate ADA. You see this everywhere in older buildings. A vanity cabinet fills the space where someone’s knees need to go. It looks nice. It provides storage. And it makes the sink completely unusable for someone in a wheelchair.
Faucets follow the same rule as door hardware: no tight grasping, no pinching, no twisting. Lever handles or sensor-activated faucets are the standard.
Now here’s a detail that really sticks with you once you hear it.
When a wheelchair user rolls up to a sink, their bare legs are directly underneath the basin. If someone runs hot water and the drain pipe is exposed metal, that pipe gets hot. And if their knees are pressed against it, it burns them. They may not even feel it right away if they have limited sensation in their legs.
That’s why exposed hot water and drain pipes under accessible sinks must be insulated or covered. Small detail in the specs. Big deal for the person sitting there.
For the full set of sink clearance diagrams and faucet requirements, the U.S. Access Board’s guide to lavatories and sinks covers everything in depth.
ADA Urinal Height
Here’s one that surprises a lot of people.
That single lower urinal you see in public restrooms? Most people assume it was installed for kids.
It’s not. It’s the ADA-accessible urinal.
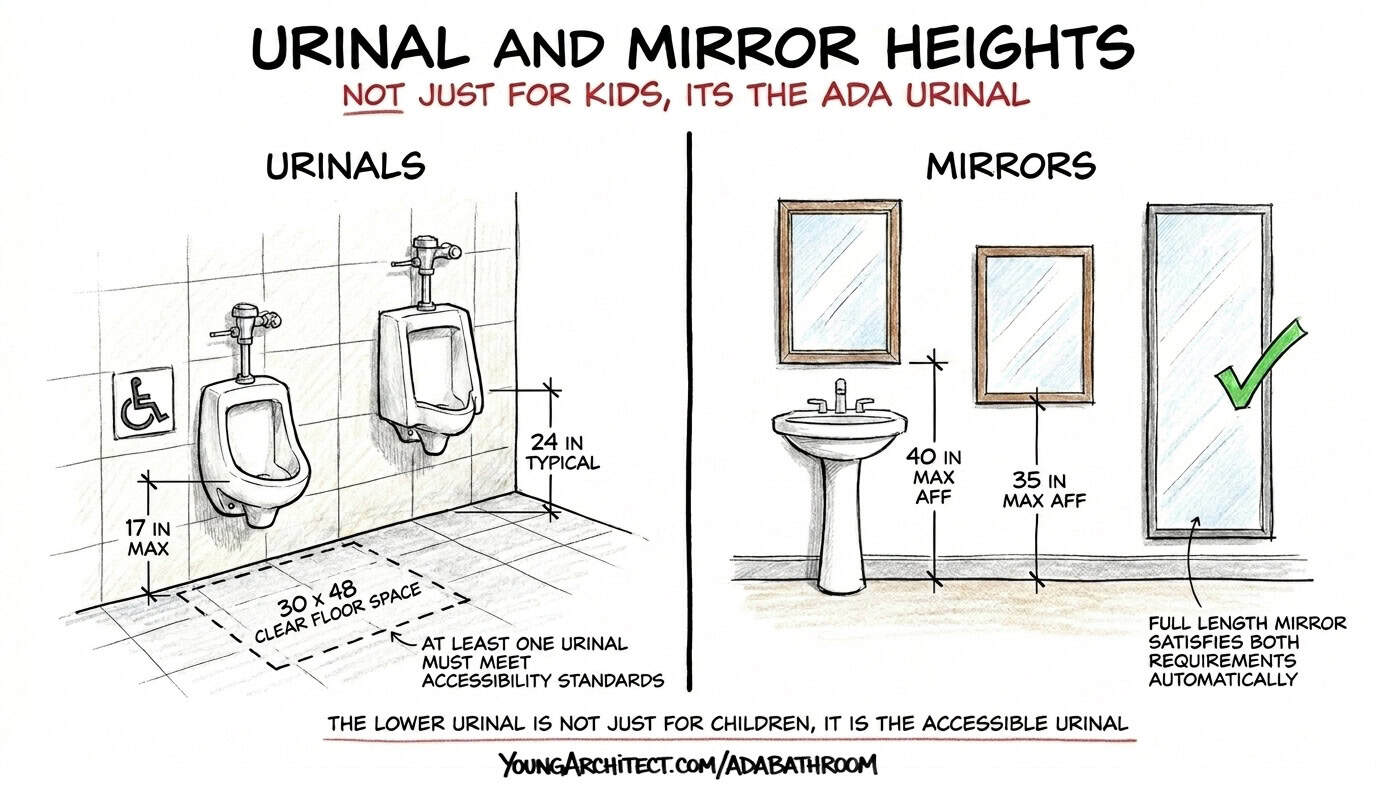
That lower urinal exists for wheelchair users, individuals of short stature, and anyone with mobility restrictions. If a public restroom has urinals, at least one has to meet accessibility standards.
The rim on an accessible urinal can’t be higher than 17 inches above the floor. A standard urinal usually sits around 24. That’s a 7-inch difference, and it’s significant.
You also need a clear floor space of 30 by 48 inches in front for a forward wheelchair approach, and the flush controls can’t be higher than 48 inches and have to be operable with one hand.
Quick coordination note: that lower mounting height changes how the waste lines and plumbing carrier get roughed into the wall. It needs to show up on the drawings early, not something the plumber discovers on install day.
ADA Mirror Height
When a mirror is mounted above a sink or counter, the bottom edge of the reflecting surface needs to be no higher than 40 inches above the floor. Any higher and a seated person is just looking at the ceiling.
If the mirror is a standalone wall mirror with nothing underneath it, that number drops to 35 inches.
Full-length mirrors automatically satisfy both requirements regardless of where they’re mounted. Sometimes the simplest solution is the best one.
ADA Dispenser Height Requirements
Everything someone needs to use after washing their hands, soap dispensers, paper towel dispensers, hand dryers, all of it needs to be mounted within the ADA reach range of 15 to 48 inches above the floor. If a person in a wheelchair can’t reach it, it doesn’t matter that it’s there.
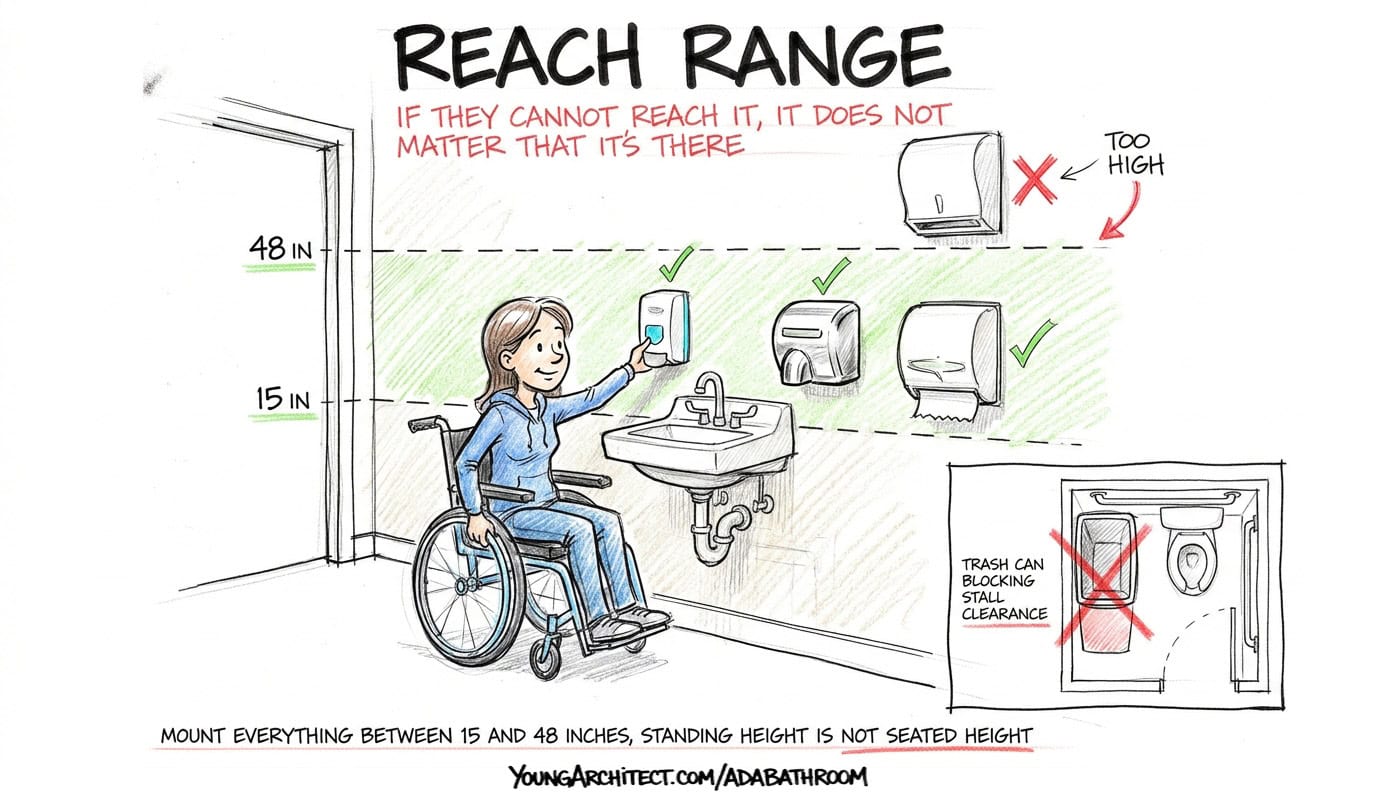
The common mistake is mounting things at a height that feels natural for a standing person but is completely out of reach for someone seated. The ADA paper towel dispenser height violation is one of the most frequent: holders mounted at eye level right next to the sink. Looks fine standing up. Useless from a wheelchair.
Common ADA Bathroom Mistakes
Understanding what goes wrong is just as valuable as knowing the requirements. Here are the real-world failures that show up over and over.
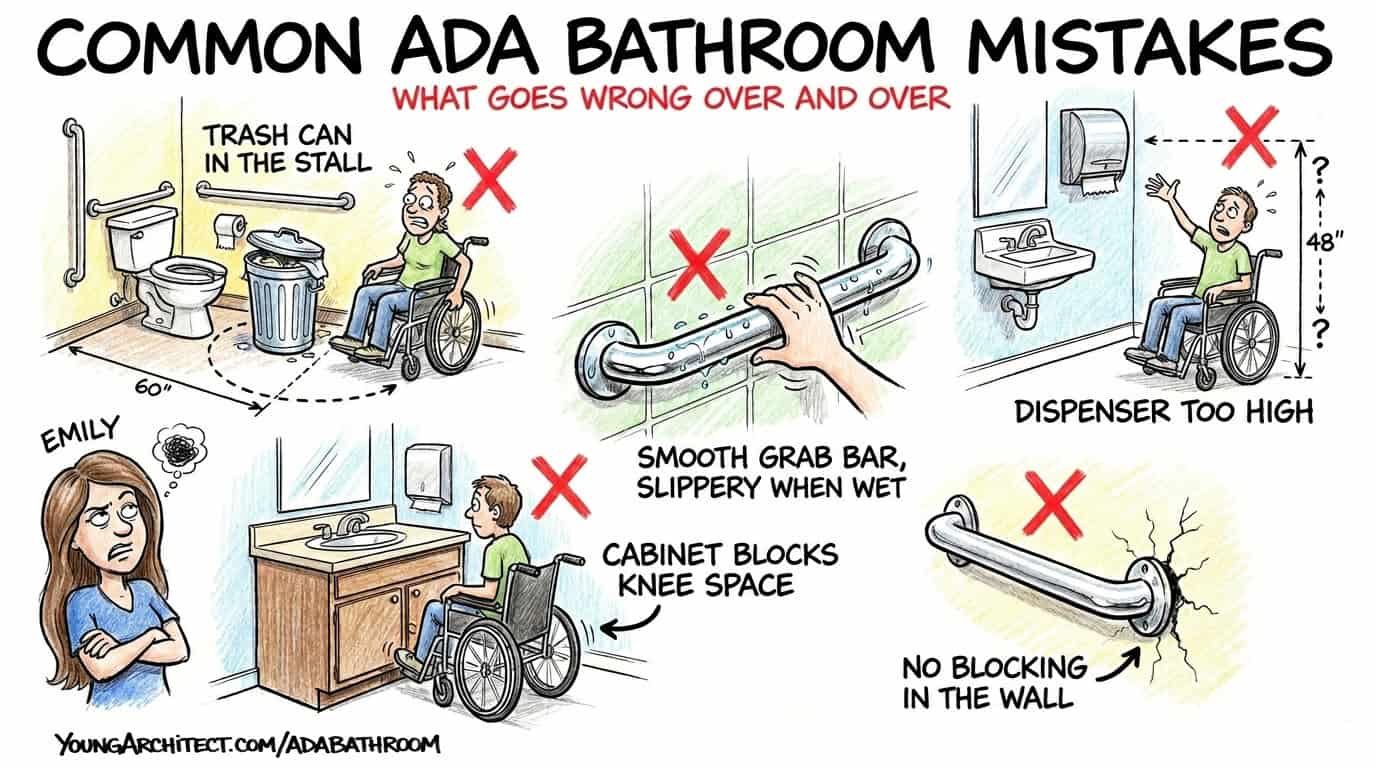
Trash cans in the ADA stall. This one happens constantly, and it’s almost never the contractor’s fault. The clearances in an accessible stall are designed for wheelchair maneuvering. Drop a trash can in there and you’ve taken away the space someone needs to turn, position, and transfer. It’s usually the cleaning crew that puts it there after the building opens. Worth flagging in your closeout documentation and maintenance manuals so the building owner knows that stall clearance isn’t storage space. This is exactly the kind of detail that belongs in the project closeout process, where operation and maintenance information gets handed off to the owner.
Paper towel dispensers mounted too high. Dispensers at 54 inches because that’s where the electrical box was roughed in. Technically installed. Practically unreachable from a wheelchair.
Grab bars without texture. Smooth chrome looks sleek, but it gets slippery when wet. When someone’s entire body weight is on that bar during a transfer, slippery is dangerous.
Grab bars that feel flimsy. During Emily’s wheelchair day, the bar she used during the transfer had a little flex to it. It moved when she pulled. That’s a terrifying feeling when you’re halfway between a wheelchair and a toilet. No blocking in the wall means the bar can’t support the load it needs to.
Cabinets under sinks. Common in older buildings. Completely blocks the knee clearance a wheelchair user needs to reach the faucet.
Contractors sometimes think nobody will measure. But someone will try to use that restroom. And when the design fails them, it’s not a code technicality. It’s a person who can’t use the bathroom with dignity. That’s the real failure.
ADA Bathroom Dimensions Reference
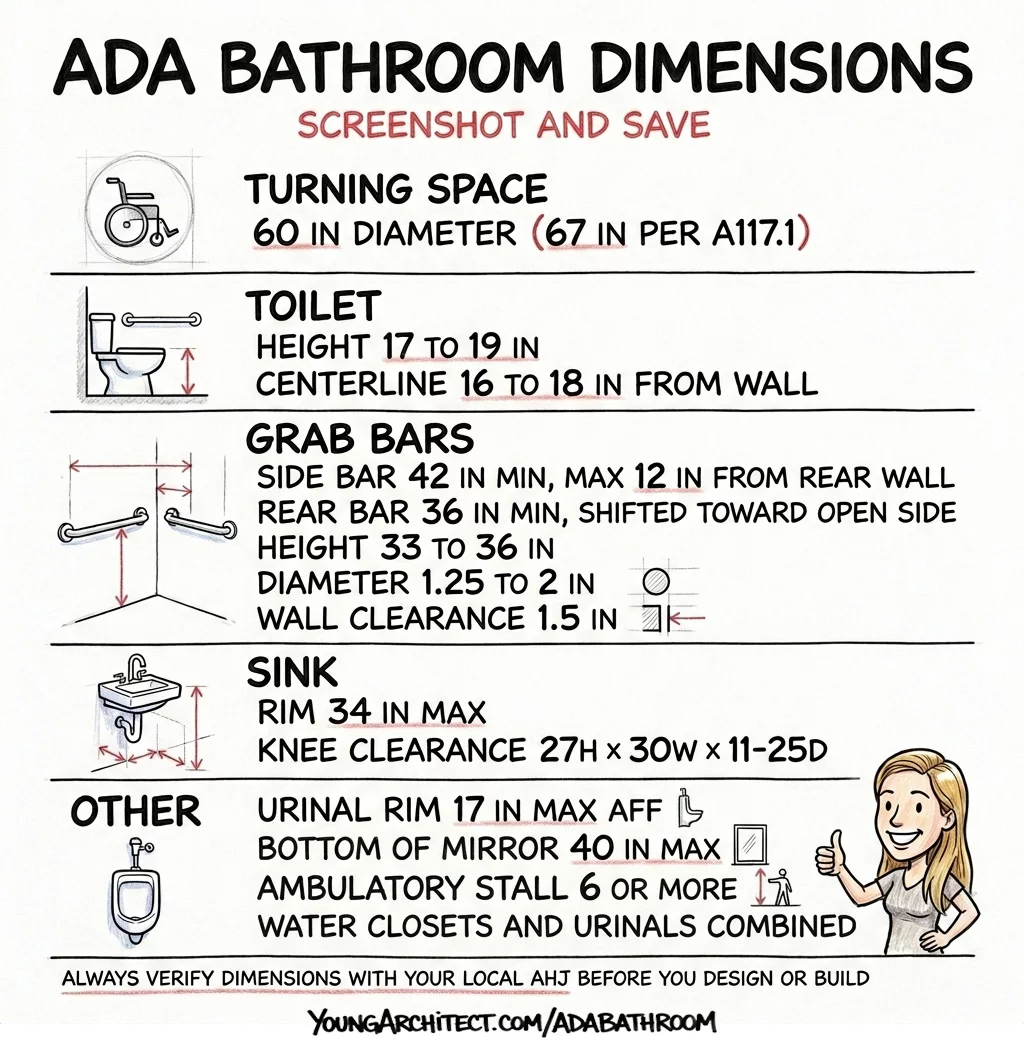
Here are all the key ADA bathroom dimensions from this post. Pull up your last restroom floor plan and check your work.
- Turning diameter: 60 inches (67 inches per A117.1)
- Toilet height: 17 to 19 inches
- Toilet centerline: 16 to 18 inches from wall
- Flush lever: open side of toilet (not wall side)
- Side grab bar: 42 inches min, max 12 inches from rear wall
- Rear grab bar: 36 inches min, shifted toward open side
- Grab bar height: 33 to 36 inches
- Grab bar diameter: 1.25 to 2 inches
- Wall clearance: 1.5 inches
- Sink rim: 34 inches max
- Knee clearance: 27H x 30W x 11-25D inches
- Urinal rim: 17 inches max
- Mirror above sink: 40 inches max
- Reach range: 15 to 48 inches
- Ambulatory stall trigger: 6+ fixtures
If you understand why these dimensions exist, you don’t need to memorize a chart. Think about the transfer. Think about someone’s knees under that sink. Think about wet hands on a smooth grab bar. The logic drives the numbers.
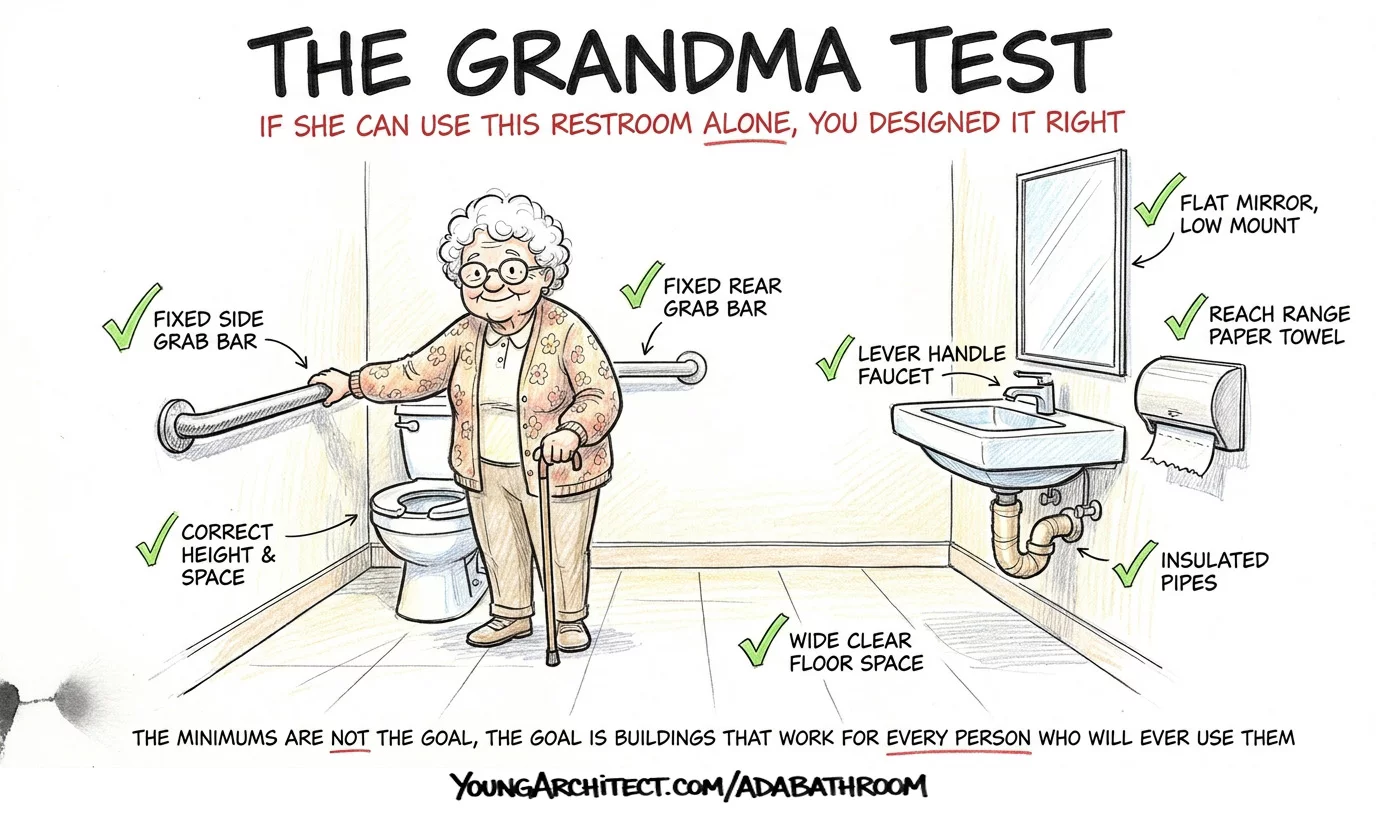
If your elderly grandma with a cane and limited vision can use this restroom independently, safely, and without losing her dignity, you designed it right. ADA lists the minimums. But the minimums aren’t the goal. The goal is restrooms that work for every person who will ever use them.
Restroom accessibility is referenced in NCARB’s published objectives across PPD, PDD, PA, and CE. Understanding how people physically use spaces, how clearances work together, and how construction details like blocking support accessibility are skills that serve you across every division. The full set of dimensional requirements is in the 2010 ADA Standards for Accessible Design.
Everything we’ve covered in this post and our ADA door clearance post happens inside the building. But ADA actually starts before anyone walks through the front door. The parking lot. The path to the entrance. The signage. The curb ramp that gets you from the car to the sidewalk. That’s coming next.
If you want to build your accessibility knowledge systematically, ARE Boot Camp gives you coaching, accountability, and a community of candidates working toward the same goal. Inside the ARE 101 Membership, every course addresses accessibility at the level that division requires:
- Building Codes 101 covers the code requirements that drive accessibility decisions
- PA 101 covers ADA in the programming and site analysis phase
- PPD 101 covers accessibility at the design level
- PDD 101 covers documenting accessibility in construction documents
Frequently Asked Questions About ADA Bathroom Layout
What are the ADA bathroom layout requirements for turning space?
ADA requires a 60-inch diameter turning space in accessible restrooms. That’s a diameter measurement, not a radius. The T-shaped turning space is an alternative that fits inside a 60-inch square with 36-inch wide arms and base. A door swing can overlap the turning circle in single-user toilet rooms, but it cannot swing into the clear floor space required at any fixture unless a 30-by-48-inch clear area remains beyond the door arc. ICC A117.1 increased this to 67 inches for new construction.
What height should ADA grab bars be mounted at?
ADA grab bars mount between 33 and 36 inches above the floor. The side grab bar must be at least 42 inches long and start within 12 inches of the rear wall. The rear grab bar must be at least 36 inches long and is offset toward the transfer side, not centered behind the toilet. Both need solid blocking in the wall to support a person’s full body weight during the toilet transfer.
What is the ADA sink height and knee clearance requirement?
The sink rim cannot be higher than 34 inches above the floor. Underneath the sink, there must be at least 27 inches of height, 30 inches of width, and 11 to 25 inches of depth for knee clearance so a wheelchair can roll underneath. Exposed hot water and drain pipes under accessible sinks must be insulated or covered to prevent burns, especially for users with limited sensation in their legs.
What is the ADA toilet height requirement?
ADA requires the toilet seat height to be between 17 and 19 inches above the floor. This range matches the approximate height of a wheelchair seat so the user can transfer sideways without going uphill or downhill. The toilet centerline must be 16 to 18 inches from the side wall to allow proper grab bar leverage during the side transfer.
When is an ambulatory accessible stall required?
An ambulatory accessible stall is required when a restroom has 6 or more water closets and urinals combined. These narrower stalls have grab bars on both sides and serve people who can walk but need support, such as someone using a cane, recovering from surgery, or dealing with balance issues. Both walls must have solid blocking to support the grab bars.