

Years ago, I spent an entire day in a wheelchair. Not because I needed one, but because my professor told me to. I could dimension every ADA door clearance on a floor plan, but I couldn’t get through a single door without a fight. This post breaks down why every ADA dimension exists, from doors to ramps to turning space, so you understand the real human problem each one solves and stop memorizing numbers you’ll forget.
This podcast is also available on YouTube, Spotify, and Apple Podcasts
What Is ADA
The Americans with Disabilities Act (ADA) is a federal civil rights law that prohibits discrimination against people with disabilities. It was signed in 1990, and among many other things, it establishes technical standards for how buildings must be designed and built so that everyone can use them independently.
For architects, ADA means specific dimensions and requirements for doors, ramps, corridors, restrooms, and every other element of a building that people need to move through. We’ll get into the legal framework and enforcement later in this post. First, I want to tell you why this topic is personal for me.
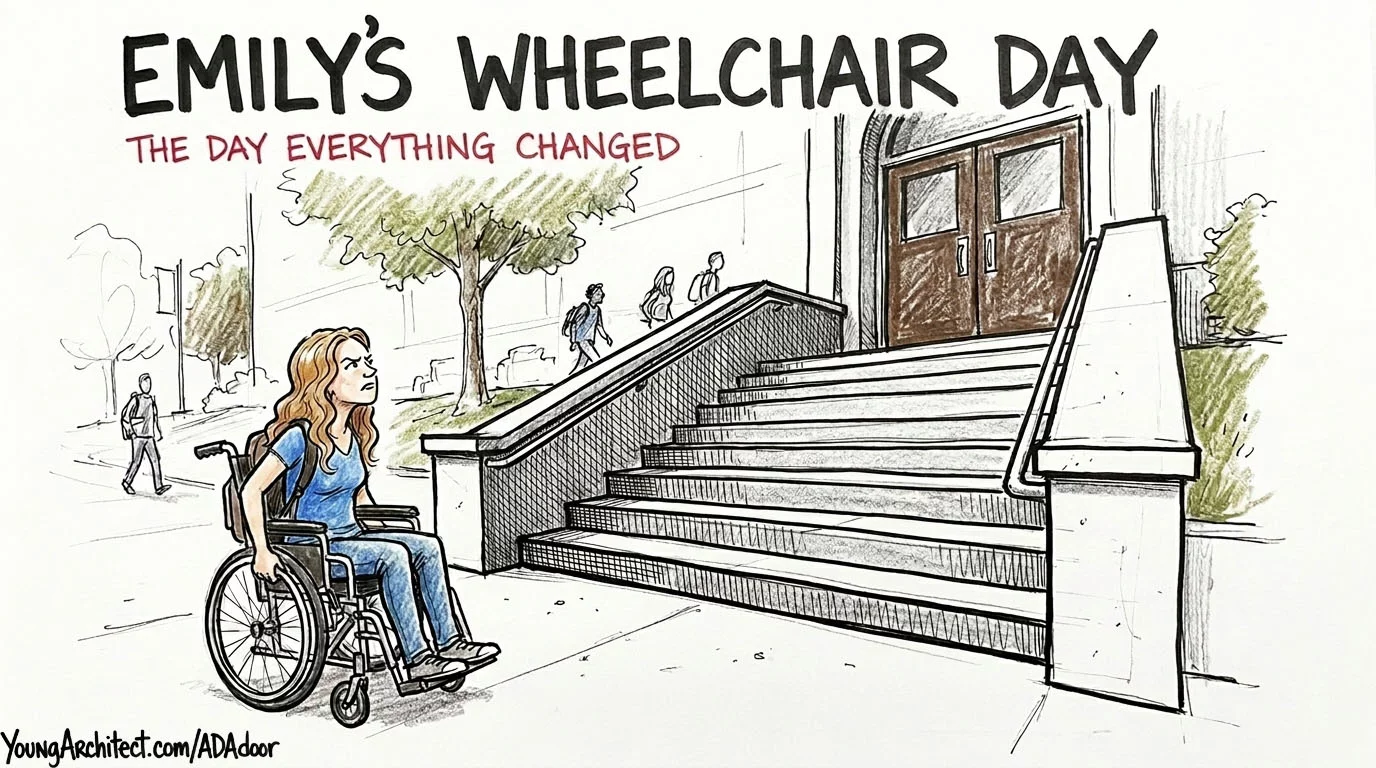
Years ago, my professor told me to spend an entire day in a wheelchair. By the end of that day, my arms were shaking and I was honestly embarrassed. I’d been drawing ADA requirements on floor plans for months, and I had no idea what any of them actually felt like.
I could dimension every clearance on a drawing. But I couldn’t get through a single door without a fight. That day changed the way I think about accessibility, and it’s the reason I wanted to do this episode.
Quick note up front. This post is for educational purposes only. Always check your local building code and verify requirements with your local jurisdiction before you design or build anything.
Here’s what I want you to walk away with. By the end of this post, you’re going to understand why every ADA dimension exists, not just what the number is, but what real human problem it solves. Because once you get the why, the numbers stick and you stop memorizing and start designing.
Today we’re focusing on how people move through a building. Doors, ramps, corridors, turning space. We’re starting with doors, because every single person who uses a building has to get through one.
ADA Door Clear Width
This is the most universal ADA requirement there is. Every building has doors. Every person uses them. And getting them wrong means the building doesn’t work from the very first moment someone tries to enter.
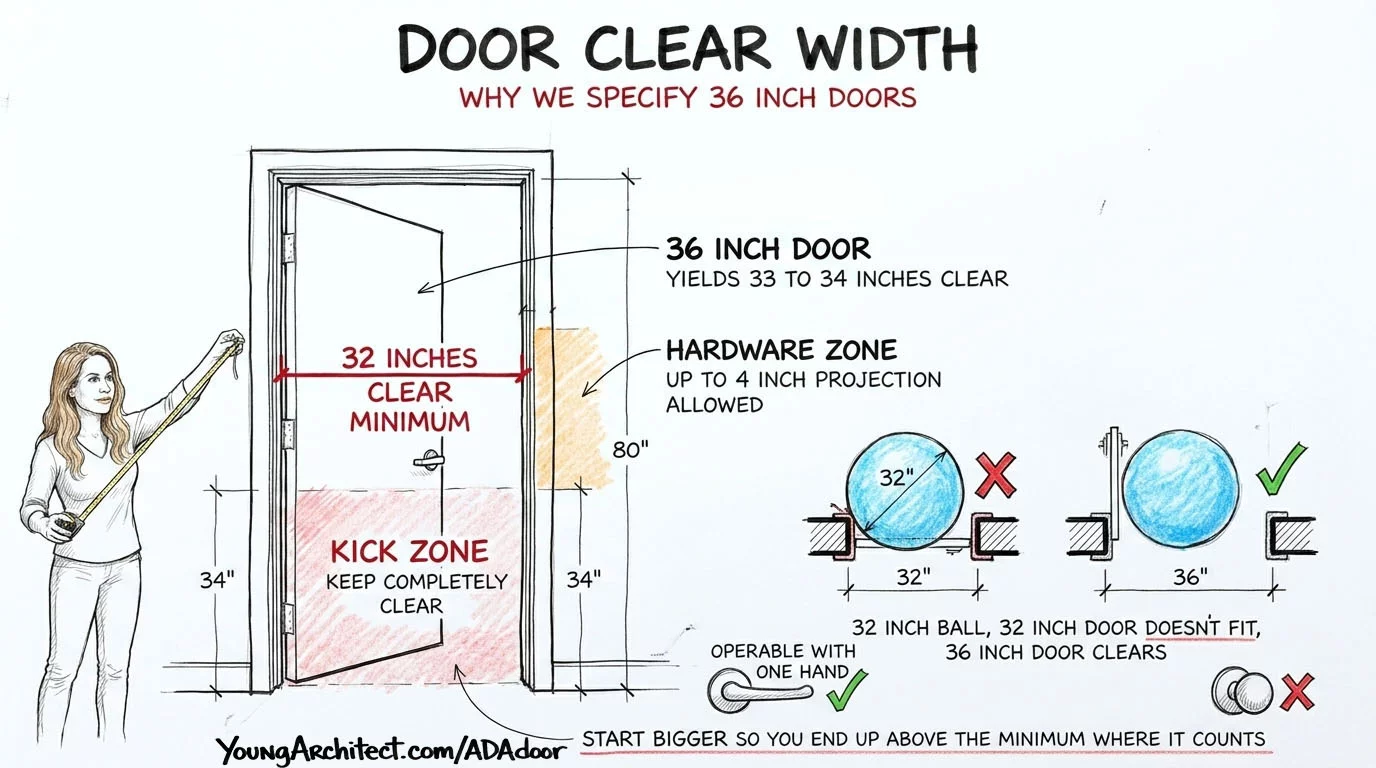
The minimum ADA door clearance is 32 inches when the door is open to 90 degrees. That measurement is taken from the face of the door to the stop on the frame, not from the frame itself.
Your first instinct might be to grab a 32-inch door and call it a day. Makes sense, right? You need 32 inches of clear, so use a 32-inch door.
That won’t work. A 32-inch door doesn’t give you 32 inches of clear opening. The door itself has thickness, and the stop on the frame projects into the opening. Once you subtract those, a 32-inch door might only give you 30 inches of usable space, and that’s below the minimum.
Imagine you’ve got a 32-inch plastic ball. Try to push it straight through a doorway with a 32-inch door. It’s not going to fit. The door has thickness, the stop projects into the opening, and that ball is going to hit the frame on both sides. You need a bigger door so the ball clears.
That’s why 36-inch doors became the standard specification. A 36-inch door gives you about 33 to 34 inches of clear opening after the door thickness and the stop take their share. You start bigger so you end up above the 32-inch minimum where it counts.
ADA Door Hardware and the Kick Zone
Even with a 36-inch door, your hardware can eat into that clearance. ADA allows hardware like panic bars or door pull protection plates to project up to 4 inches into the opening, but only between 34 and 80 inches above the floor.
Below 34 inches, nothing can project into the clear width. That’s the kick zone where a wheelchair footrest or a cane could catch on something, so the bottom of the door opening needs to stay completely clean.
And while we’re on hardware, here’s the rule. All ADA door hardware must be operable with one hand, without tight grasping, pinching, or twisting. That’s why lever handles replaced round knobs in accessible design.
If someone can’t close their fist, whether it’s from arthritis, a hand injury, or a muscular condition, a round knob is completely useless to them. A lever handle just needs a push down. You can do that with your elbow if you had to.
ADA Door Opening Force
You’ve got the right door, the right width, the right hardware. But none of that matters if the door is too heavy to open.
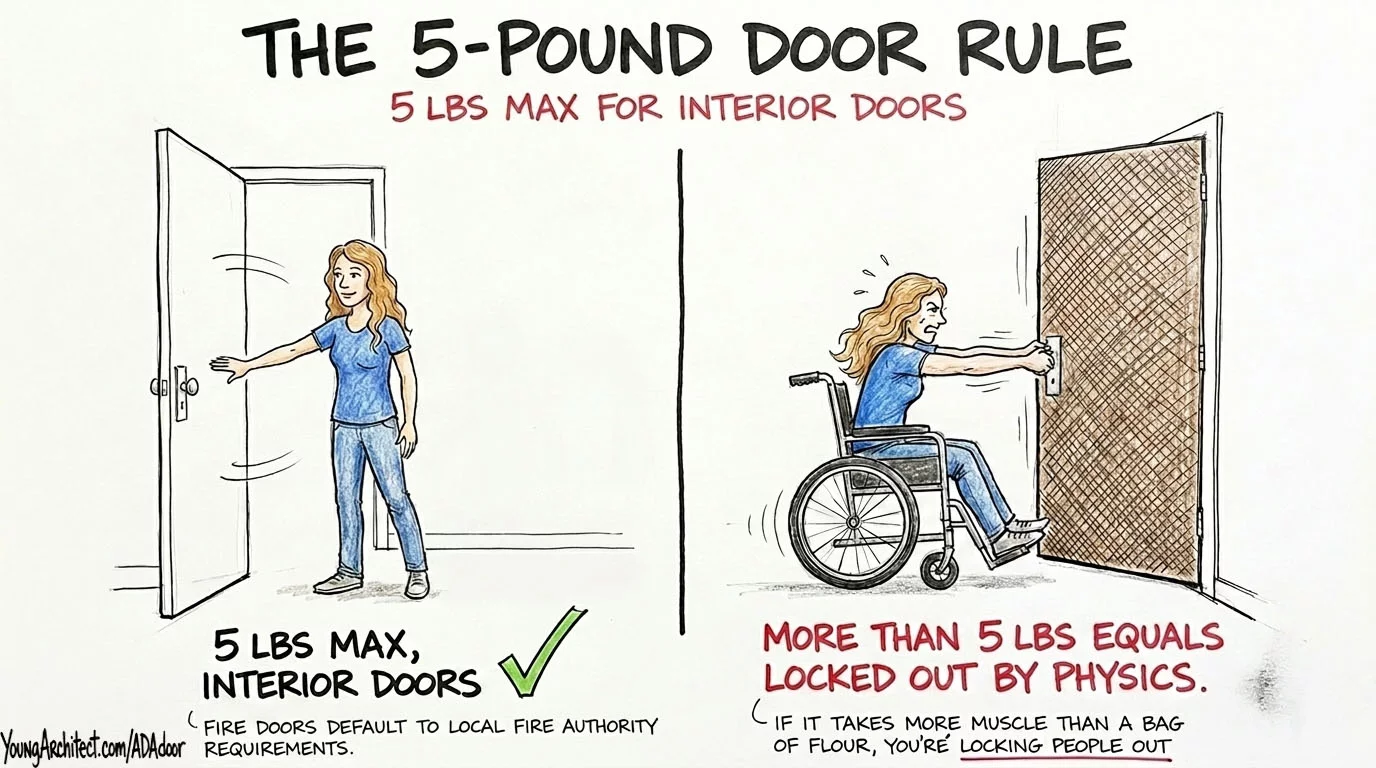
5 pounds maximum for interior doors. That’s the rule.
Think about what 5 pounds actually feels like. Pick up a bag of flour. Pick up a small laptop. That’s it. That’s the maximum amount of force someone should need to open an interior door.
If it takes more muscle than that, you’re locking people out with physics.
We’ve all been to that building where the front door feels like a gym workout. ADA exists so that doesn’t happen.
Fire doors are the exception, but they’re not completely off the hook. They default to whatever minimum force the local fire authority requires to make sure the door latches shut. Fire safety and accessibility have to coexist, and the fire code gets priority on closing force because lives depend on that door latching in an emergency.
But outside of fire-rated assemblies, 5 pounds is the ceiling.
ADA Door Maneuvering Clearance
We’ve covered width, hardware, and force. But there’s one more piece to ADA door clearance that a lot of people overlook, and it’s the one that made the biggest impression on me during my wheelchair day.
Maneuvering clearances are the floor space you need on both sides of a door to approach it, open it, and pass through. The required dimensions change depending on whether you’re pushing or pulling and which direction you’re approaching from.
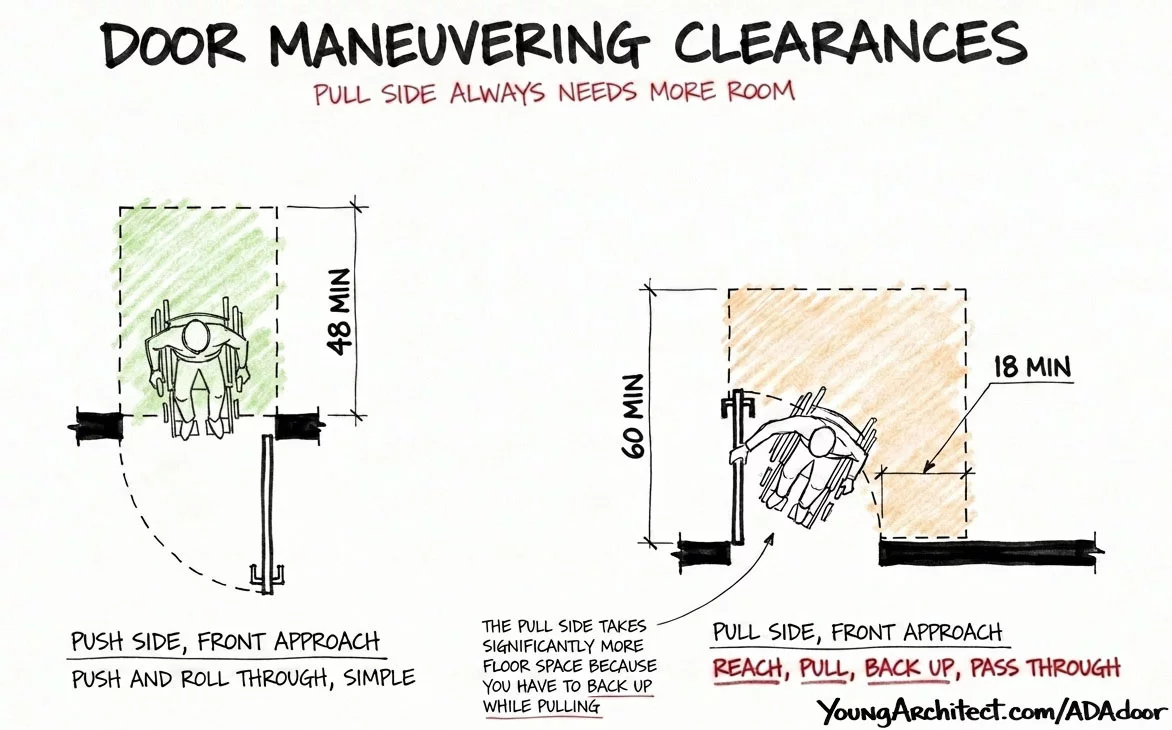
The pull side always needs more clearance, and once you understand why, you’ll never forget it.
If you’re in a wheelchair and you need to pull a door toward you, you have to back up while pulling. You’re reaching forward with one hand to grab the handle, pulling the door toward your body, and simultaneously wheeling backwards to make room for the swing.
That takes significantly more floor space than just pushing a door open and rolling through.
During my wheelchair day, I got to a building entrance with no push button. I had to pull a heavy exterior door toward me while backing the chair up to make room for the swing. My arms were already tired from a ramp I’d just come up. I pulled the door, started backing up, lost my grip, and the door swung back and almost closed on me before I could get through.
Nobody designs that experience on purpose. But if you don’t give people enough floor space on the pull side, that’s exactly what you’ve designed.
Finding the Maneuvering Clearance Diagrams
The good news is you don’t have to figure out all of these clearances from scratch. The ADA Standards include a full set of diagrams that show every combination of door approach, whether it’s push or pull, front or side, and what the required clearances are for each one.
The U.S. Access Board’s guide to entrances, doors, and gates has every diagram you need. Print them out and keep them handy. This isn’t something you need to memorize. It’s something you should always have within arm’s reach when you’re designing doorways.
Get comfortable with the push side versus pull side distinction, and remember: the pull side always needs more room.
ADA History: The Capitol Crawl
So that’s doors. Width, hardware, force, and maneuvering clearance. Four things that seem simple on a drawing but make or break someone’s ability to enter a building.
And the reason all of those requirements exist comes back to something a lot of people get wrong about ADA itself.
ADA is not a building code. The Americans with Disabilities Act is a federal civil rights law. It was signed on July 26, 1990 by President George H.W. Bush, and it was the world’s first comprehensive civil rights law for people with disabilities.

Just a few months before the law was signed, disability rights activists staged what’s known as the Capitol Crawl. They abandoned their wheelchairs at the bottom of the steps of the U.S. Capitol and pulled themselves up all 100 steps to show the country what inaccessible design actually looks like.
Some of them were children. The images were broadcast across the nation, and that moment helped push the law across the finish line.
Every dimension in this post exists because real people fought for the right to get through a building without needing someone else’s help.
ADA vs Building Code: Three Layers
So what does this mean for you as a designer?
ADA is enforced by the Department of Justice, not your local building official. Non-compliance in public buildings isn’t just a code violation. It’s considered discrimination. And anyone can report it.
There’s a thing called a drive-by lawsuit where someone sees an accessibility violation from the street and files a complaint without ever entering the building. I’ve personally worked on hotels that got hit with this and had to retrofit the entire building into compliance immediately. Not next year. Immediately.
It’s real, it’s expensive, and it’s completely avoidable if you design it right from the start.
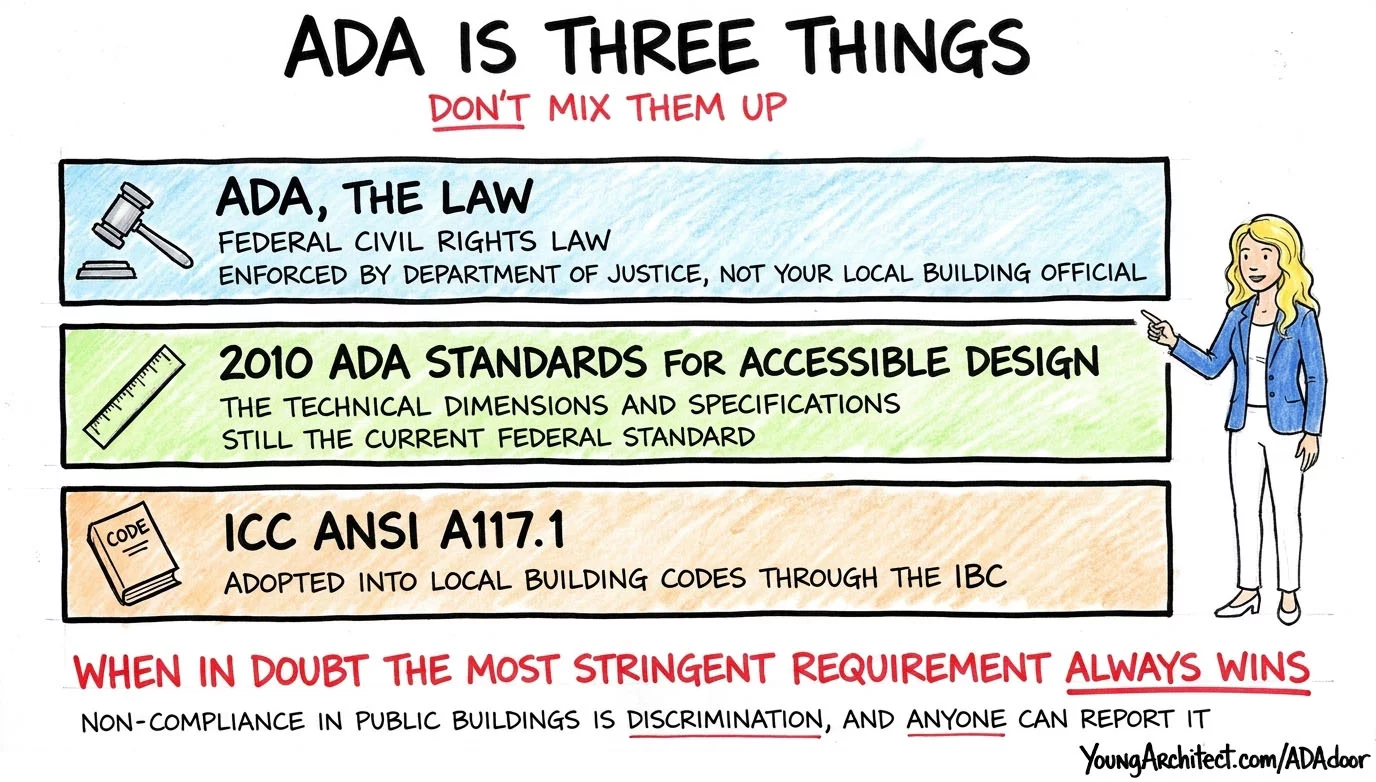
Here’s where candidates get confused, because there are three layers that people mix up:
- ADA is the law itself. It establishes the civil right to accessible spaces.
- The 2010 ADA Standards for Accessible Design are the technical requirements, the actual dimensions and specifications. These are still the current federal standard. You can find the full standards on the 2010 ADA Standards for Accessible Design page at the U.S. Access Board.
- ICC/ANSI A117.1 is the accessibility standard that gets adopted into your local building codes through the IBC.
When you’re designing, you need to know which standard applies and check which is more stringent. ADA sets the federal floor, but your local code might require more. The stricter requirement always wins.
When ADA Applies
Now that you know what ADA is, let’s talk about when it applies, because it doesn’t cover everything.
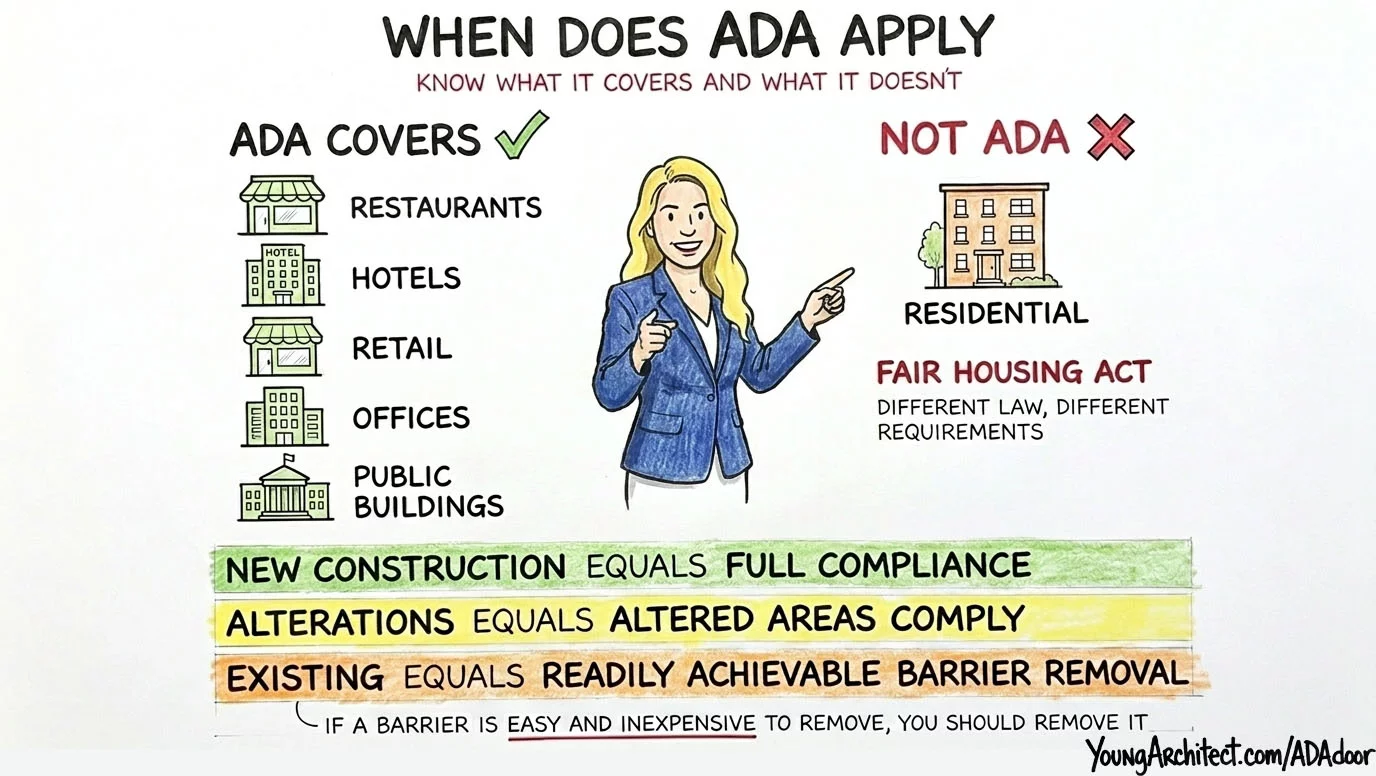
New construction has to comply. Full stop.
Existing buildings depend on the situation. If you’re doing alterations, the altered areas need to comply. If you’re not touching it, there’s a standard called “readily achievable” that applies. It basically means if a barrier is easy and inexpensive to remove, you should remove it. Installing a grab bar in an existing restroom? Probably readily achievable. Ripping out a staircase and building an elevator? Probably not.
The big distinction to know is public accommodations versus residential.
ADA covers places of public accommodation: restaurants, hotels, retail stores, offices open to the public, and government buildings. Understanding how occupancy classifications affect which accessibility requirements apply is important context here, especially when existing buildings change use.
But residential accessibility falls under the Fair Housing Act, not ADA. Different law. Different requirements. Multifamily buildings have their own set of rules with Type A and Type B units. Don’t mix them up.
ADA: Designing for Every Body
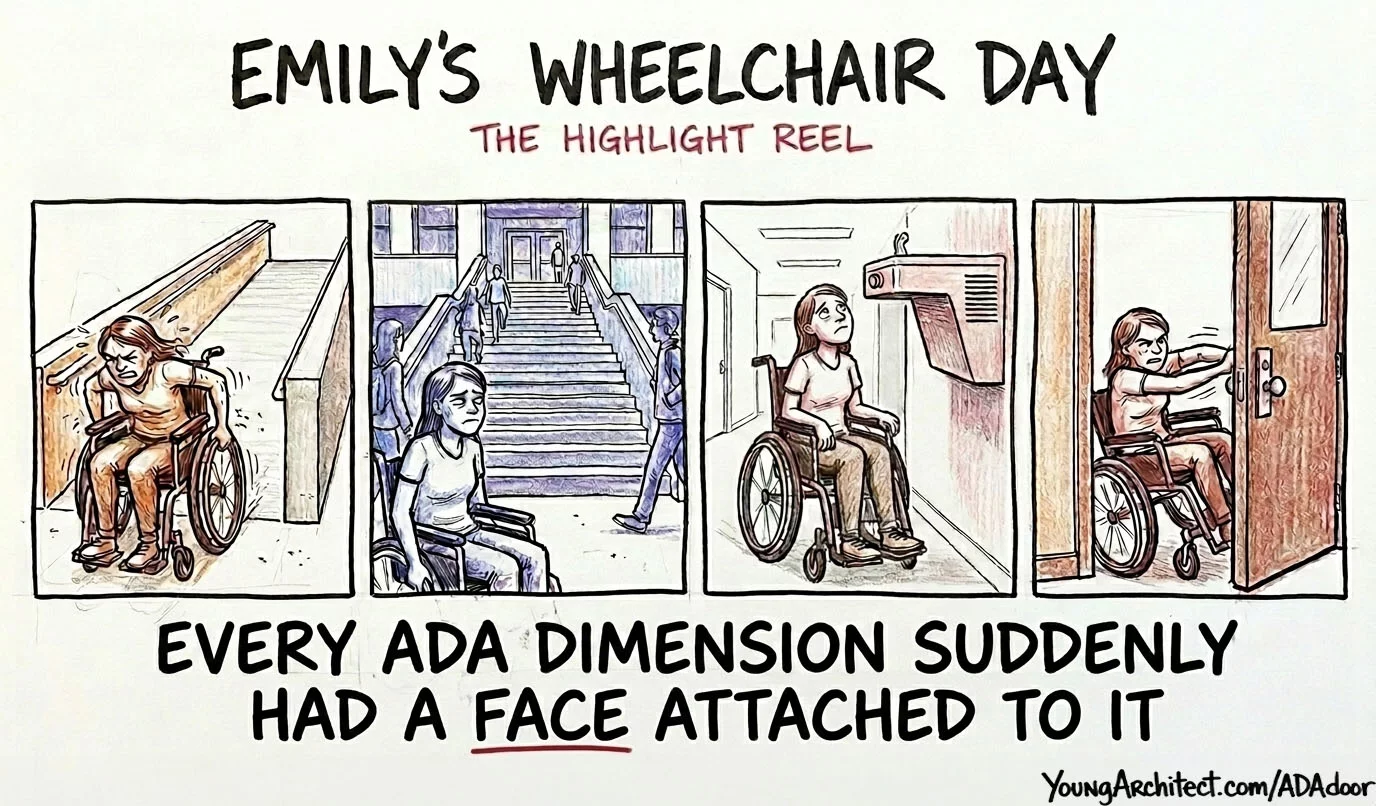
We’ve covered the law and we’ve covered the doors. Now I want to take you back to that wheelchair day, because the rest of the story is what connects all of these requirements together.
The ramp was the first thing that hit me. I’d drawn ramps on floor plans probably a hundred times at that point, but I had never pushed myself up one. The wheels are heavy. Your arms are doing all the work. And if the slope is even a little too steep, you can feel the chair wanting to slide backwards while you’re still trying to push forward.
By the time I got to the first landing, my arms were burning and I was out of breath. I remember looking forward to the next flat spot just so I could stop and reset my grip.
Then I got to a building and had to figure out which entrance was accessible. When you’re on your feet, you just walk up and go in. In a wheelchair, you’re scanning from a distance. Is that the main entrance? Are there stairs? I spotted a ramp, but it was around the corner, separate from where everyone else was walking in. I wasn’t even inside yet and I already felt like I was being separated.
Inside, the hallway was fine. And then I almost rolled straight into a water fountain mounted on the wall at chest height. If I hadn’t been looking up, I would have hit it. A person navigating with a cane would sweep right underneath this thing and walk straight into it. That’s when the protruding object rule clicked for me.
But the door was the worst. That heavy entrance with no push button, pulling it toward me while backing up, almost getting trapped when it swung back. Every ADA dimension I’d ever put on a drawing suddenly had a face attached to it.
The Grandma Test
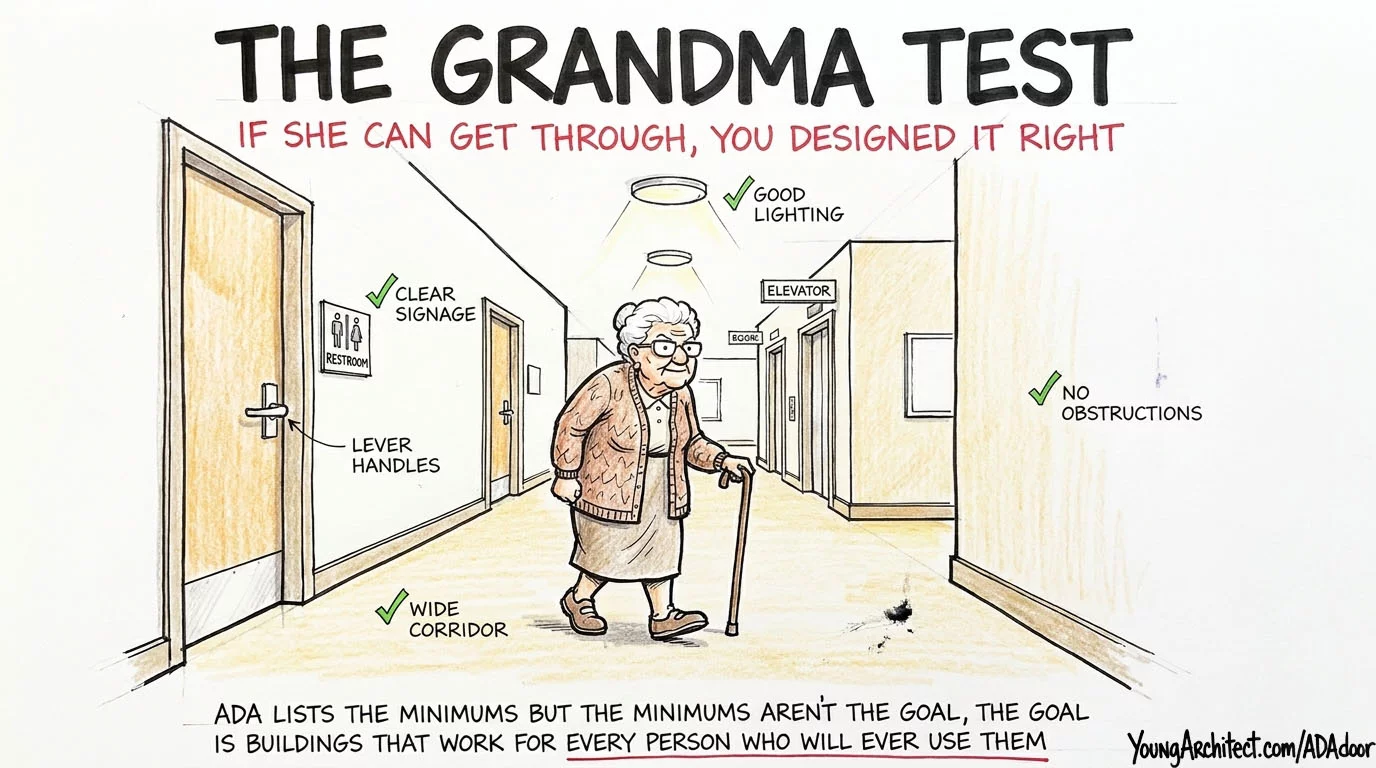
ADA isn’t just about wheelchairs. It covers visual impairments, hearing impairments, people using canes or crutches, people with limited mobility from arthritis or injuries, and aging bodies that don’t move the way they used to.
I have 5 stairs from my parking area to my front door at home. I don’t think about them now. But I might think about them a lot in 30 years.
Here’s how I want you to think about accessibility from now on:
Design as if your elderly grandma with a cane and partially blind is navigating the building all by herself. If she can get through comfortably, safely, and with her dignity intact, you designed it right.
ADA lists the minimums. But the minimums aren’t the goal. The goal is buildings that work for every person who will ever use them, including future versions of yourself.
ADA Accessible Route
We started with doors because that’s where everyone’s experience begins. But a door is just the entry point. Once someone gets through, they need to move through the entire building. And there’s one concept that ties all of this together.
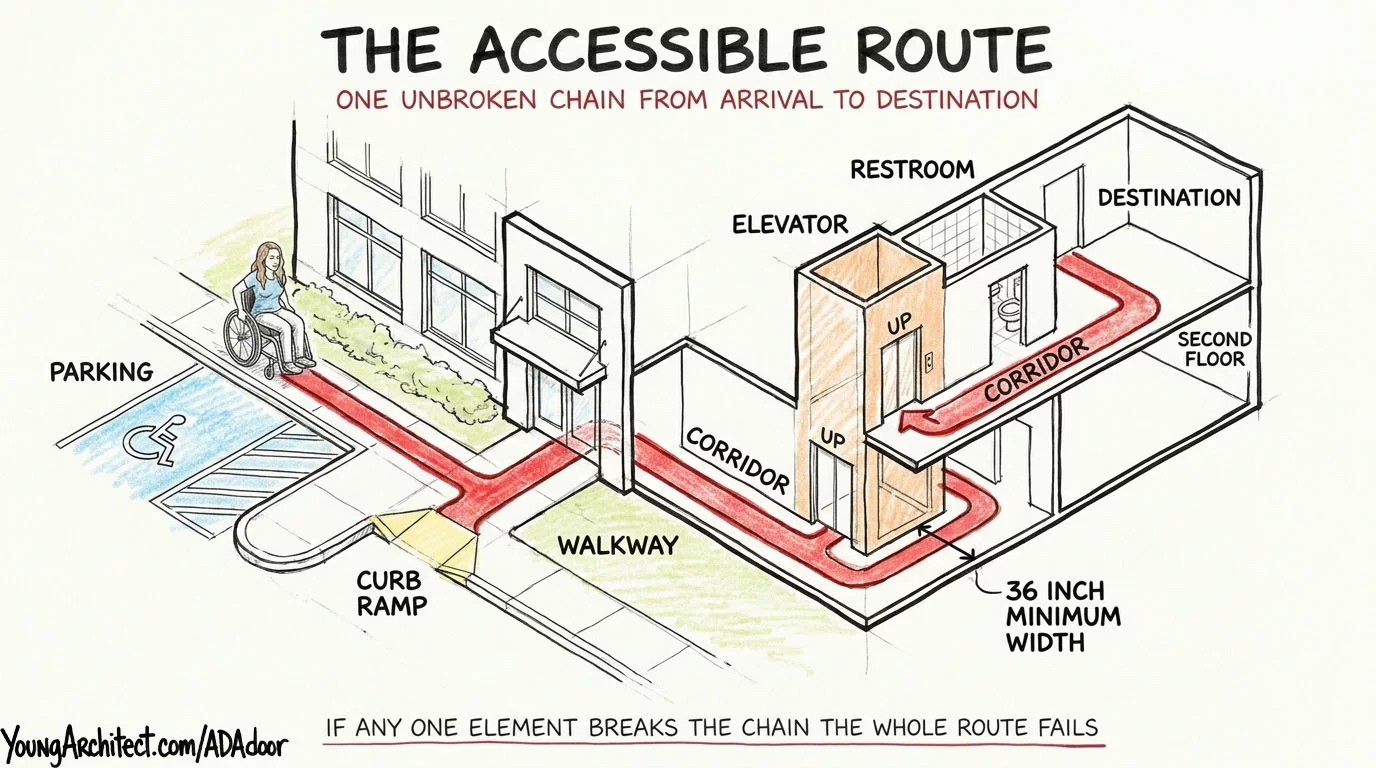
The accessible route is a continuous, unobstructed path from site arrival through the building to every required space. It’s the backbone of all accessible design.
Parking to entrance. Entrance to elevator. Elevator to restroom. Restroom to conference room. One unbroken chain.
The minimum clear width is 36 inches. And if the route is narrower than 60 inches and runs longer than 200 feet, you need passing spaces of 60 by 60 inches so two wheelchair users can get past each other.
Everything we already covered with doors, and everything we’re about to cover with ramps, corridors, and turning space, it’s all about keeping that route intact. If any one element breaks the chain, the whole route fails.
You could have the most beautifully accessible restroom in the world, and it doesn’t matter if there’s a 6-inch step somewhere between here and there. The accessible route connects directly to means of egress requirements, because both concepts are about ensuring a continuous, unobstructed path through the building.
ADA Ramp Slope: The 1:12 Rule
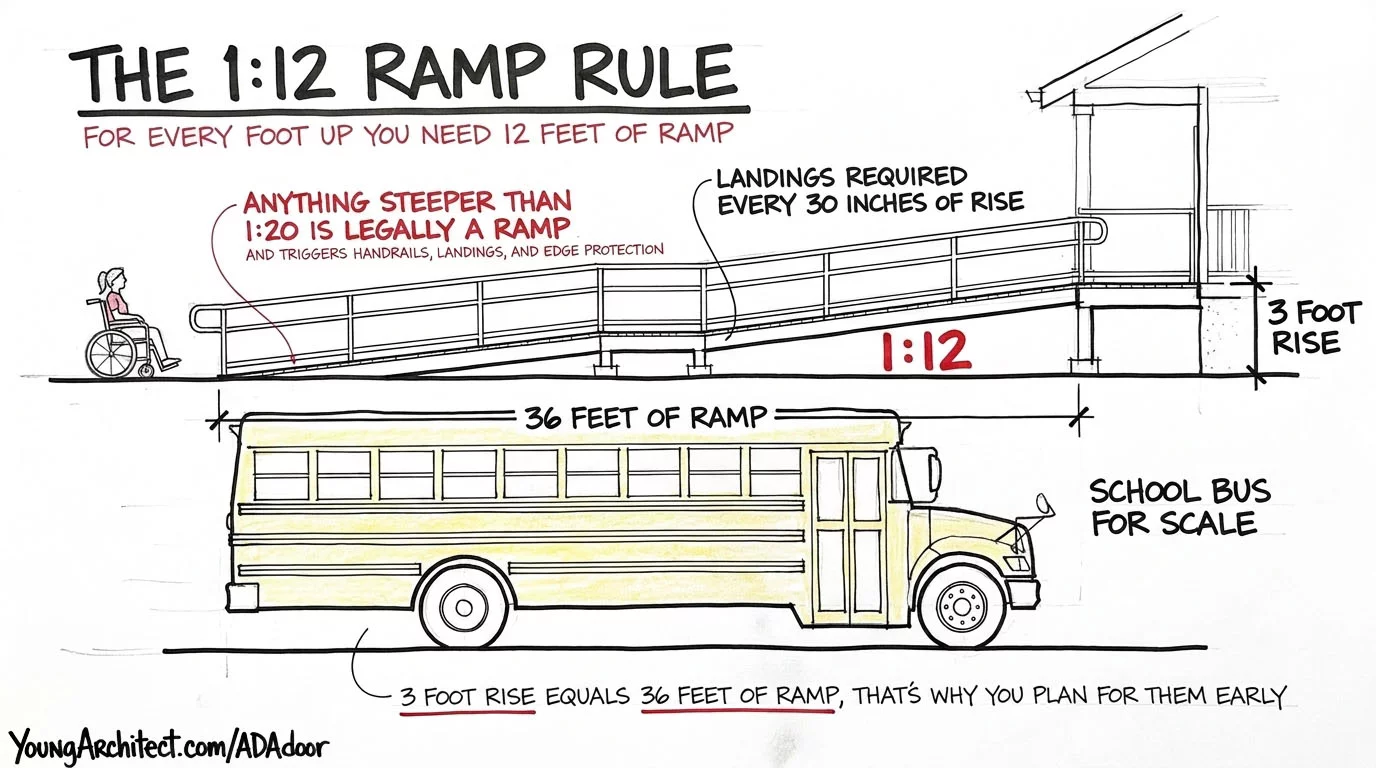
Maximum ADA ramp slope is 1:12. For every inch of rise, you need 12 inches of run.
Here’s how to picture that. For every foot you need to go up, you need 12 feet of ramp. Got a 3-foot porch drop? Your ramp needs to be roughly the length of a school bus.
That’s why ramps eat up so much site area, and it’s why you have to think about them early in your design, not treat them as an afterthought you’ll squeeze in later.
The 1:20 Threshold
Here’s a key threshold that a lot of candidates miss. Anything steeper than 1:20 gets classified as a ramp and triggers handrail requirements. If your walkway is 1:20 or flatter, it’s just a walkway. The second it crosses that line, it’s legally a ramp, and now you need handrails on both sides, level landings, and edge protection.
A lot of exterior walkways end up just barely on the wrong side of that threshold, and suddenly the site plan gets a lot more complicated.
Landings are required at the top, at the bottom, and every 30 inches of vertical rise. They have to be level so someone can rest.
Remember what I said about feeling the chair wanting to slide backwards? That’s what happens when someone builds a ramp steeper than 1:12. And those landings I was so grateful for? They’re required every 30 inches of rise because exhaustion is real, and a flat spot to catch your breath and reset your grip is what keeps someone from rolling backwards.
For more detail on ramp-specific dimensions, the U.S. Access Board’s guide to ramps and curb ramps covers slopes, landings, handrails, and edge protection in depth.
Guardrail vs Handrail
Ramps need handrails on both sides, and that brings us to a distinction that seems small until you get it wrong.
I was on a site visit at a commercial building where the contractor had installed a beautiful continuous rail along a corridor ramp at 42 inches, matching the guardrail height at the adjacent stairway. It looked clean. It looked consistent. The contractor was proud of it.
But 42 inches is guardrail height. Not handrail height.
Someone in a wheelchair or using a cane can’t comfortably grip a rail at 42 inches. It’s too high.
Here’s the distinction:
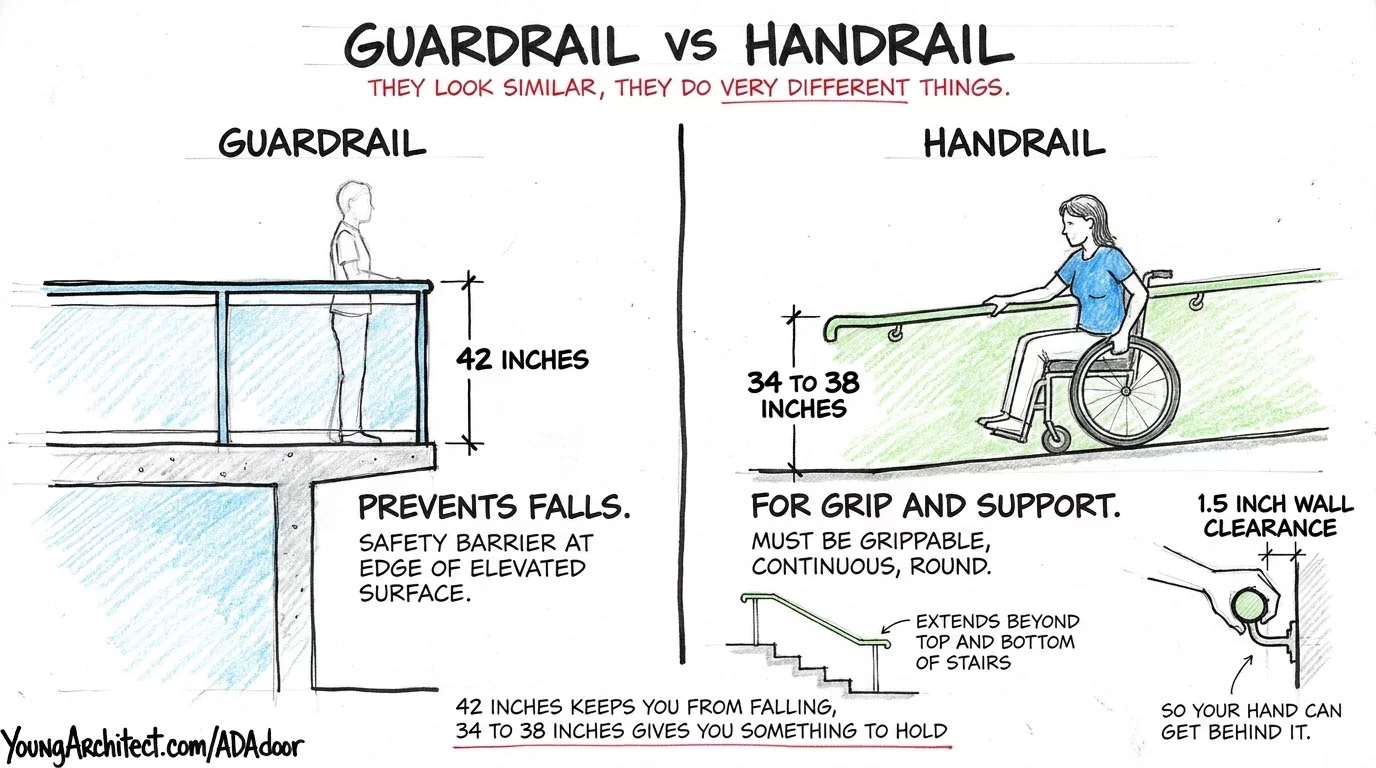
- A guardrail at 42 inches prevents falls. It keeps you from going over an edge. It’s a safety barrier.
- A handrail at 34 to 38 inches is for grip. It helps someone pull themselves up a ramp or steady themselves on stairs.
A handrail needs to be continuous, round enough that your fingers can wrap completely around it, and mounted with at least 1.5 inches of clearance from the wall so you can actually get your hand behind it. If it’s flush against the wall, you can’t grab it, which means it’s just a piece of metal bolted to a wall pretending to be useful.
Handrails on Stairs
That same handrail height applies on stairs too: 34 to 38 inches. And handrails must extend beyond the top and bottom of the stair run, because that transition from flat ground to the first step is where most falls happen.
Having a rail in your hand during that weight shift can be the difference between a safe step and a trip to the emergency room.
The contractor’s instinct was aesthetics and consistency. My job was explaining that a handrail isn’t decorative. It’s functional. We ended up adding a second rail at 36 inches below the existing one. Problem solved, but it shouldn’t have gotten that far into construction.
ADA Turning Diameter
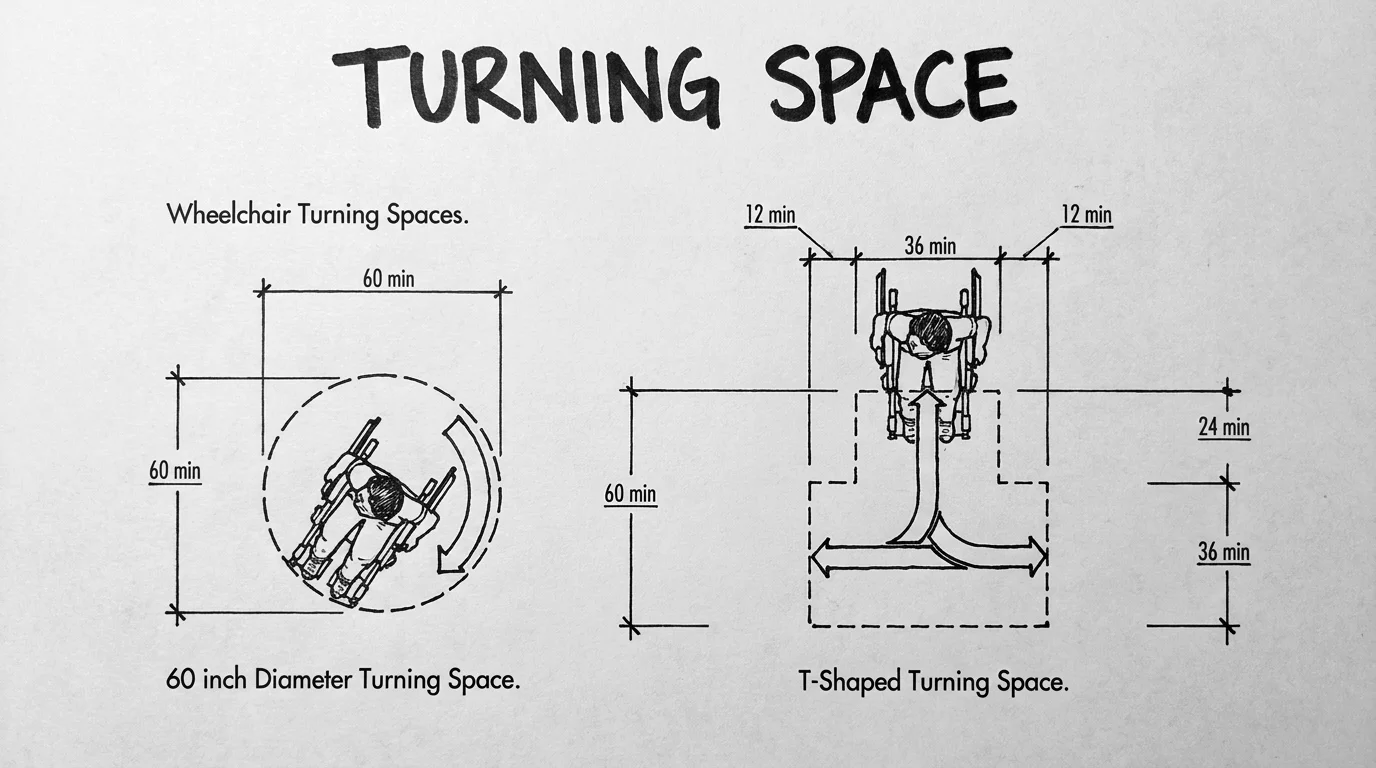
Someone’s made it through the door, up the ramp, along the corridor. But at some point, they need to turn around. And this is where one of the most common mistakes shows up.
A wheelchair needs a 60-inch diameter circle to make a full turn. And I want to stress the word diameter, because I’ve heard architects say “60-inch radius” on job sites and in study groups more times than I can count.
A 60-inch radius would be a 10-foot circle. That’s enormous. The requirement is 60 inches across, not 60 inches from center to edge. That’s a 5-foot circle.
The alternative is a T-shaped turning space, which allows for a three-point turn using a T-shaped intersection of clear floor space. The T fits inside a 60-inch square, with 36-inch wide arms and base. Same result, different geometry. Useful when you can’t fit a full circle into your layout.
One more important note. Federal ADA says 60 inches. But ICC A117.1, which is what your local building code actually adopts, bumped the ADA turning diameter to 67 inches for new construction to accommodate larger modern wheelchairs and power chairs. Another reason to always check local requirements against the federal number.
Corridors serving accessible spaces typically require a minimum width of 44 inches, but always check your local code for specific use cases.
ADA Protruding Objects
The accessible route covers the floor. The corridor width, the ramp, the turning space, those are all about the horizontal path. But ADA also protects people from hazards that come from the walls, and this goes back to that water fountain I almost hit during my wheelchair day.
Objects mounted on walls between 27 and 80 inches above the floor cannot project more than 4 inches into the circulation path.
Here’s why, and I want you to really picture this.

Someone who is visually impaired navigates by sweeping a cane back and forth at floor level. The cane detects obstacles on the ground and along the base of walls.
But if a drinking fountain sticks out 8 inches from the wall at chest height, the cane sweeps completely underneath it through empty air. The cane tells their brain the path is clear. And then they walk face-first into a metal box at full stride.
That’s why anything in that zone can’t project more than 4 inches. Below 27 inches, the cane catches it. Above 80 inches, it clears someone’s head. But between 27 and 80 is the blind spot, and it’s completely invisible to someone navigating by touch.
Common violations include wall-mounted drinking fountains, fire extinguisher cabinets, decorative shelving, and wall-mounted displays. Basically anything that sticks out from a wall at body height.
Hi-Lo Drinking Fountains
Speaking of drinking fountains, they’re a great example of what’s called a hi-lo fixture. You need two heights: one mounted higher for standing users, and one lower for wheelchair users. And even the lower one can’t project more than 4 inches into the path unless there’s a cane-detectable barrier underneath it that the cane can find.
For more detail on the protruding object rules and edge cases, the U.S. Access Board’s guide to protruding objects has the full breakdown with diagrams.
ADA Reach Range Requirements
ADA also regulates what height operable items are mounted at, specifically whether people can actually reach the things they need to use.
The ADA reach range is 15 to 48 inches above the floor. That’s a big range, so let me explain where each end comes from.
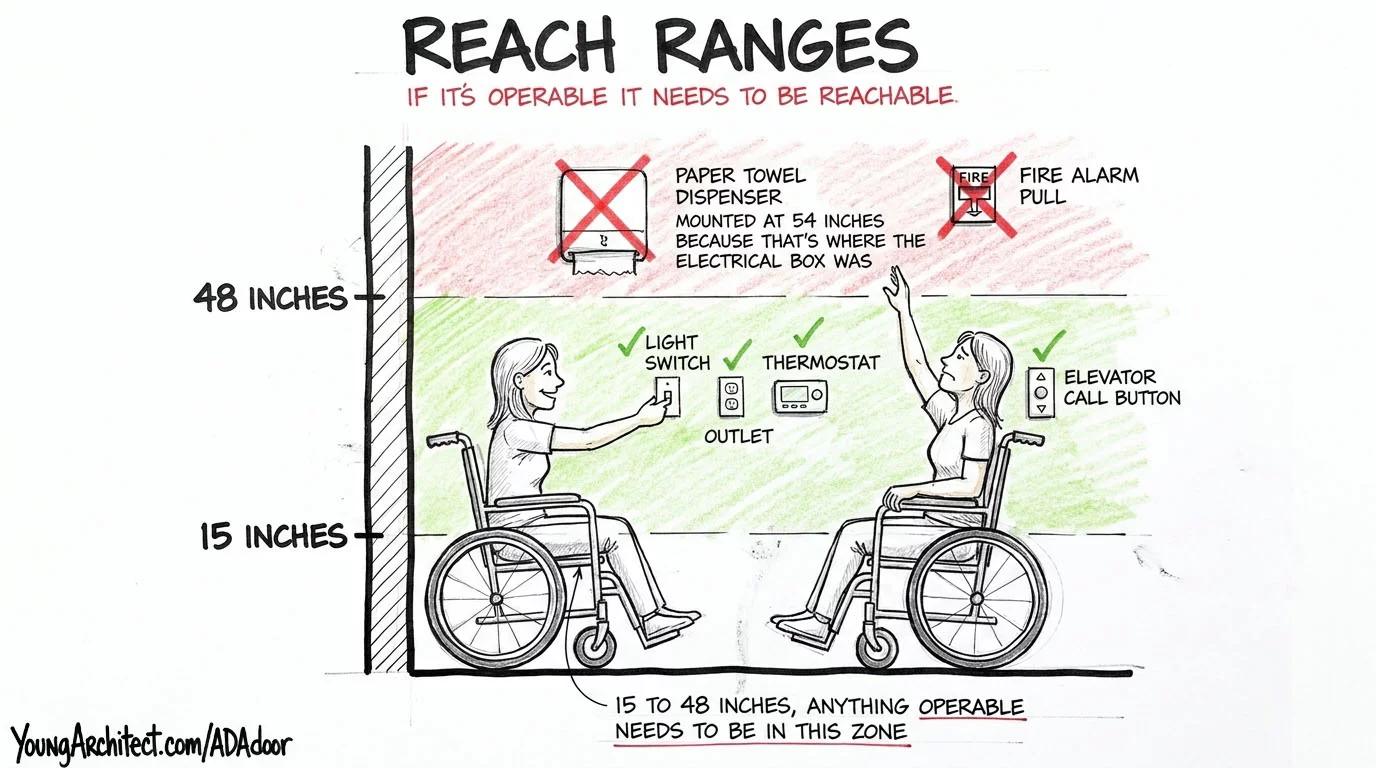
Picture yourself sitting in a wheelchair. If you’re reaching for something right next to you, like a light switch on the wall beside you, that’s a side reach. You can reach up pretty high because you’re not leaning or stretching. That’s where the 48-inch upper limit comes from.
Now picture yourself reaching forward over a counter or an obstruction. You’re leaning your body forward and reaching out and down. That forward reach is more limited, and 15 inches is about as low as someone can comfortably reach down from a seated position without tipping forward.
If there’s an obstruction like a counter in the way, the limits get even tighter because you’re reaching over something while seated.
That covers light switches, outlets, thermostats, elevator buttons, fire alarm pulls, paper towel dispensers. Anything operable. If someone needs to interact with it, it needs to be within that zone.
Mounted above 48 inches, and a person in a wheelchair simply can’t get to it.
This is one of those requirements that’s easy to get right in design and easy to mess up during construction. I’ve seen paper towel dispensers mounted at 54 inches because that’s where the electrical box was roughed in. Technically installed. Practically useless for anyone who can’t stand and reach up.
ADA Elevator Requirements
When a building has multiple floors and no other accessible route connects them, an elevator is required. The cab needs minimum dimensions for wheelchair maneuvering, and the buttons need to be mounted at 42 inches to center so a seated person can reach them.
You also need braille next to every button and audible signals announcing each floor for people with visual impairments.
Elevators are their own deep topic, and we cover types of elevators in a separate post. For today, just know that the elevator is how the accessible route changes floors. When the chain needs to go up, the elevator is what keeps it unbroken.
ADA Quick Reference
Here are all the key ADA door clearance and accessibility dimensions from this post:
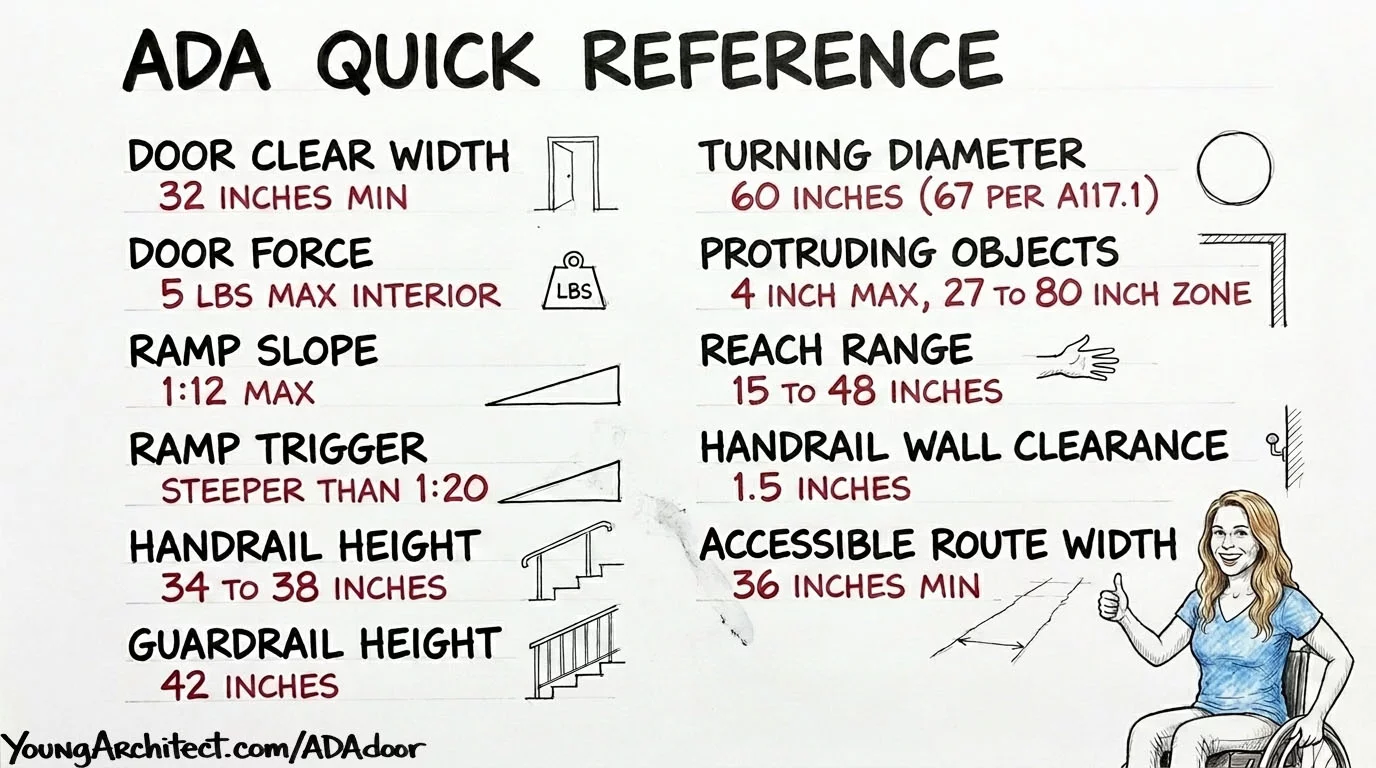
- Door clear width: 32 inches minimum
- Door force: 5 lbs max (interior)
- Ramp slope: 1:12 maximum
- Ramp trigger: steeper than 1:20
- Handrail height: 34 to 38 inches
- Guardrail height: 42 inches
- Turning diameter: 60 inches (67 per A117.1)
- Protruding objects: 4 inch max, 27 to 80 inch zone
- Reach range: 15 to 48 inches
- Handrail wall clearance: 1.5 inches
- Accessible route width: 36 inches minimum
But here’s the real tip. If you understand why these dimensions exist, you don’t need to memorize a chart.
The 5-pound door force makes sense when you’ve felt what it’s like to fight a heavy door from a wheelchair. The 1:12 ramp slope makes sense when you’ve pushed yourself up one and felt the chair sliding backwards. The 4-inch protruding object limit makes sense when you picture the cane sweeping underneath.
Understand the logic, and the numbers follow.
Accessibility isn’t a silo on the exam. It’s woven into every phase of practice. Whether you’re researching codes during programming, designing accessible routes, detailing construction documents, or verifying compliance during site visits, accessibility touches all six divisions of the ARE.
Study ADA Requirements with Young Architect
Understanding ADA dimensions is foundational knowledge that shows up across multiple ARE divisions. If you want to build that knowledge systematically, that’s exactly what our courses and programs are designed for.
The fastest way in is the ARE Boot Camp, our 10-week coaching program that gives you a study plan, accountability, and a community of candidates working through the exams alongside you.
If you’d rather go self-paced, the ARE 101 Membership gives you access to every one of our courses for one low monthly price, cancel anytime. For accessibility content specifically:
- Building Codes 101 covers the code requirements that drive accessibility decisions
- PA 101 covers ADA in the programming and site analysis phase
- PPD 101 covers accessibility at the design level
- PDD 101 covers documenting accessibility in construction documents
Now go pass this exam.
Frequently Asked Questions
What is the minimum ADA door clearance?
ADA requires a minimum of 32 inches of clear width when the door is open to 90 degrees. This is measured from the face of the door to the stop on the frame, not from the frame itself. A standard 36 inch door typically provides 33 to 34 inches of clear opening, which is why 36 inch doors became the standard specification for accessible design.
What is the difference between a guardrail and a handrail?
A guardrail is a 42 inch tall safety barrier that prevents falls from elevated surfaces. A handrail is mounted at 34 to 38 inches and provides grip and support for people navigating ramps and stairs. They serve different functions and buildings often need both. Guardrails keep you from going over an edge. Handrails give you something to hold onto.
What slope triggers ADA ramp requirements?
Any walking surface steeper than 1:20 is classified as a ramp under ADA and triggers requirements for handrails on both sides, level landings, and edge protection. The maximum ramp slope allowed is 1:12, meaning for every inch of rise you need 12 inches of run.
What is the ADA turning space requirement?
ADA requires a 60 inch diameter turning space for wheelchair users. This is a diameter measurement, not a radius. A 60 inch radius would create a 10 foot circle, which is a common verbal mistake. The alternative is a T-shaped turning space. ICC A117.1, adopted by local building codes, increased this to 67 inches for new construction.
Why can’t objects project more than 4 inches from a wall?
Objects mounted between 27 and 80 inches above the floor cannot project more than 4 inches into a circulation path. This protects people with visual impairments who navigate using a cane. The cane sweeps at floor level and detects obstacles below 27 inches, but anything projecting from the wall between 27 and 80 inches is undetectable by the cane.