

A lighting calculation determines how many fixtures a room needs to hit a target light level. This post covers the foot candle chart by space type, the lumen method formula, the inverse square law, and two fully worked examples that size a real fixture count.
This podcast is also available on YouTube, Spotify, and Apple Podcasts.
Test yourself! This episode has a free 10-question lighting calculations quiz at the bottom of this page.
Lighting Calculations Are Just Multiplication and Division
Somewhere on your study list there is a line item you keep sliding to next week.
Lighting calculations.
You tell yourself you will circle back once the bigger topics are handled.
You quietly hope it does not come up.
You would genuinely rather study almost anything else, including the stuff you already know cold.
The phrase itself is doing most of the damage. Lighting calculations sounds like something that requires an engineering degree and a scientific calculator with buttons you have never pressed.
It does not.
A lighting calculation is multiplication and division. That is the entire toolkit.
If you can multiply a few numbers together and divide once at the end, you already have the math.
The arithmetic was never the problem.
The problem is that nobody ever slowed down and explained what the terms mean, so you end up staring at a formula full of letters and assuming the difficulty lives in the math.
It lives in the vocabulary. And vocabulary is a solvable problem.
One quick piece of orientation before the numbers start.
Lumens leave the lamp. Foot candles land on the surface.
Those are two different measurements of two different things, and if you want the full breakdown of the units, what a foot candle actually measures is its own post.
By the time you get to the bottom of this one, you will be able to look at any ordinary room, pull a target light level for it, and calculate how many fixtures it takes to get there.
Foot Candle Chart by Space Type
Before any formula comes out, there is a more basic question to answer.
How much light does this space actually need?
You cannot size a fixture count until you know what you are aiming at. That target gets measured in foot candles, and the industry has published ranges for just about every space type you will ever design.
Running from the spaces that need the least light up to the spaces that need the most:
- Corridors, lobbies, and storage rooms: 10 to 20 foot candles
- General offices and classrooms: 30 to 50 foot candles
- Detailed task work and retail: 50 to 75 foot candles
- Drafting, inspection, and fine handwork: 75 to 100 foot candles
- Surgery and laboratories: 100 foot candles and up
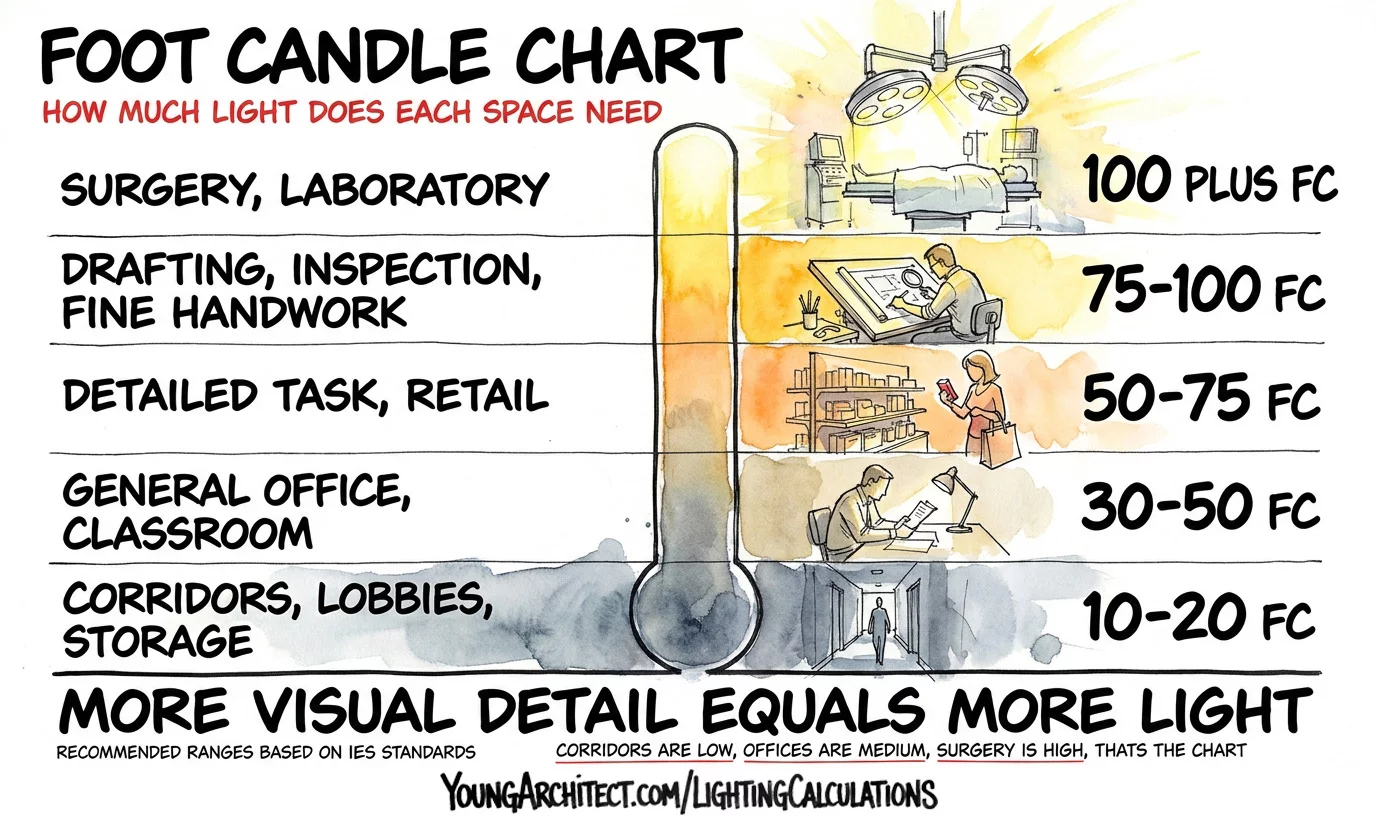
Do not sit down and memorize that whole chart. Learn the pattern instead, because the pattern is what actually transfers.
Foot candle requirements climb as the visual demands of the task climb.
You are walking through a corridor, so your eyes are barely working.
You are reading a contract at a desk, so they are working harder.
Someone is holding a scalpel, so you give them every bit of light you can produce.
Corridors low. Offices medium. Surgery high. Everything else slots in between based on how much detail a person has to resolve.
Rule of thumb: the more visual detail a task demands, the more light it needs. That single idea gets you most of the way through any chart question.
These recommended foot candles come from IES standards, published by the Illuminating Engineering Society.
They are the levels the entire industry designs to, and they show up in reference manuals, manufacturer literature, and energy code discussions alike.
If you want a fuller reference table to keep on hand, Lighting Design Lab’s footcandle guide lists levels across far more space types than any chart needs to cover.
NCARB’s published objectives point toward understanding these general ranges and being able to rank one space against another. PPD Objective 3.3 covers determining special systems, and it names lighting directly alongside acoustics, communications, security, conveying, and fire suppression.
Nobody is asking you to recite a table. They are asking whether you understand that an operating room and a storage closet are not lit the same way, and why.
The Lumen Method Formula
You know what the space needs. Now the real question.
How many fixtures does it take to get there?
That is the lumen method, and it is the workhorse for lighting a whole room evenly. The formula looks like this:
Number of fixtures = (Foot-candles × Area) ÷ (Lumens per lamp × Lamps per fixture × CU × LLF)
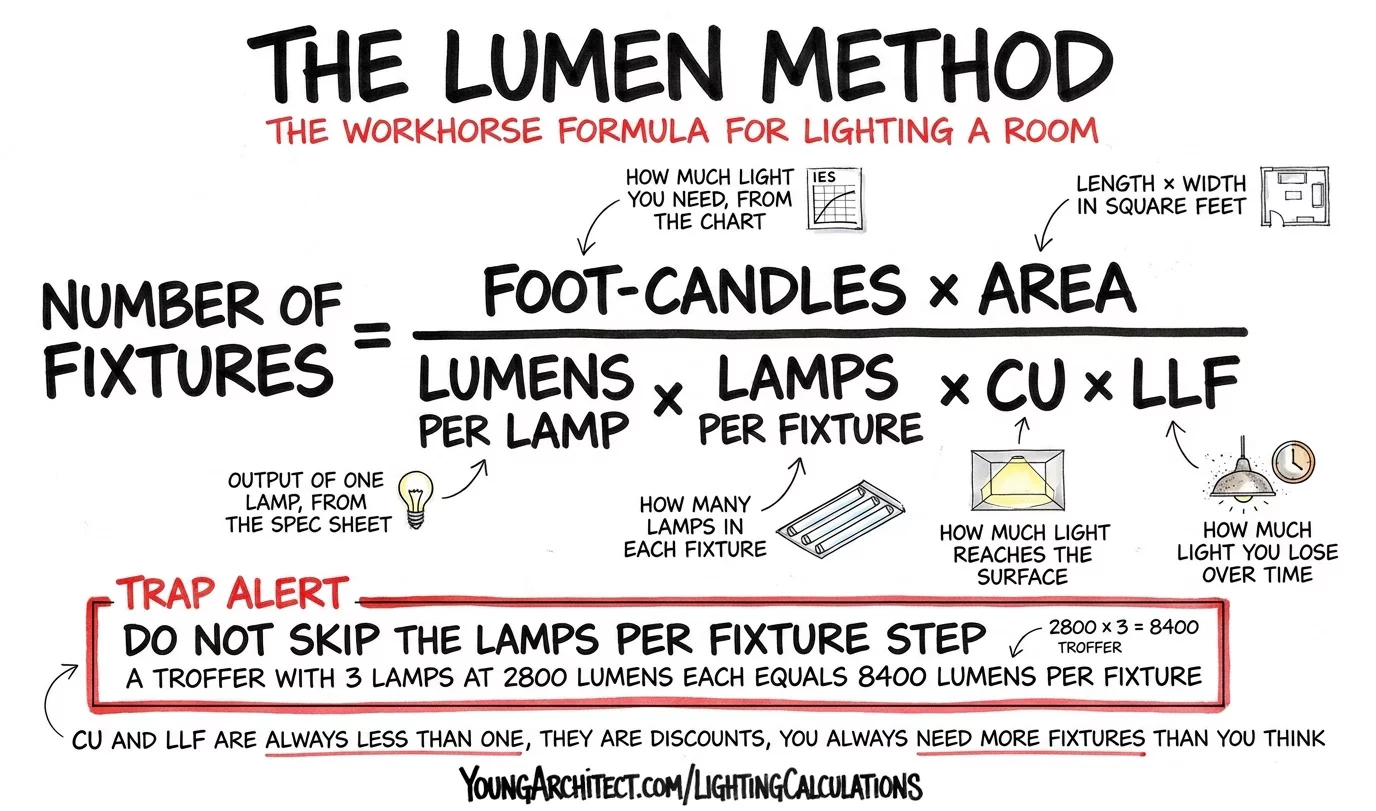
That is a lot of letters at once. Take it in two halves and it stops being intimidating, because each half is doing one simple job.
The top of the equation is your demand. How much light the space is asking for.
The bottom of the equation is your supply. How much usable light one fixture actually delivers.
Start with the top. Foot candles, pulled from the chart, multiplied by the area of the room in square feet. Length times width.
Multiply those together and you have the total amount of light the space demands.
There is a clean reason those two quantities belong together.
One foot candle equals one lumen falling on one square foot of surface.
That relationship is why target light levels sometimes get written as lumens per square foot instead, and why the top of this formula produces a lumen total rather than some abstract number.
Now the bottom. Four values, and each one is doing something specific:
- Lumens per lamp. Straight off the manufacturer’s spec sheet.
- Lamps per fixture. How many lamps sit inside one housing.
- CU, the coefficient of utilization. How much of that light reaches the work surface.
- LLF, the light loss factor. How much light you lose over time.
A traditional linear troffer holds multiple lamps, which is exactly why the formula separates those first two values.
Most modern integrated LED luminaires are tested and rated as a complete luminaire, so lamps per fixture is simply 1 and the cut sheet hands you the total fixture lumens directly.
CU and LLF each get their own section next, because each one deserves a real explanation rather than a definition you memorize and never understand.
For now, one idea about both of them matters more than anything else.
CU and LLF are always less than one. They are discounts.
They shrink the bottom of the equation, which means the answer always comes out higher than your gut expects.
The room absorbs some of your light. Time takes some more. The formula accounts for both losses instead of pretending they do not happen.
Now the step people skip.
Check whether a problem is handing you lumens per lamp or lumens per fixture. Those are not interchangeable, and treating them as though they are will wreck an otherwise correct answer.
A single fluorescent troffer might hold three lamps inside one housing.
If a spec gives you 2,800 lumens per lamp and tells you the fixture holds three of them, the fixture is producing 8,400 lumens, not 2,800.
Skip that multiplication and your final fixture count is off by a factor of three.
Check this every time: 2,800 lumens per lamp × 3 lamps = 8,400 lumens per fixture. Lamp lumens and fixture lumens are different numbers, and the formula wants the fixture number.
This is the exact math we drill inside Building Systems 101, where the lighting module works the formula forward and backward until it stops feeling like a formula.
Coefficient of Utilization: How Much Light Reaches the Surface
CU answers one question.
Of all the light leaving your fixtures, what percentage actually lands on the work surface?
Not all of it does. Some hits the walls. Some hits the ceiling. Some gets absorbed and never reaches anybody’s desk.
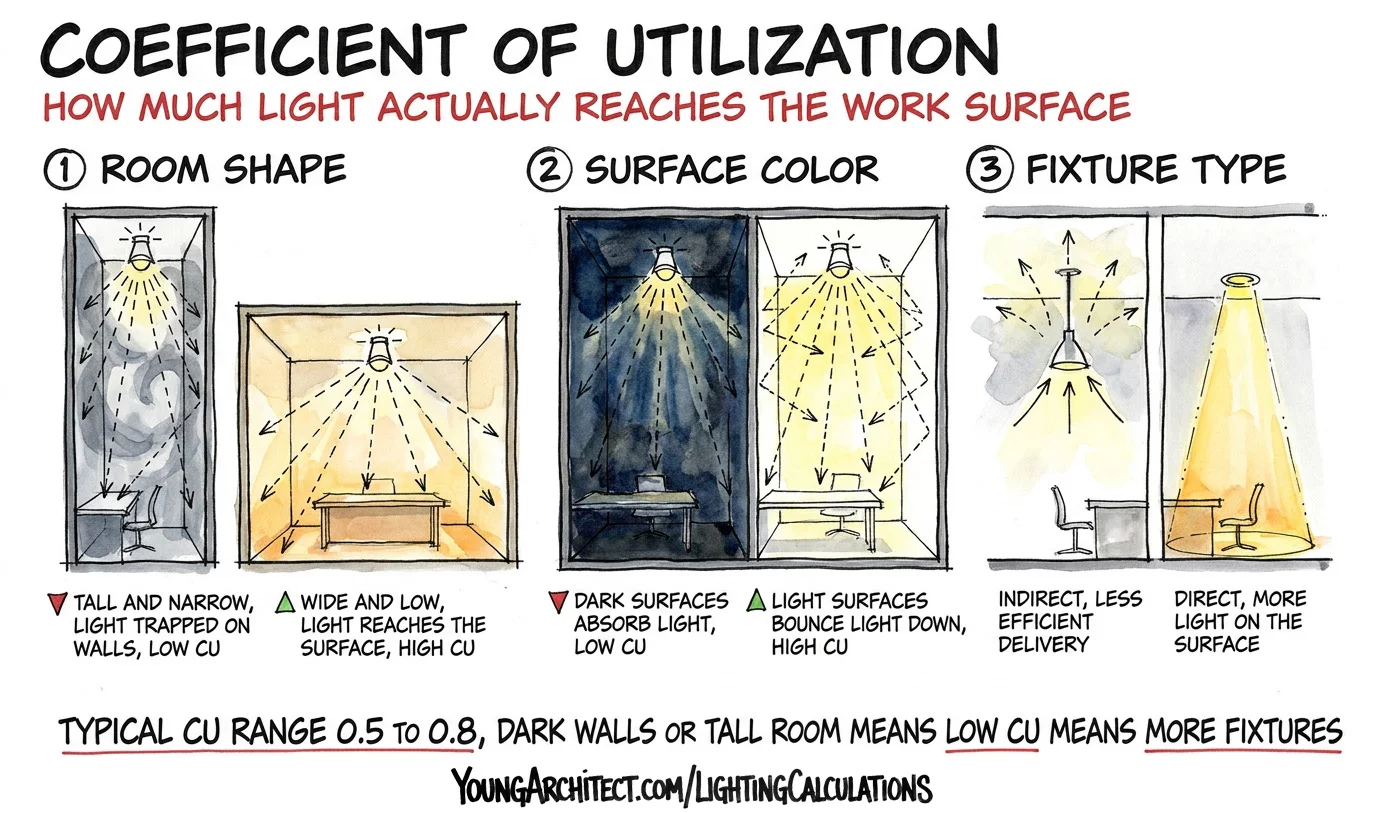
Three things drive that percentage.
- Room shape. A tall, narrow room traps light on the walls before it ever reaches the work plane. A wide, low room delivers light to the surface far more efficiently.
- Surface color. White walls and a white ceiling bounce light back down where you want it, so CU goes up. Dark finishes absorb it like a sponge, so CU drops.
- Fixture type. A downlight aiming everything straight at the floor delivers more of its output to the surface than an uplight that bounces off the ceiling first.
The proportions of the room have a name attached to them.
The room cavity ratio describes the relationship between a room’s length, width, and the height between the fixtures and the work surface, and it is one of the inputs behind any published CU value.
You will not be asked to calculate it. You just need to know that room proportions are doing real work inside that number.
For most ordinary rooms, CU lands somewhere between 0.5 and 0.8, and you will typically be handed the value rather than asked to derive it.
The useful takeaway is about reading the setup.
When a problem mentions dark walls or describes a tall, narrow room, it is telling you something. Those conditions push CU down, and a lower CU shrinks the bottom of your equation.
Read the signal: dark surfaces or awkward room proportions mean low CU, and low CU means more fixtures. The finishes are a lighting decision whether anyone treats them like one or not.
One naming note that trips people up in reference material.
Some sources call the coefficient of utilization the utilization factor, abbreviated UF. Same concept, different letters. If a chart says UF, read CU.
Light Loss Factor: What Time Takes Away
If CU accounts for the light the room steals, LLF accounts for the light that time steals.
It answers a different question. Two years from now, how much less light will this system produce than it did the day it was commissioned?
Because a lighting system is at its brightest on day one, and from there it only heads downhill.
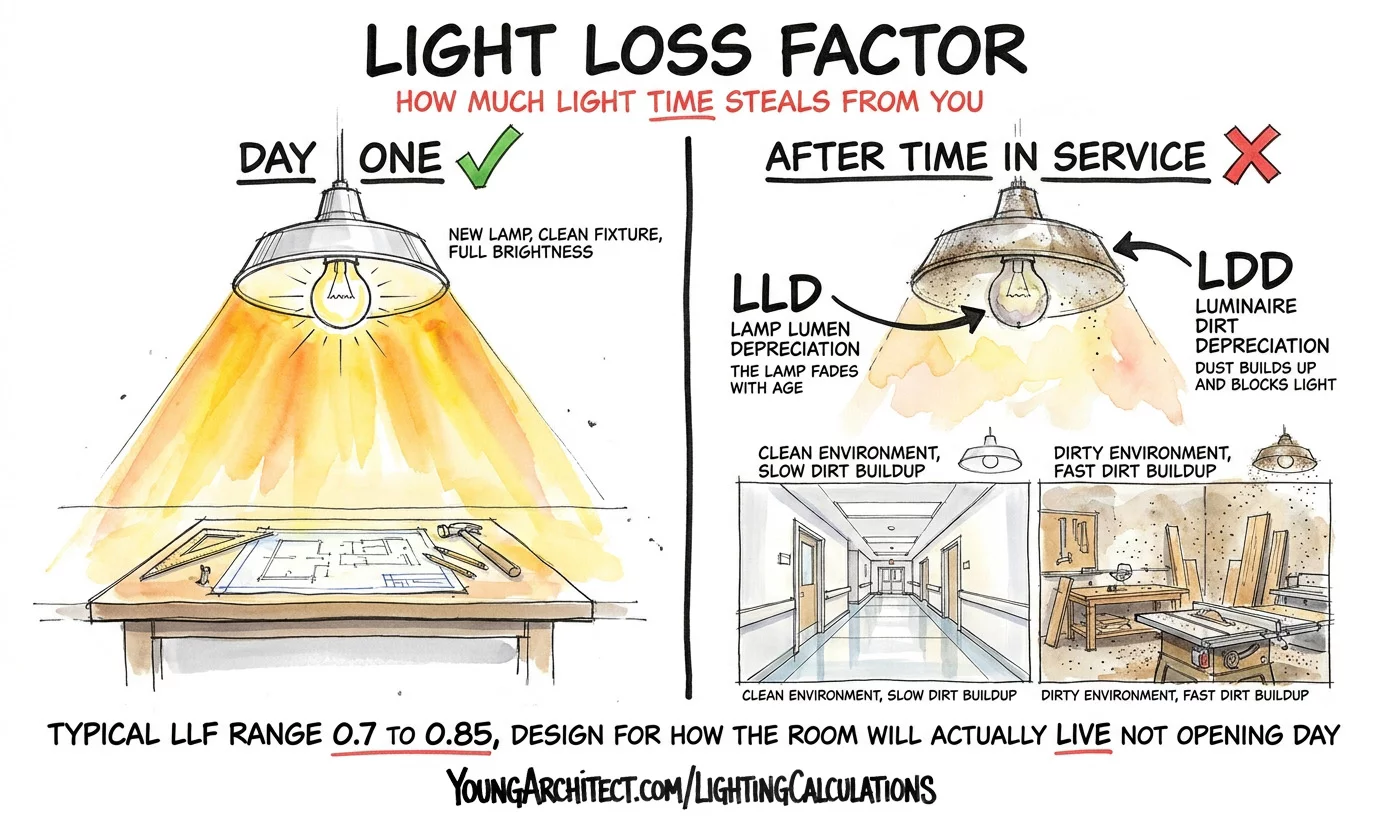
The light loss factor bundles several things together, but two of them do most of the work and both are worth knowing by name.
- Lamp lumen depreciation (LLD). The lamp itself getting dimmer as it ages.
- Luminaire dirt depreciation (LDD). Dust and grime blocking light the lamp is still producing.
Every light source fades. LEDs are usually rated to drift down toward seventy percent of their original output over their rated life, and that slow fade is lamp lumen depreciation doing its thing.
If you want the fuller picture of how different lamp types fade over their service life, that is its own topic.
Dirt depreciation builds up on the lens, the reflector, and the housing. And it depends almost entirely on where the fixture lives.
A luminaire in a clean hospital corridor stays bright for years.
The identical luminaire in a dusty woodshop gets filthy in months.
Same product. Wildly different depreciation.
Put an aging lamp together with a dirty fixture and you get your light loss factor. A typical LLF runs somewhere between 0.7 and 0.85, meaning you are designing a system that will deliver seventy to eighty-five percent of its opening-day output once it has been in service a while.
Same naming situation as CU, incidentally. Some references call this the maintenance factor, or MF. Different letters, identical concept.
This is where ignoring LLF bites you in practice.
Design a space around brand new lamps in spotless fixtures and that room will be measurably underlit within a year, with nothing broken and nobody at fault.
The design standard: light the room for how it will actually live, not for how it looks on opening day.
Lighting Calculation Example: A 400 Square Foot Office
Enough setup. Time to run a real lighting calculation, slowly, with every number showing.
Here is the space:
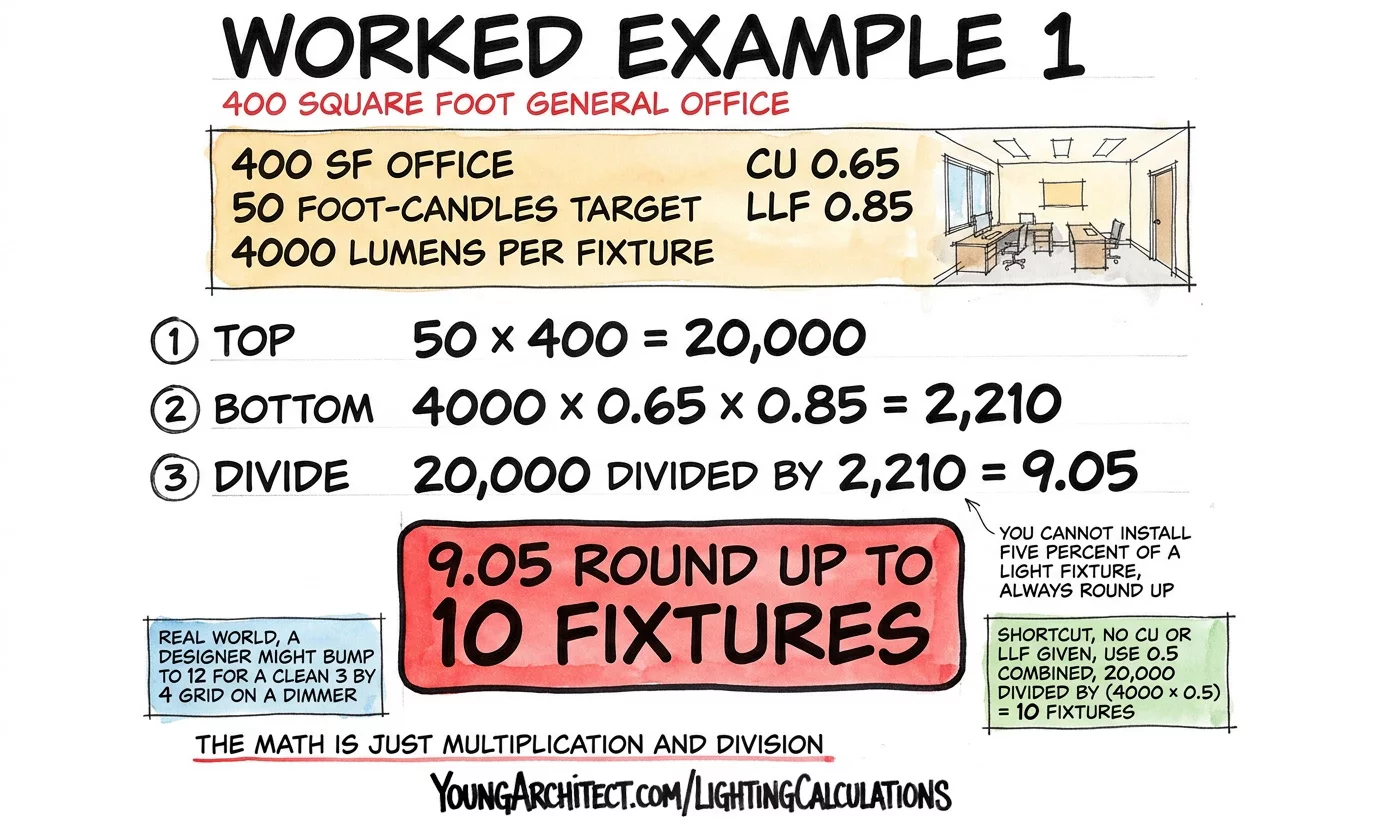
- 400 square foot general office
- 50 foot candles at the desks
- Troffers holding two lamps at 2,000 lumens each
- CU is 0.65
- LLF is 0.85
Build it one piece at a time.
Step one, the top. Foot candles times area. 50 × 400 = 20,000
Hold onto that number.
Step two, the bottom. Start at the fixture, not the lamp. Two lamps at 2,000 lumens each gives you 4,000 lumens per fixture, and that is the number the formula wants.
Now multiply it out. 4,000 × 0.65 × 0.85 = 2,210
Notice what just happened in that first move.
If you had dropped 2,000 straight into the formula because that was the number printed on the lamp spec, every step after it would have been wrong by half.
Step three, divide. 20,000 ÷ 2,210 = 9.05
So the room needs 9.05 fixtures.
Which brings up the moment people get wrong more than any other in this entire process.
You have 9.05. Do you round down to 9?
No. You round up. Always.
The rule that never bends: always round up. 9.05 fixtures means 10 fixtures. You cannot install five percent of a light fixture, and if you tried, your electrician would have questions.
Worth a note on what happens after the math in actual practice.
Ten fixtures is the correct answer to the calculation, but ten does not break into a tidy ceiling grid. A designer might bump it to twelve for a clean three by four layout and put the whole thing on a dimmer.
The calculation tells you the minimum. The reflected ceiling plan tells you the arrangement.
Both are real constraints and they do not always agree.
One more thing this example can teach you. If a problem never gives you CU and LLF, you are not stuck.
The safety net: when CU and LLF are not provided, use 0.5 as a combined factor for both.
Watch it work on the same room.
20,000 ÷ (4,000 × 0.5) = 20,000 ÷ 2,000 = 10 fixtures
Identical answer.
That is not a coincidence, and it is worth understanding why.
The real combined factor in this example was 0.65 × 0.85 = 0.5525. The 0.5 shortcut is standing in for typical, decent conditions: ordinary surface reflectances and maintenance that actually happens.
It sits right next to the real number because this office is a normal room.
Which also means the shortcut answers a question people ask constantly. How many lumens do I need for a given space?
Multiply your foot candle target by your square footage, then roughly double it to account for the losses. That is the whole estimate.
A Second Calculation Example: When the Room Fights Back
One more lighting calculation, because the interesting part of this formula is not the arithmetic.
It is watching how far the answer moves when the room stops cooperating.
New space:
- 1,200 square foot retail floor
- 75 foot candles, because retail demands more light than an office
- Integrated LED luminaires rated at 6,000 lumens each
- The same 0.5 shortcut from the last example, since nobody handed us CU and LLF
That 6,000 figure is already the fixture total, so there is no lamp multiplication to do this time.
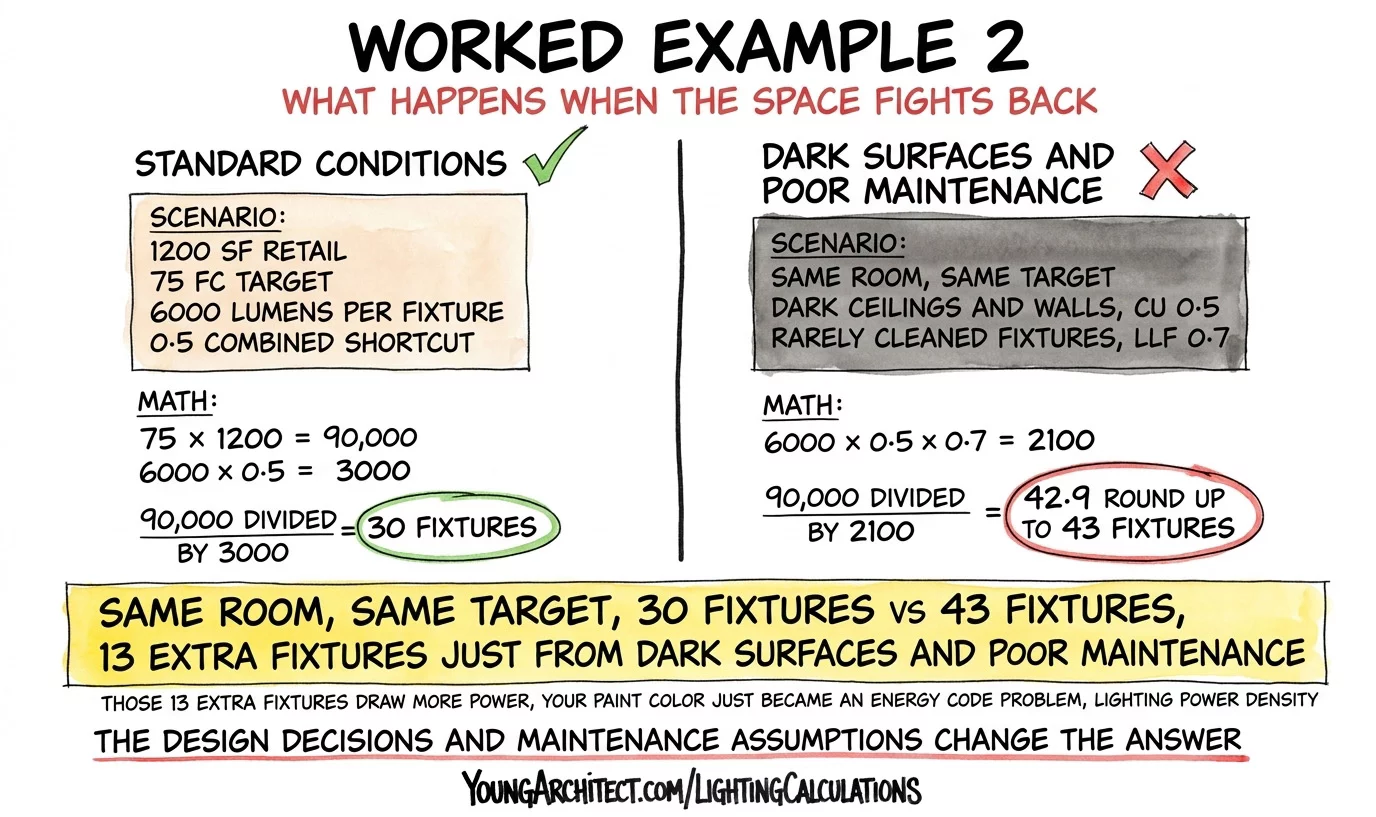
Top of the equation. 75 × 1,200 = 90,000
Bottom of the equation. 6,000 × 0.5 = 3,000
Divide. 90,000 ÷ 3,000 = 30 fixtures
A clean number for a normal room.
Now change the room and nothing else.
This particular retail space has dark ceilings and dark walls, which drops the CU to 0.5. The owner almost never has the fixtures cleaned, which drops the LLF to roughly 0.7.
Same square footage. Same light target. Same fixtures.
New bottom. 6,000 × 0.5 × 0.7 = 2,100
Divide again. 90,000 ÷ 2,100 = 42.9, which rounds up to 43 fixtures
Sit with the gap for a second.
The first version of this room ran on a combined factor of 0.5, standing in for decent conditions. The second version runs on 0.35.
Thirty percent of the available light disappeared before anyone picked a fixture out of a catalog.
Same room, same target. 30 fixtures versus 43 fixtures. Thirteen extra luminaires, bought entirely with dark paint and a skipped maintenance schedule.
That difference does not stop at the fixture count either.
Thirteen additional luminaires pull real additional wattage, and that can shove the project past its lighting power density allowance under the energy code.
Think about what just happened there.
An interior finish selection turned into an energy compliance problem.
The DOE’s Building America guide on high-efficiency lighting gets into how fixture efficiency and wattage interact with those budgets, and it is a useful companion once you start connecting lighting decisions to energy performance.
The formula is not plug and chug. The inputs are telling a story about the space, and reading that story is the actual skill.
Running the calculation tells you how many fixtures a room needs. Placing those fixtures on a reflected ceiling plan without colliding with ductwork, diffusers, sprinkler heads, and structure is where the design work starts.
That is where the lighting module inside Building Systems 101 picks up:
- Six practice problems, including ones that run the formula backward and solve for foot candles instead of fixture count
- Fixture spacing, including the edge distance equals half spacing rule
- RCP coordination against diffusers, sprinklers, and structure
- Code requirements for lighting the egress path: exit signs visible from 100 feet, a 1 foot candle minimum along the path, and 90 minutes of battery backup
Inverse Square Law: Double the Distance, Quarter the Light
Everything to this point lights a whole room evenly. Different tool, different job.
What about a single fixture aimed at a single spot?
- A picture light over a painting
- A pendant over a kitchen island
- A display light hitting one product on one shelf
For that you need the inverse square law, also called the point method or the point-by-point method depending on which reference manual you are holding.
The formula is short:
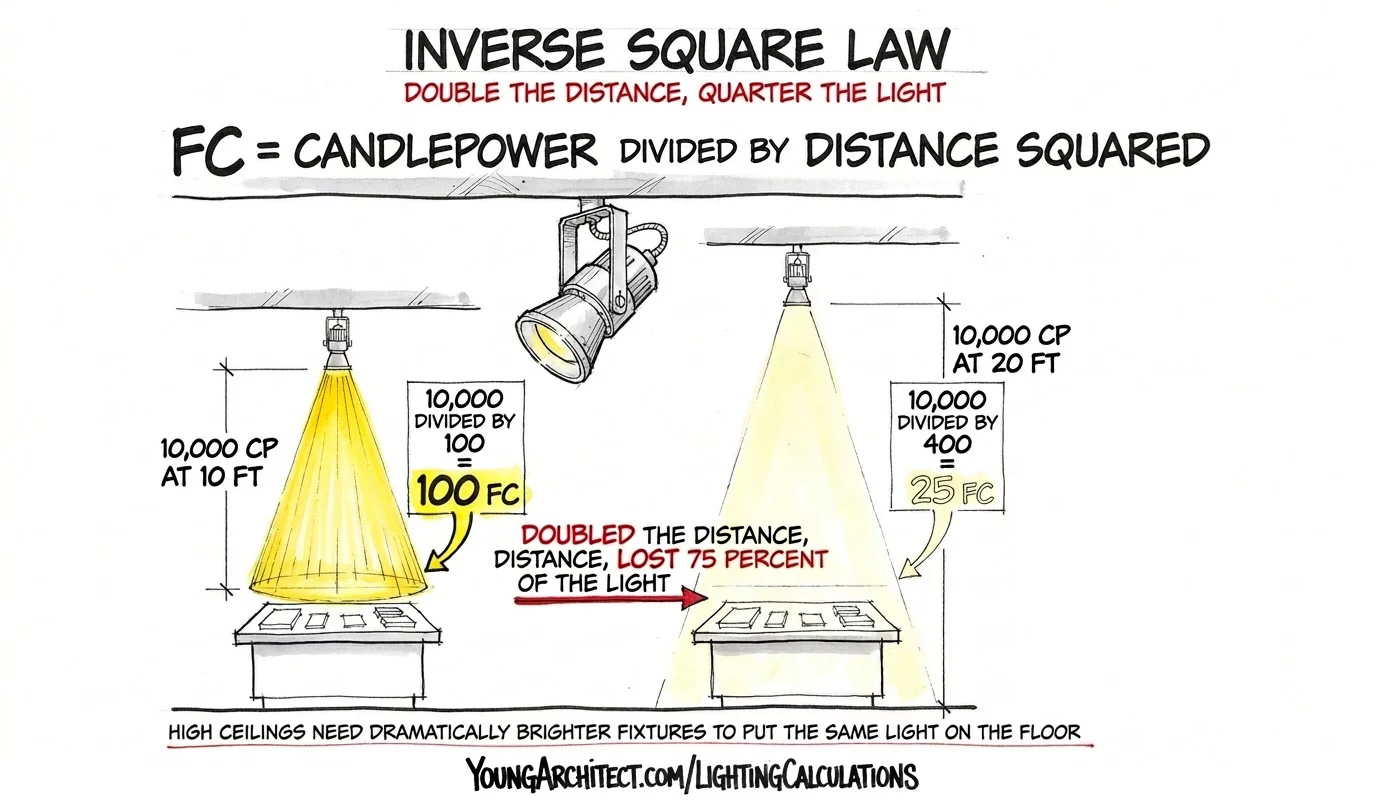
Foot-candles = Candlepower ÷ Distance²
That exponent is the only new operation in the whole post, and it is not really new. Squaring a distance means multiplying it by itself. Ten feet squared is 10 × 10.
Quick vocabulary note. Candlepower is the traditional term for candelas, the directional intensity of a light source. Older textbooks and most exam prep material say candlepower, so that is the word this formula uses.
The two methods split cleanly by the question being asked.
Lumen method. Uses lumens, total output, for lighting a room. “How many fixtures does this space need?”
Point method. Uses candlepower, directional intensity, for a single location. “What is the light level at this exact spot?”
Now the part that makes this formula stick.
Double the distance and you quarter the light. Not half. A quarter.
Run it. A spotlight rated at 10,000 candlepower hangs 10 feet above a display table.
10,000 ÷ 10² = 10,000 ÷ 100 = 100 foot candles on the table
Now somebody raises the ceiling and the same fixture sits 20 feet up. Same lamp, same output, double the distance.
10,000 ÷ 20² = 10,000 ÷ 400 = 25 foot candles
The distance doubled and the light dropped from 100 to 25.
Seventy-five percent of it, gone, with nothing changed but mounting height.
Double the distance, quarter the light. The physics does not negotiate. Tall ceilings demand dramatically more powerful fixtures to put the same light on the floor.
If you want to see the principle demonstrated physically rather than algebraically, the Exploratorium’s inverse square law demonstration is a good fifteen minutes.
Two details on that formula are worth getting right, because they stack rather than substitute for each other.
First, the distance is the beam path. It is the diagonal line from the fixture to the point it is illuminating, not the vertical mounting height.
If a diagram gives you a ceiling height and an angle, those are two different numbers, and squaring the ceiling height when the light is aimed sideways will hand you an answer that is too high.
Second, the angle costs you separately. The basic formula gives you the light landing on a surface held perpendicular to the beam.
Light arriving at a slant onto a horizontal surface spreads across a wider ellipse of floor, so the same beam delivers fewer foot candles. The full version multiplies by the cosine of that angle.
Using the diagonal distance does not cover the angle. Both reductions apply.
You do not need to memorize cosine values or run the trigonometry. You need to recognize that a fixture aimed at an angle puts less light on that surface than the straight-on formula predicts, and that the number you square is the travel distance of the beam.
Common Lighting Calculation Mistakes
Most wrong answers in lighting math are not arithmetic failures.
The multiplication is fine. The setup is what goes sideways, usually because a number got read as the wrong kind of number.
These are the errors that cost people correct answers and cause real problems on real projects. Read them once now and once more the week before you test.
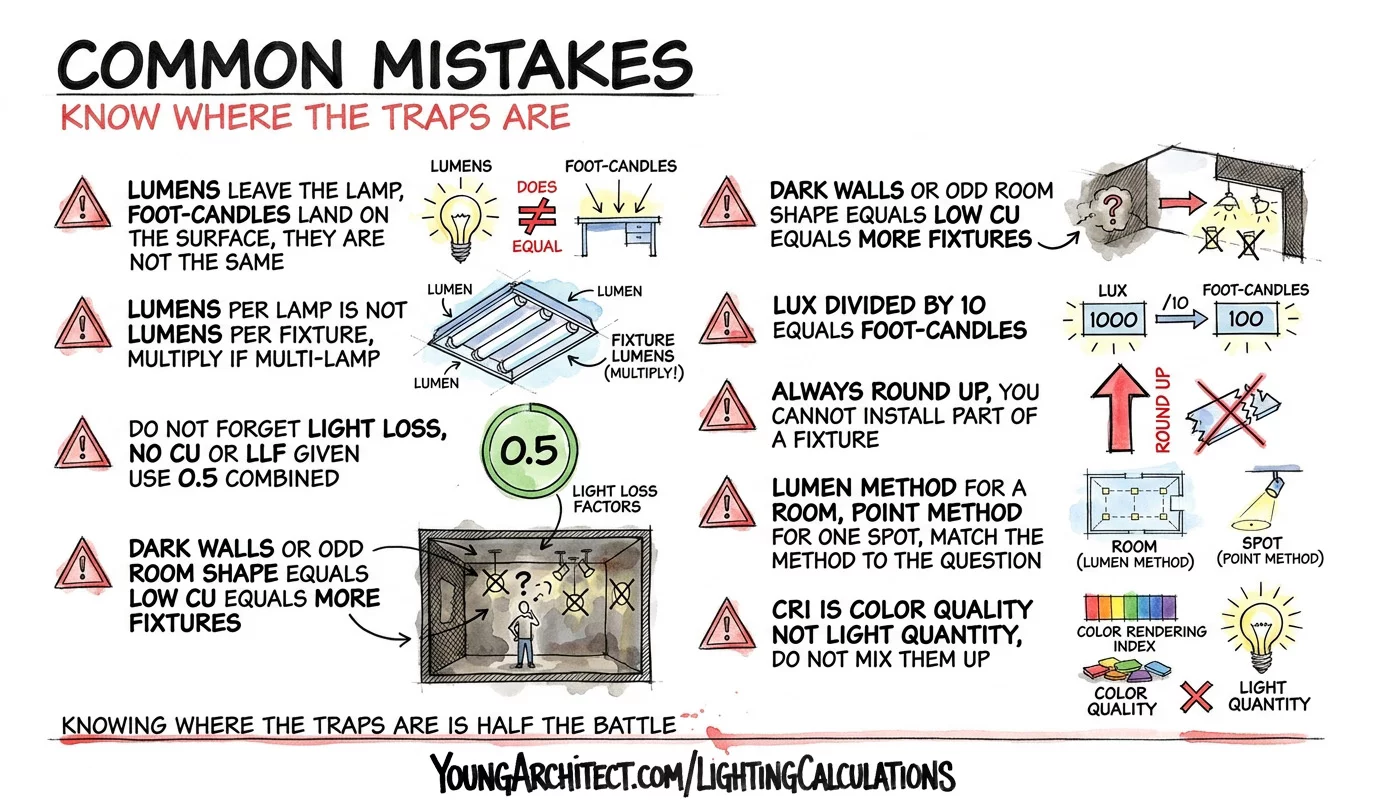
- Confusing lumens with foot candles. Lumens leave the lamp. Foot candles land on the surface. If the question is about what reaches the desk, the answer is in foot candles.
- Using lumens per lamp when you need lumens per fixture. If the housing holds multiple lamps, multiply before anything else. Old fluorescent troffers are where this one hides.
- Forgetting light loss entirely. No CU and LLF in the problem does not mean no losses exist. Reach for the 0.5 combined shortcut instead of dividing lumens straight into area, which gives you an opening-day answer for a room that will not stay that way.
- Treating 0.5 as a floor. It describes an ordinary room. Dark finishes or neglected maintenance run below it, as the retail example showed.
- Ignoring what the finishes are telling you. Dark walls and odd room proportions are not scenery. They mean low CU, and low CU means more fixtures.
- Mixing up lux and foot candles. Lux divided by about 10 gives you foot candles. Same concept, metric units.
- Forgetting to round up. You cannot install part of a fixture. Round up every single time.
- Grabbing the wrong method. “How many fixtures for this room” is the lumen method. “What is the light level at this point” is the point method. Read the question before you choose the formula.
- Letting CRI drift into a quantity question. CRI describes color quality, not how much light you have. It has nothing to do with any calculation on this page.
Where Lighting Calculations Show Up in Practice
This material sits across two divisions, and the split makes sense once you see what each one is actually doing.
But first, worth knowing where NCARB files this material, because it is not where most people look.
Lighting is a special system in NCARB’s taxonomy, not a mechanical or electrical one. It sits in the same bucket as acoustics, conveying, and fire suppression.
Go hunting under mechanical and electrical and you will not find it.
PPD Objective 3.3 covers determining special systems such as acoustics, communications, lighting, security, conveying, and fire suppression. That is the selection and evaluation work: understanding the lighting system, deciding what a space needs, and judging how it lands in the design before anything gets sized.
PDD Objective 1.4 covers integrating those same specialty systems to meet project goals. That is where a target light level turns into a fixture count, a layout, and a schedule a contractor can build from.
PDD Objective 1.6 covers coordinating mechanical, electrical, plumbing, structural, and specialty systems together. That is the reflected ceiling plan problem in one line.
That is why this math appears in two places rather than one.
One division decides what the space needs. The other sizes it, coordinates it, and writes it down.
If you want a clearer picture of how PA, PPD, and PDD divide up the technical material, it is worth understanding before you schedule either one.
In practice, this is the math behind sizing a lighting layout, coordinating a reflected ceiling plan, and defending a finish selection to a client after it quietly added thirteen fixtures to the budget.
The courses that go deepest here are PPD 101 and PDD 101.
Lighting Calculation Recap
Everything worth carrying out of this post, in one place.
Two formulas.
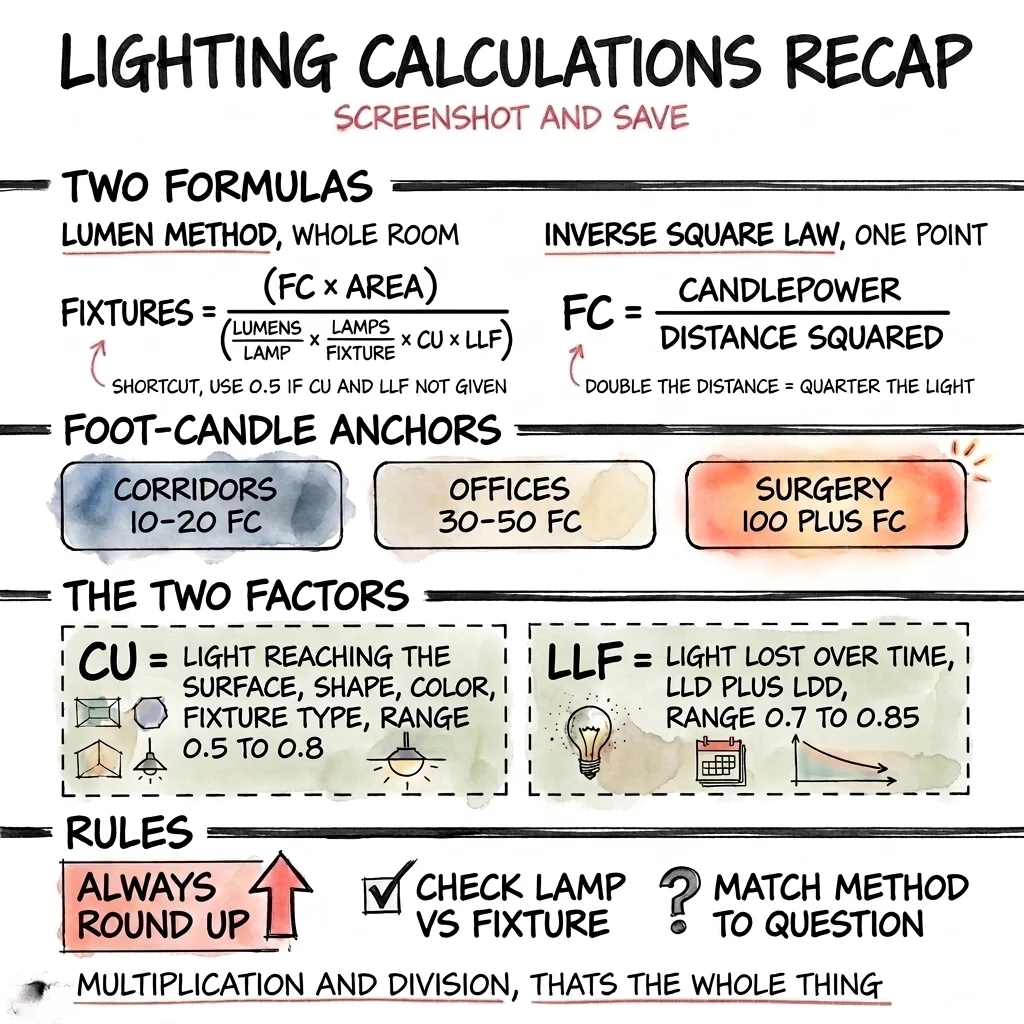
- Lumen method, for a whole room: Fixtures = (FC × Area) ÷ (Lumens per lamp × Lamps per fixture × CU × LLF)
- Inverse square law, for a single point: FC = Candlepower ÷ Distance²
The shortcut. No CU and LLF given? Use 0.5 as a combined factor.
Your foot candle anchors. Corridors 10 to 20. Offices 30 to 50. Surgery 100 and up. More visual detail means more light.
The two factors. CU is how much light the room lets reach the surface, driven by shape, surface color, and fixture type. LLF is how much light you lose over time, from lamps fading and fixtures getting dirty.
The rules that keep the math clean.
- Always round up
- Check lamp versus fixture
- Match the method to the question
Every lighting calculation on this page came down to multiplication and division, exactly as promised at the top.
Lighting Calculations FAQ
How many foot candles does an office need?
A general office needs 30 to 50 foot candles at desk height based on IES recommended levels. The right number inside that range depends on how much visual detail the work demands. Tasks like drafting or detailed inspection push higher, into the 75 to 100 range. The principle holds across every space type: harder visual work needs more light on the surface.
What is the lumen method formula?
The lumen method calculates fixture count for a whole room. Multiply target foot candles by room area in square feet, then divide by lumens per lamp times lamps per fixture times CU times LLF. CU covers light the room absorbs and LLF covers lamps dimming and fixtures collecting dirt. Always round a lighting calculation up.
What is the coefficient of utilization in lighting?
CU is the share of light leaving your fixtures that actually arrives at the work surface. Room proportions, the reflectance of the walls and ceiling, and the fixture’s distribution pattern all feed into it. Values usually fall between 0.5 and 0.8, and darker or more awkwardly shaped rooms land at the low end. Some references label it the utilization factor.
What is the light loss factor?
LLF describes how much output a lighting system loses over its service life compared to day one. Two components carry most of the weight: lamp lumen depreciation, meaning the source dims as it ages, and luminaire dirt depreciation, meaning accumulated dust blocks light the lamp still makes. Typical values run 0.7 to 0.85. Some references call it the maintenance factor.
What is the inverse square law in lighting?
The inverse square law says foot candles equal candlepower divided by the square of the distance. Practically, moving a light source twice as far away cuts the light to a quarter of what it was, not half. It explains why tall spaces need far more powerful fixtures than short ones to deliver identical light at floor level.
Turning Two Formulas Into Fluency
Two formulas and a handful of rules will carry you through any lighting problem you encounter.
What turns that from “I followed the explanation” into “I can do this cold” is repetition. And repetition is the thing that is hard to build on your own.

If you want structure and people to do it alongside, the ARE Boot Camp is built for that.
You get a personalized weekly study curriculum, daily study groups with other candidates working the same material, and enough accountability that studying actually happens instead of getting scheduled and skipped.
If you would rather work at your own pace, the ARE 101 Course Membership opens up the whole library. One membership, every course inside it.
Building Systems 101 is one of those courses, and its lighting module is where this material gets drilled properly.
Video 5 runs six practice problems, including several that flip the formula and solve for foot candles instead of fixture count. It also covers fixture layout and spacing, RCP coordination, and egress lighting requirements.
Video 2 handles lighting controls and energy code, including how to calculate lighting power density, which is the constraint that showed up when dark paint added thirteen fixtures to that retail floor.
The same course covers the rest of the systems that share a ceiling with your light fixtures, from types of HVAC systems through plumbing, fire protection, and acoustics.
PPD 101 and PDD 101 sit alongside it in the membership for the division-level material.