

The most critical material on your building is not the steel, the concrete, or the glass. It is the quarter-inch bead of sealant between them, and most building envelope failures happen right there at the joints. This post breaks down the five sealant types, when to use each one, plus backer rod and joint design so you can detail a joint that actually performs.
This podcast is also available on YouTube, Spotify, and Apple Podcasts
Sealant vs. Caulk
Before we get into the technical stuff, let’s clear up the question that is already bouncing around in your head.
What is the difference between sealant and caulk?
Short answer: caulk is the hardware store term, and sealant is the professional, industry term. Walk into a home improvement store and the aisle says caulk. Open a spec book on a commercial project and the section says sealant.
There is a real technical distinction too.
Caulk traditionally means a rigid, low-movement filler, like the acrylic tube you use to fill a gap around a baseboard before you paint.
Sealant means a flexible, high-performance product built to handle real building movement.
In practice, the industry says “sealant” for anything you would specify on a commercial building. You will still hear people say “silicone caulk” or “concrete caulk” in casual conversation, and they are talking about the same products.
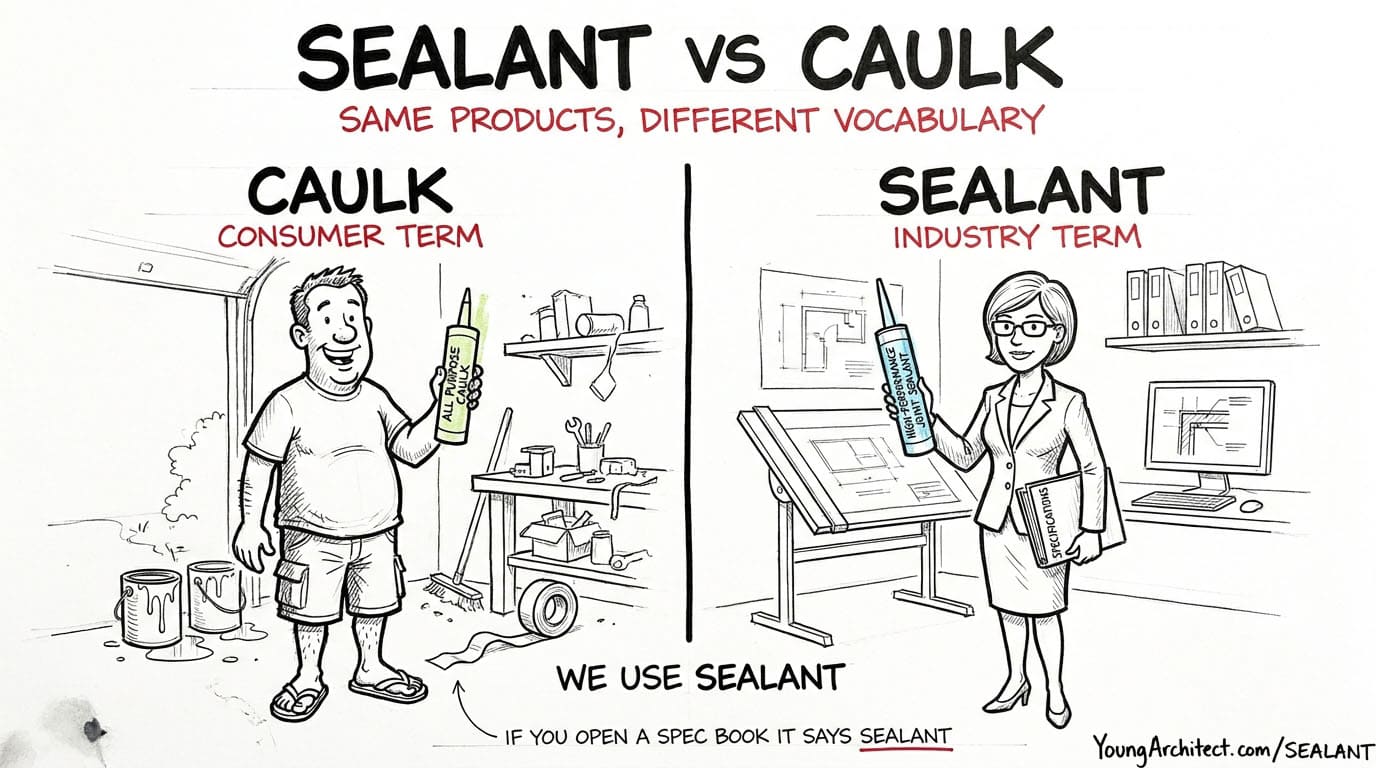
And look, if you have been calling it caulk your entire career, you are not alone. Half the people on job sites still call it caulk. Just know that when you open a spec book, it says sealant. For the exam and for this post, we are using the professional term.
Why Sealants Matter for the Building Envelope
Here is the thing most people miss. A building is not a static object. It moves.
It expands when it gets hot and contracts when it cools. It settles over time. It flexes under wind load. And every material moves at a different rate. Steel expands differently than concrete. Glass moves differently than aluminum.
If you design every connection as rigid, those connections will crack. It is not a question of if. It is when.
Sealants are the connective tissue that lets a building move without leaking.
They stretch, compress, and recover, over and over, for decades, without losing their grip on the materials they are bonded to.
And the stakes are real. Moisture is the number one enemy of buildings. When water gets into a wall assembly, you get mold, corrosion, freeze-thaw damage, ruined insulation, and eventually structural problems. Most of that infiltration happens at joints, not in the middle of a panel, but right at the seam where two things meet.
This is exactly why proper joint sealing is critical to building envelope performance, and it ties directly into how the rest of your building envelope manages water, air, and vapor.
Adhesion vs. Cohesion Failure
So how does a sealant actually fail? There are two ways, and you need to know both.
The first is adhesion failure. That is when the sealant lets go of the substrate. It peels off the brick. It pulls away from the window frame. The sealant itself might be perfectly intact, but it is no longer stuck to the thing it is supposed to be stuck to.
The second is cohesion failure. That is when the sealant tears apart internally. It held onto both sides of the joint just fine, but the material itself ripped in half. It could not handle the movement.
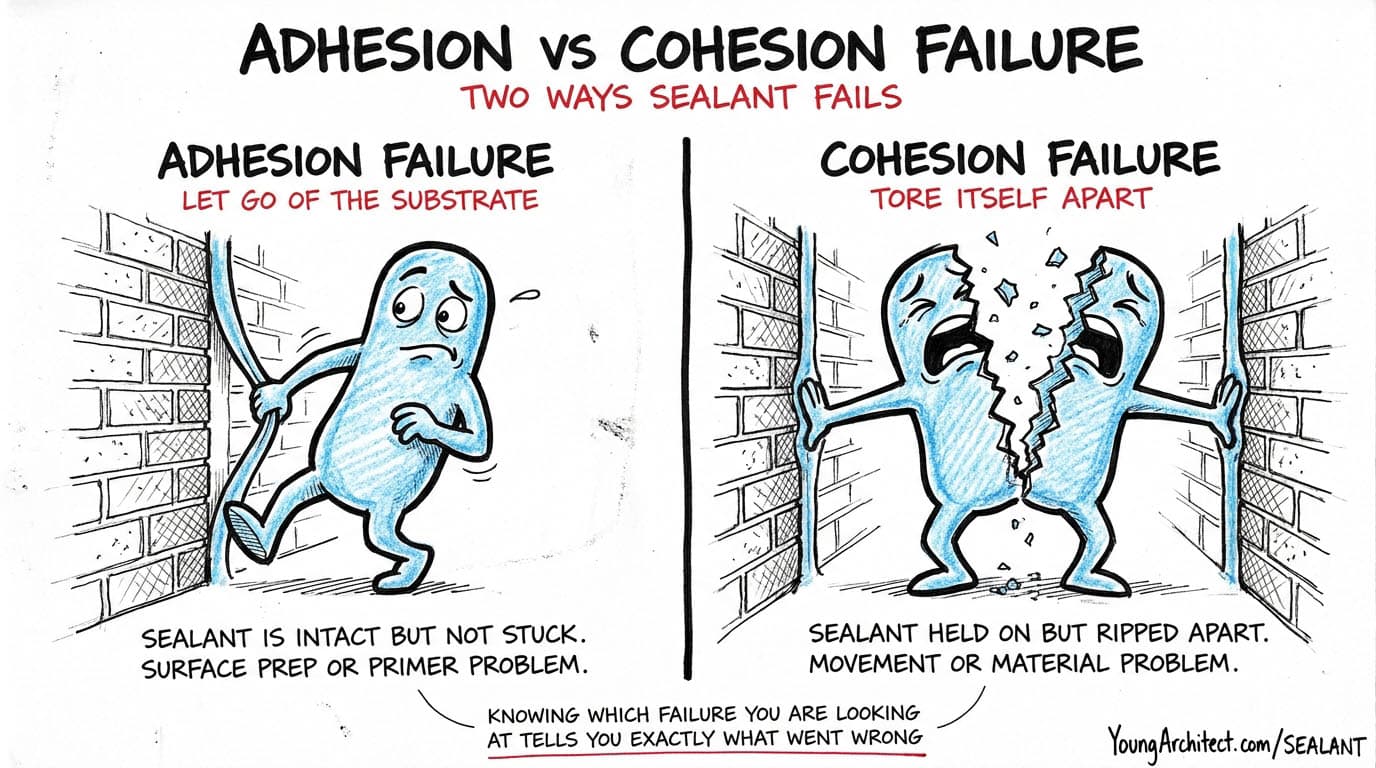
Knowing which one you are looking at tells you exactly what went wrong.
Adhesion failure points to a substrate or surface prep problem.
Cohesion failure points to a movement or material selection problem.
Depending on the substrate, some sealants need a primer to bond properly. Sealant failure is often less about the product and more about poor surface prep or a missing primer. That is a specification decision you make at the drawing board, not something you leave the field to figure out. It is one of the more common specification writing errors we see. Get the bond wrong on a big enough building, and the failure makes the news.
The John Hancock Tower Failure
If you want a real-world reminder of how high the stakes are, look at Boston.
In the 1970s, the John Hancock Tower became famous for all the wrong reasons. Its windows were falling out of the building and crashing onto the sidewalk below. The city had to close off streets.

There were several causes, but a big part of the forensic story came down to the bonding within the insulated glass units themselves. Those bonds failed under thermal cycling and wind stress, and once the bond broke, the glass became loose panels in the wind.
A hundred-million-dollar icon, and part of the failure traced back to a bonding seal. So how do you make sure that does not happen? It starts with knowing which sealant to use and where. And each sealant type has its own personality. Let me introduce you to the crew.
Silicone Sealant (The Diva)
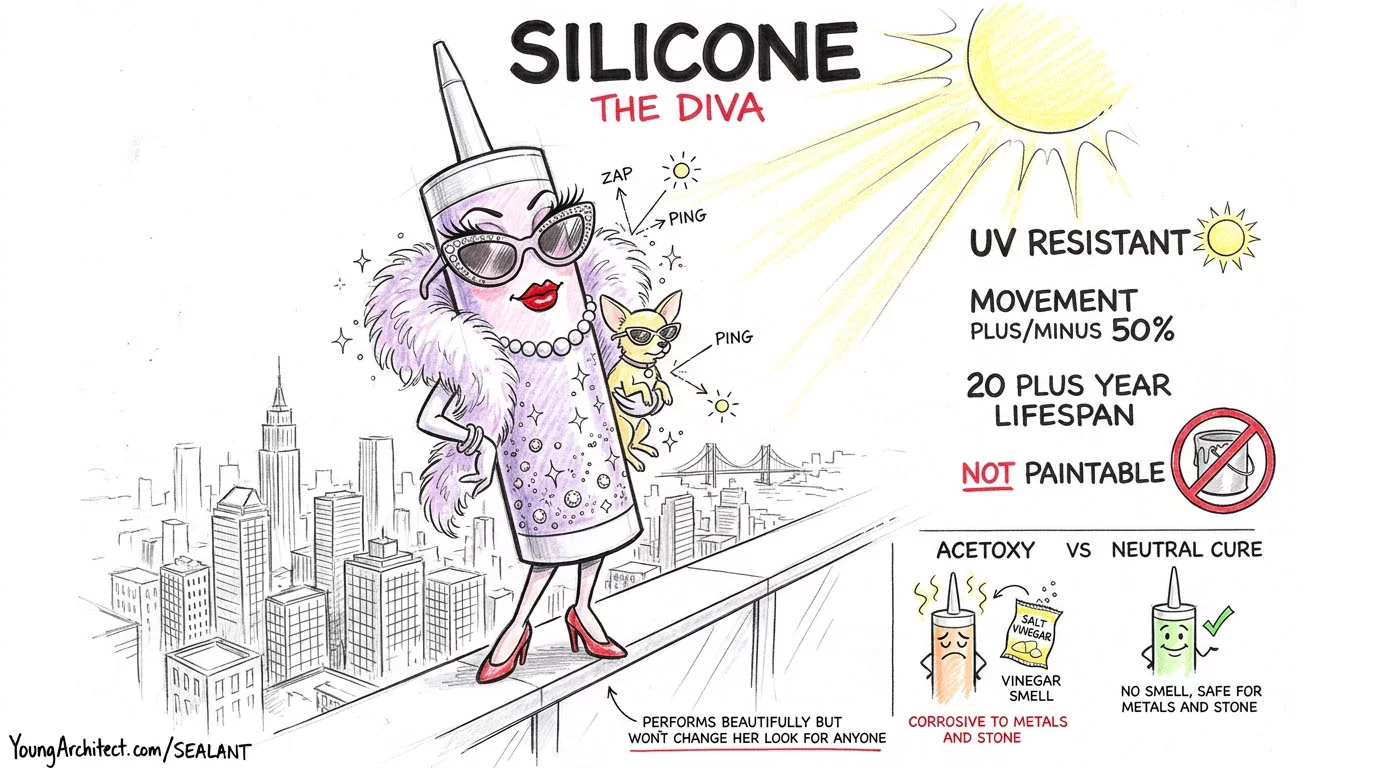
First up is silicone sealant, and I call it the diva because it performs beautifully but absolutely will not change its look for anyone.
Silicone is that friend from college who was incredibly talented but impossible to work with on group projects. Shows up, delivers an amazing performance, but entirely on their own terms.
Here is what makes silicone special:
- UV resistant. It does not care about sun exposure. Leave it fully exposed on a south-facing curtain wall for 20 years and it holds up.
- Excellent movement, up to plus or minus 50 percent in some formulations, so it handles serious joint movement without tearing. This movement class is governed by the ASTM C920 specification for elastomeric joint sealants.
- Performs across extreme temperatures.
So what is the catch? First, it is expensive. It is the premium option and you will feel it in the budget.
Second, and this is the big one, you cannot paint silicone. Try it, and the paint beads up like water on a freshly waxed car and rolls right off. The diva shows up looking how the diva wants to look, and that is the end of the conversation.
Silicone is your go-to for glass-to-glass joints, curtain walls, structural glazing, and skylights. Anywhere you need longevity and flexibility and you do not need to paint it.
You will also hear silicone called “silicone caulk” at the hardware store. Same product family.
Acetoxy vs. Neutral Cure Silicone
There are two major types of silicone based on how they cure.
Acetoxy cure releases acetic acid as it cures. That is the vinegar smell. If you catch a whiff of something like a salt-and-vinegar-chip factory on a job site, someone just opened a tube of acetoxy silicone.
But that acetic acid is corrosive. Applied to copper, brass, galvanized steel, concrete, or porous stone, the acid can chemically attack the substrate and destroy the bond. On natural stone like marble or limestone, it leaves a permanent wet-looking stain that never cleans off.
Neutral cure silicone releases a non-acidic byproduct instead. No vinegar smell, no corrosion, no staining.
The spec rule is simple.
Use acetoxy for general glass-to-glass work where corrosion is not a concern. Specify neutral cure anytime you are working with metals, masonry, or natural stone.
Memory hook: Silicone is the diva. Performs beautifully but won’t change its look for anyone.
Polyurethane Sealant (The Workhorse)
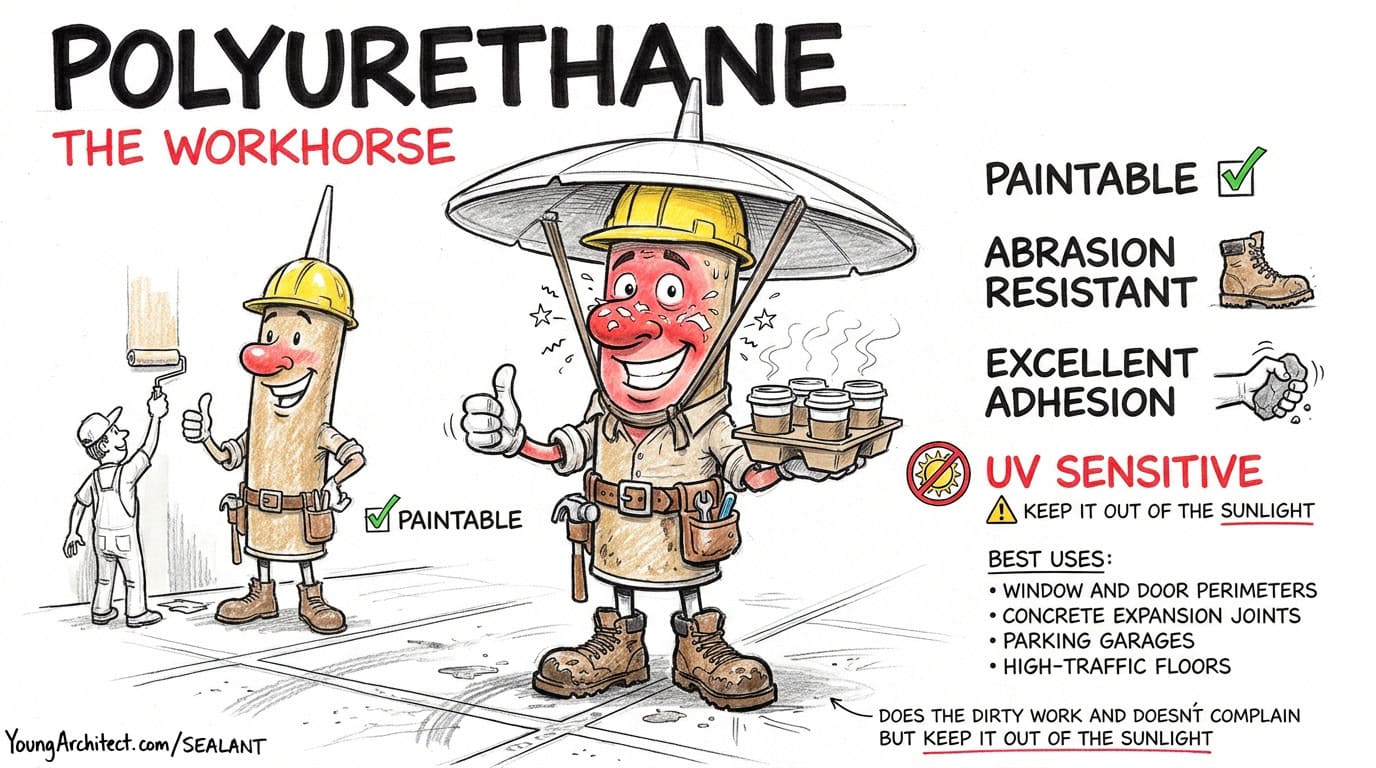
Now the opposite end of the personality spectrum. If silicone is the diva, polyurethane sealant is the workhorse.
Polyurethane is the friend who showed up to every group project early, did whatever you needed, never complained, and always had coffee for the whole team.
Need it to bond to concrete? Done. Paint over it? No problem. Handle foot traffic in a parking garage? On it.
What makes it great:
- Tough and abrasion resistant. It has higher tear resistance than silicone, which is why it is the preferred choice for horizontal traffic joints. Think of a parking garage floor joint taking high heels, rolling carts, and debris. Silicone would get chewed up. Polyurethane takes the beating.
- Excellent adhesion to most substrates.
- Paintable. Unlike silicone, polyurethane accepts paint beautifully, which makes it the default whenever a joint needs to blend into the surrounding finish.
- Cheaper than silicone, which matters when you are sealing hundreds of linear feet of window perimeters.
The catch? Polyurethane hates UV. Direct sun makes it brittle over time, so it will crack and deteriorate if you leave it exposed without paint or other protection. Polyurethane is the one friend who burns on the first day of the beach trip every single time.
Use it for window and door perimeters, expansion joints in concrete and masonry, parking garages, and high-traffic floor joints. Anywhere you need toughness and paintability and the sealant is not sitting in direct sun unprotected.
This is the one people call “concrete caulk” or “concrete sealant” in casual conversation. When someone is sealing an expansion joint in a concrete slab, they are usually reaching for polyurethane. It is also the default window sealant on most commercial projects, where window and door perimeters need a tough, paintable bead. For more on detailing the joint itself, Building Science Corporation has a great resource on air sealing windows in the building envelope.
Memory hook: Polyurethane does the dirty work and doesn’t complain, but keep it out of the spotlight.
Polysulfide Sealant (The Hazmat Suit)
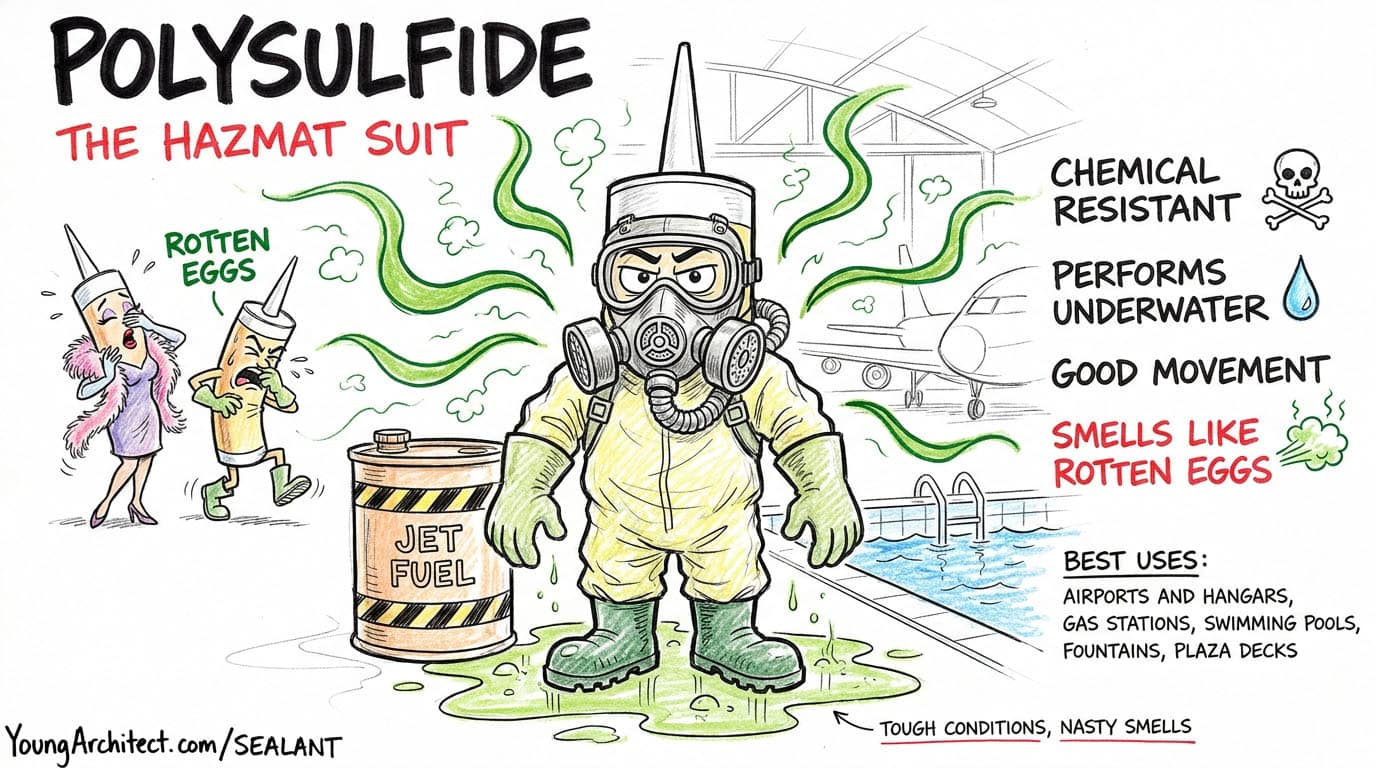
Next up is polysulfide sealant, and this one has a very specific superpower. Chemical resistance.
Polysulfide is the friend who worked in the campus chemistry lab and always smelled a little off. Nobody wanted to sit with them at lunch, but when you needed someone who could handle the nasty stuff, they were the only one to call.
Polysulfide can handle things that would eat other sealants alive. Jet fuel. Industrial solvents. Prolonged water immersion. It is the go-to waterproof sealant for below-grade and immersion applications, where the joint is essentially underwater for long stretches.
You will find it in:
- Airports and aircraft hangars where jet fuel exposure is a daily reality
- Gas stations
- Swimming pools, fountains, and plaza decks
The catch? It smells terrible. Like rotten eggs. I am not exaggerating. Open a tube of polysulfide on a job site and you will know about it from across the building.
It also has a longer cure time than silicone or polyurethane, it is less UV stable, and it is an older technology that newer products are replacing in some applications.
Memory hook: Polysulfide is the hazmat suit. Tough conditions, and it smells like rotten eggs.
Acrylic Sealant (The Weekend Warrior)
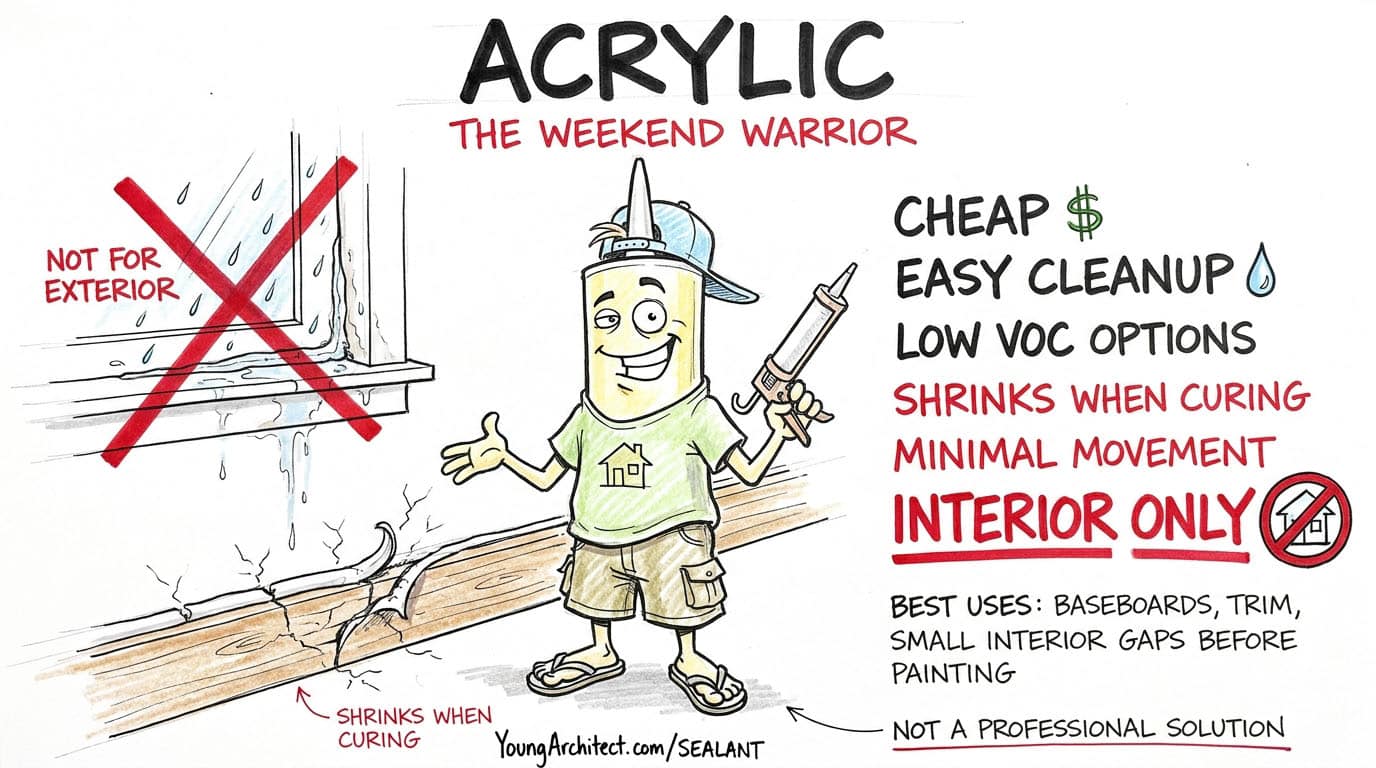
Now the one you have probably used at home. Acrylic sealant is cheap, it cleans up with water, and it is easy to apply. Low-VOC options are widely available. It is the tube you grab for a quick weekend fix.
Acrylic is the friend who showed up to help you move but brought a sedan instead of a truck. Good intentions, limited capacity.
- It shrinks significantly as it cures.
- It has minimal movement capability, roughly plus or minus 7.5 to 12.5 percent, versus plus or minus 50 percent for high-performance silicone. That is a huge difference, and it is why acrylic cannot handle the movement in a commercial joint.
- It is not durable outdoors. Sun and weather break it down.
We have all used it, and if you are being honest, you have probably also watched it crack and peel off a window frame about six months later. That is acrylic doing what acrylic does.
Use acrylic for interior applications only. Baseboards, trim, small gaps before painting. Never specify it on the exterior of a building. It is not built for that.
Memory hook: Acrylic is the weekend warrior. Not a professional exterior solution.
MS Polymer Sealant (The Hybrid)
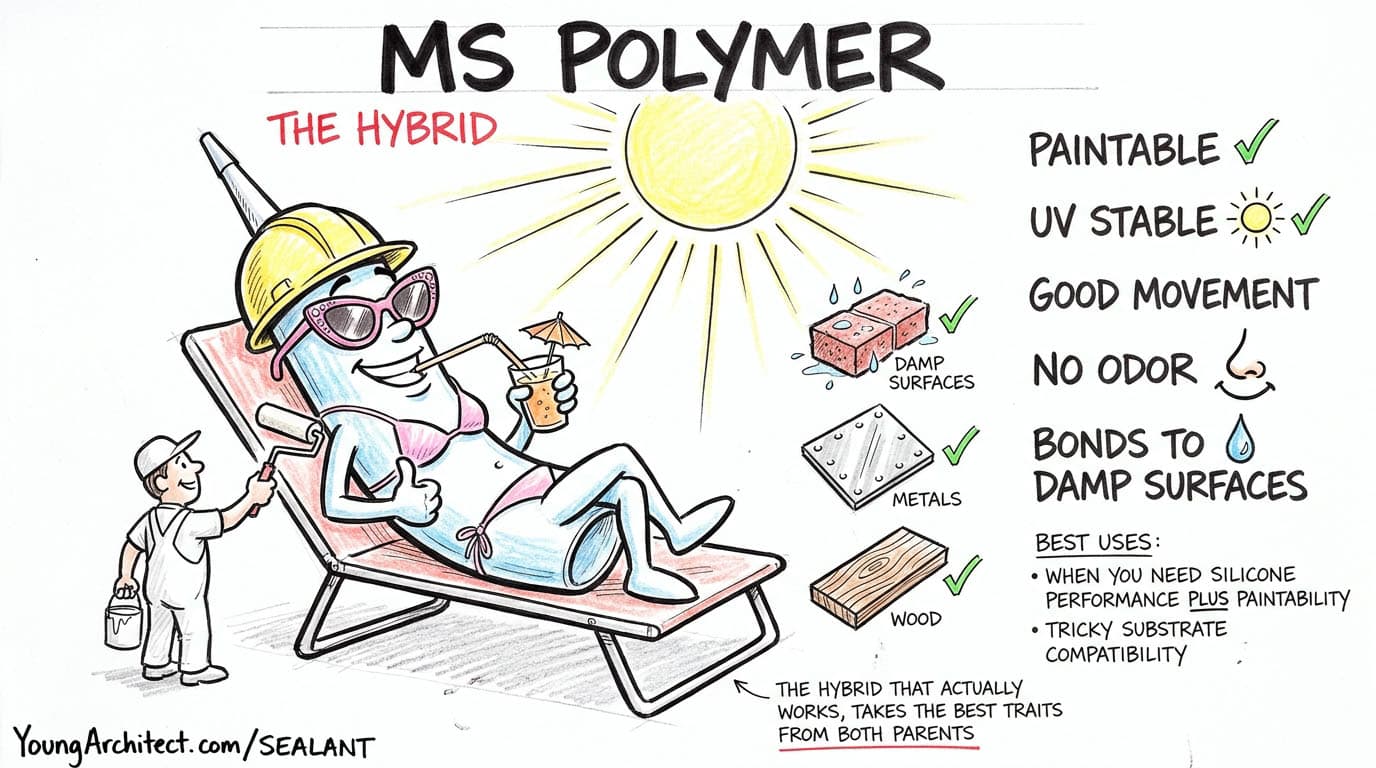
The last of the five is MS polymer sealant, which stands for modified silicone polymer.
MS polymer is the friend who transferred in junior year and somehow got along with everybody. You wonder why you didn’t meet them sooner.
MS polymer looked at silicone and polyurethane and said, “Why can’t I be both?”
- Paintable, which silicone is not.
- UV stable, which polyurethane is not.
- Good movement capability.
- Virtually no odor during cure.
- Bonds to almost anything, including damp surfaces, which is a real advantage on job sites where you cannot always wait for perfect conditions.
This is the answer when the old silicone vs polyurethane tradeoff would normally force you to give something up. The catch is that it is a newer technology, so some contractors are less familiar with it, and its movement capability, while good, is slightly less than pure silicone.
Use MS polymer when you need silicone-level performance but also need to paint the joint, or when you are dealing with tricky substrate compatibility.
Memory hook: The hybrid that actually works. Takes the best traits from both parents.
How to Choose the Right Sealant
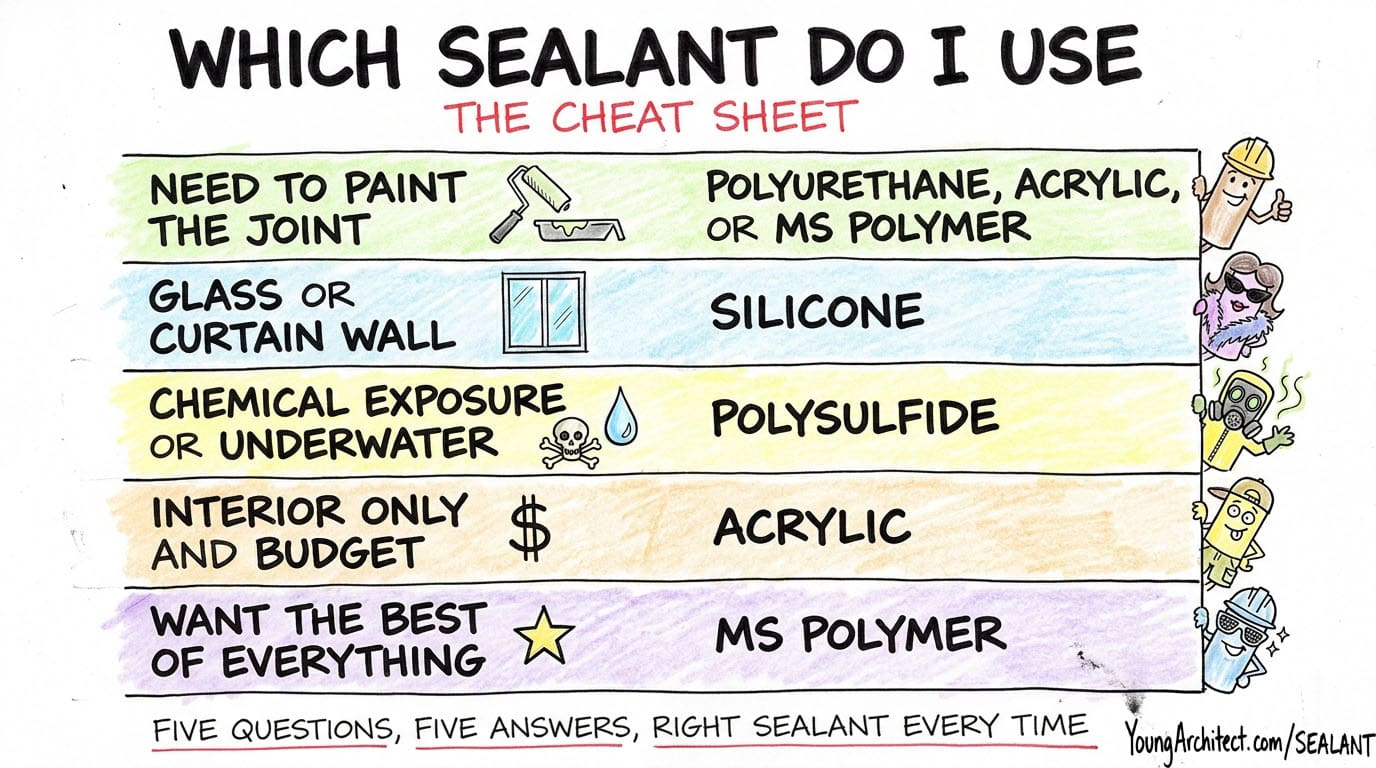
So that is the crew. Five sealants, five personalities. Here is a quick reference to keep them straight.
| Sealant | Paintable | UV Resistant | Best For |
|---|---|---|---|
| Silicone | No | Yes | Glass, curtain walls, structural glazing |
| Polyurethane | Yes | No | Window perimeters, concrete joints, traffic floors |
| Polysulfide | Limited | No | Chemical exposure, underwater, fuel areas |
| Acrylic | Yes | No | Interior trim and baseboards only |
| MS Polymer | Yes | Yes | Paintable joints needing silicone-level performance |
Run through a few quick scenarios and you will see how fast this gets:
- Expansion joint in a parking garage? Polyurethane. Abrasion resistant, paintable, handles traffic.
- Glass-to-glass corner on a curtain wall? Silicone. UV stable, flexible, built for glazing.
- Baseboards in a nursery? Acrylic. Low-VOC, paintable, interior only.
- Jet fuel storage area at an airport? Polysulfide. Nothing else survives that.
- Window perimeter that needs to match the paint? Polyurethane or MS polymer.
- Sound-rated wall assembly? Acoustical sealant. Different product, different job, and we will get to it below.
When you are choosing, you really only need to answer three questions:
What is moving? What is it touching? What is it exposed to?
Answer those three and you will land on the right sealant every time. This is also where specifications come in, and how sealants get organized in CSI® MasterFormat® under Division 07. If you want to see how a product like this moves through review on a real project, that is the construction submittals process.
Butyl Sealant
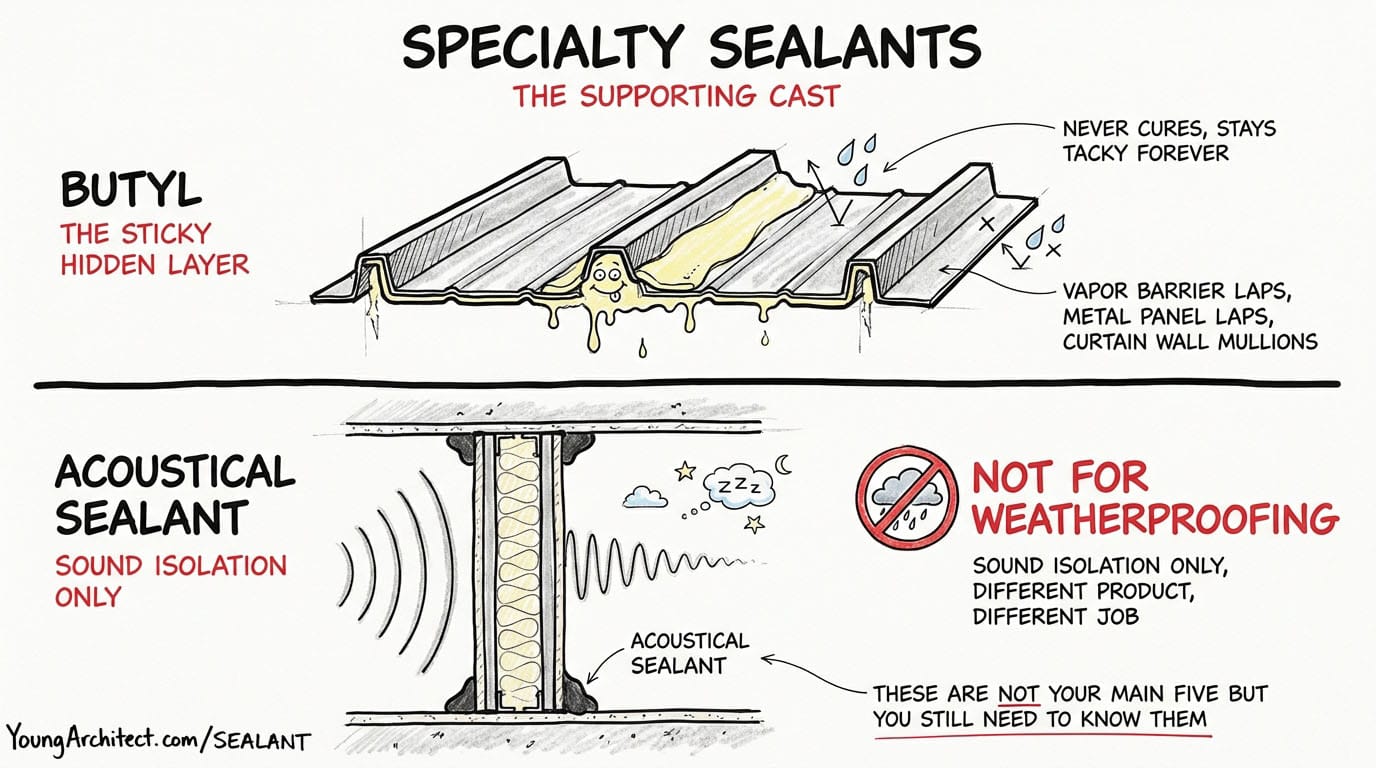
Before we get to joint design, there are two specialty products that do not fit neatly into the five families but you still need to know.
First is butyl sealant. Butyl is a sticky, non-curing product that stays gooey forever. It never hardens, it never skins over, it just stays tacky.
You will find it inside metal roof panel laps and behind curtain wall mullions. It is also the go-to for vapor barrier laps because it is virtually impermeable to water vapor.
It is not structural, and it is never exposed. It is a reliable hidden sticky layer that keeps water and vapor from migrating through concealed joints.
Acoustical Sealant
The second specialty product is acoustical sealant. This is the black gunk you see inside wall assemblies at the perimeter of sound-rated partitions. Its entire purpose is to seal the gaps that would let sound leak through.
It never hardens, which means it never cracks, which means the acoustic seal stays intact over time.
Here is the important part:
Acoustical sealant is for sound isolation only. It is not for weatherproofing.
If a question describes a wall that needs both an acoustic seal and a weather seal, those are two different products doing two different jobs. This connects directly to how sound moves through sound-rated wall assemblies, and it shows up alongside detailing for fire-rated wall assemblies where continuity at the perimeter matters.
Backer Rod
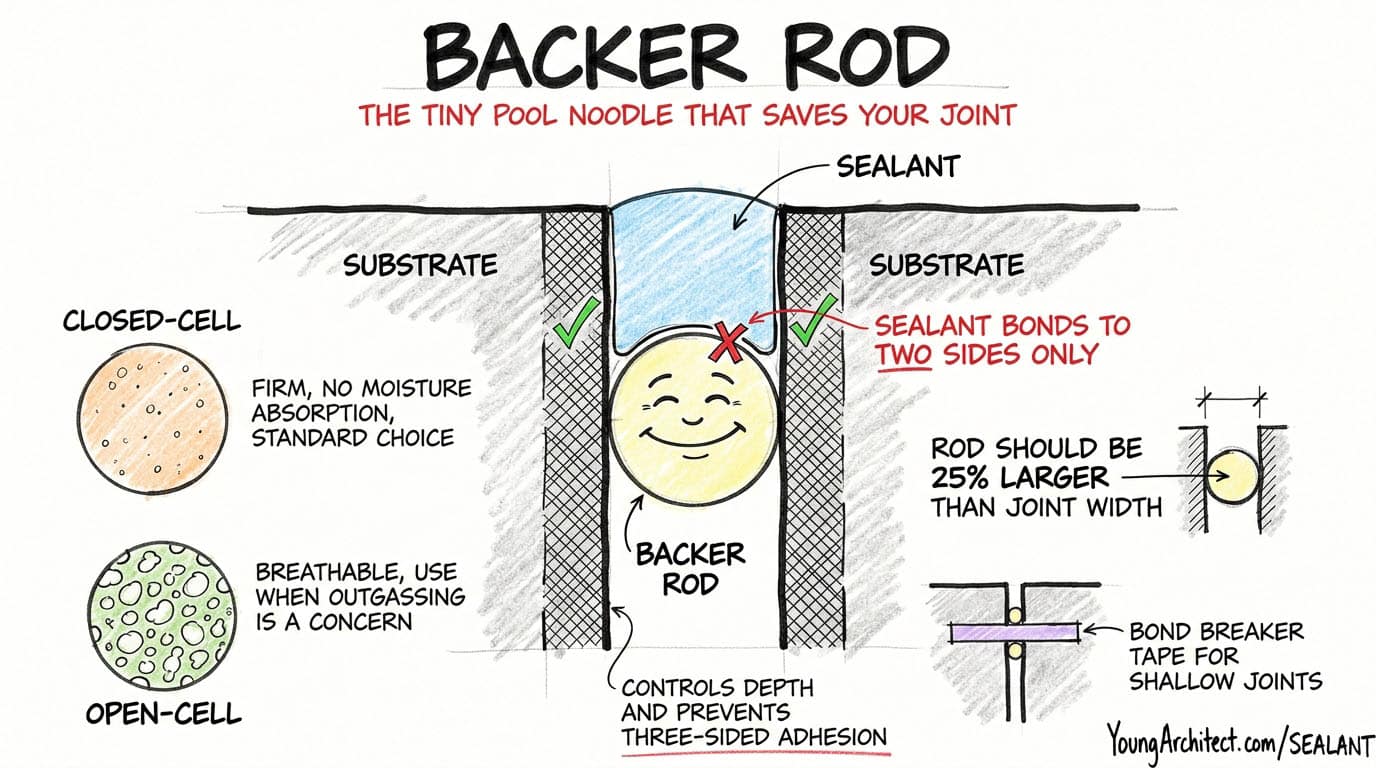
Now you know which sealant to pick. The next question is how to detail the joint itself, because even the best sealant in the world fails if the joint design is wrong. And it starts with the backer rod.
A backer rod is a foam rod, think of it like a tiny pool noodle, that gets pressed into the joint before the sealant goes in.
It does two critical things:
- It controls the depth of the sealant so you get the right proportions.
- It prevents three-sided adhesion, which we will get into in a minute.
Open Cell vs. Closed Cell Backer Rod
There are two main types.
Closed-cell backer rod is the standard choice. It does not absorb moisture and it provides a firm, consistent backing for the sealant.
Open-cell backer rod is breathable, used when outgassing or cure venting is a concern.
That word “outgassing” deserves a warning, because it is a construction detail worth knowing for PDD.
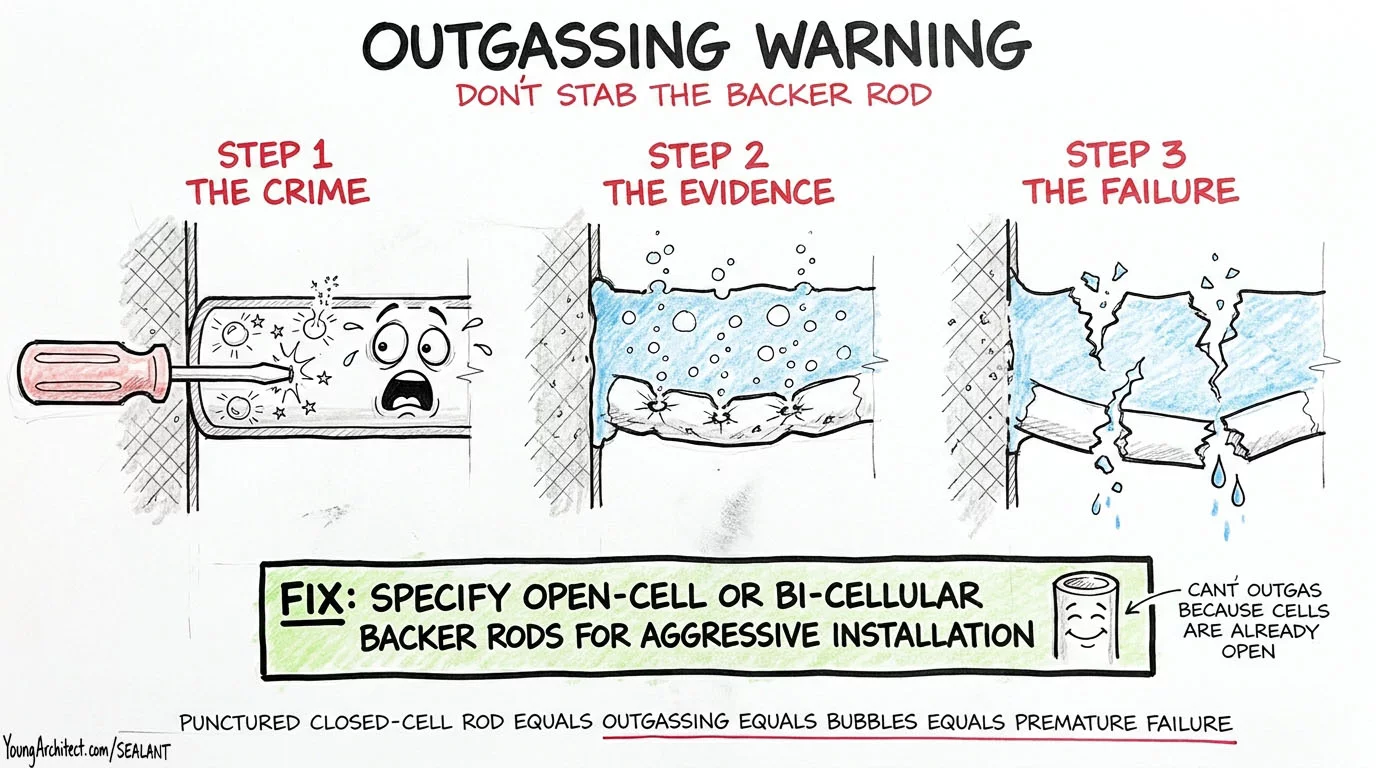
If a contractor jams a closed-cell backer rod into a tight joint with a sharp tool, like a screwdriver or a utility knife, they rupture the sealed cells. The trapped gas escapes straight up into the wet sealant sitting on top, and it blows bubbles and hollow voids through the entire bead.
That is not just ugly. Those voids are weak points where the sealant tears the moment the joint moves.
The fix: if aggressive installation conditions are likely, specify open-cell or bi-cellular backer rods. Their cells are already open, so they cannot outgas.
Backer Rod Sizing
Sizing is straightforward. The backer rod should be about 25 percent larger than the joint width, so it compresses and holds itself in place without falling deeper into the joint.
Bond Breaker Tape
What if the joint is too shallow for a backer rod?
Then you use bond breaker tape instead. It is a thin polyethylene tape that runs across the back of the joint. Same purpose: keep the sealant from sticking to the back so it stays a two-sided bond.
Sealant Joint Width and Depth
Now let’s talk proportions, because the width-to-depth ratio is what makes or breaks a joint.
The dimensional rules come straight from ASTM C1193, the industry standard for joint design:
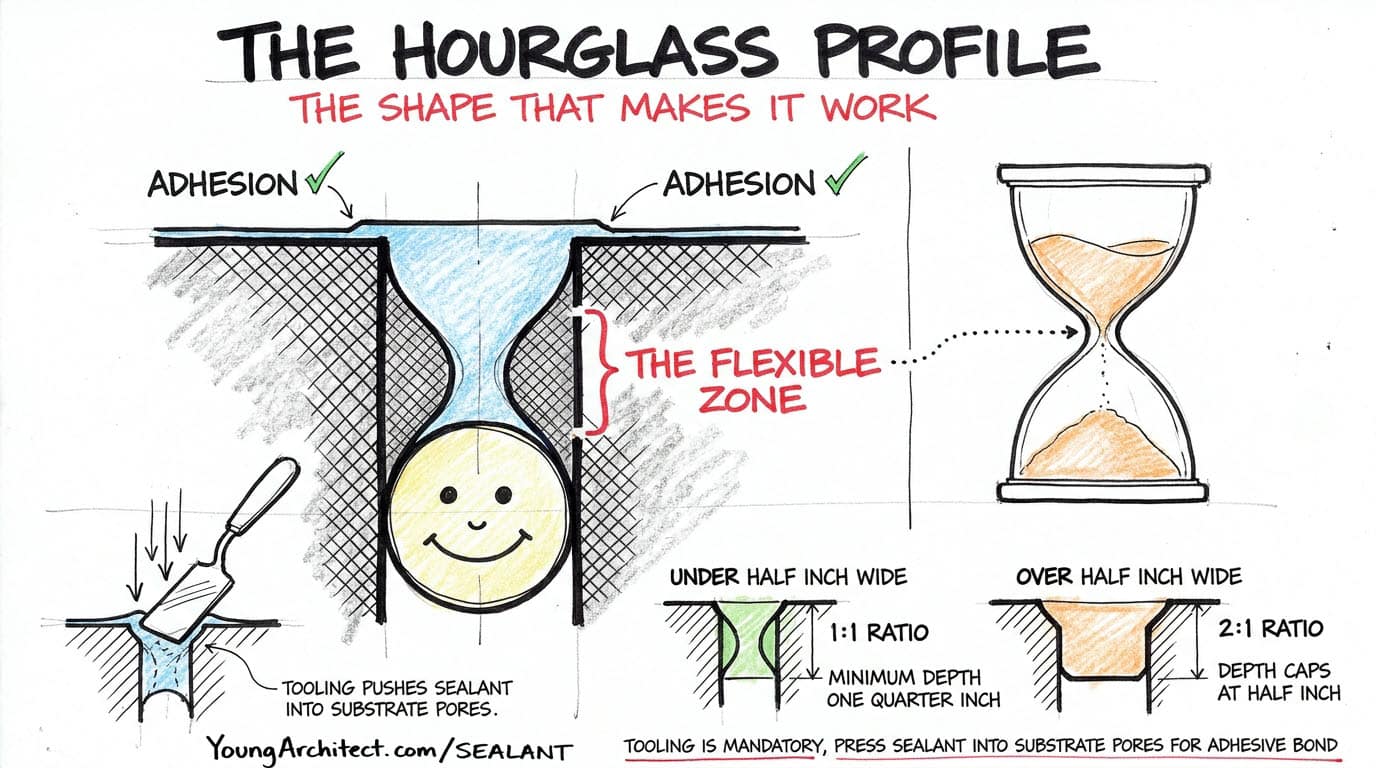
- Minimum joint size is 1/4 inch wide by 1/4 inch deep. Never go below that.
- For joints up to 1/2 inch wide, the depth equals the width. That is a 1:1 ratio.
- For joints over 1/2 inch wide, the depth drops to about half the width. That is a 2:1 ratio.
- The maximum depth caps at 1/2 inch, no matter how wide the joint gets.
So a one-inch-wide expansion joint should still only be a half-inch deep. Make it any deeper and the internal stresses get too high, and the sealant tears itself apart when the joint expands.
Here is why the backer rod matters so much for this geometry. When the sealant gets pressed against the round surface of the backer rod, it forms an hourglass shape. That thin waist in the middle is the flexible zone, the part that stretches and compresses as the joint moves. Like a rubber band, the thinner middle has the freedom to elongate without pulling off the sides.
But the hourglass shape does not happen on its own. It takes a step called tooling.
Tooling is mechanically vital, not a cosmetic finishing step. When the installer fires sealant out of the gun, it comes out as a loose, round bead sitting on top of the joint. Tooling presses it into place, and it does three jobs at once:
- Forces air pockets out of the wet sealant
- Presses the sealant against the backer rod to form the hourglass
- Drives the material into the microscopic pores of the substrate for a real adhesive bond
If the joint is not tooled, the sealant just sits on the surface without really grabbing on, and it eventually fails.
One more thing before we move on. Sealant is the first line of defense at a joint, but it should never be the only one. Good envelope design assumes some water will eventually get past the outer seal, and it provides drainage, flashing, and weeps behind it. The sealant keeps the bulk of the water out, and the backup system handles the rest. If you want to go deeper on how that water moves through and damages a building, the Whole Building Design Guide has a solid overview of moisture dynamics in buildings.
Three-Sided Adhesion
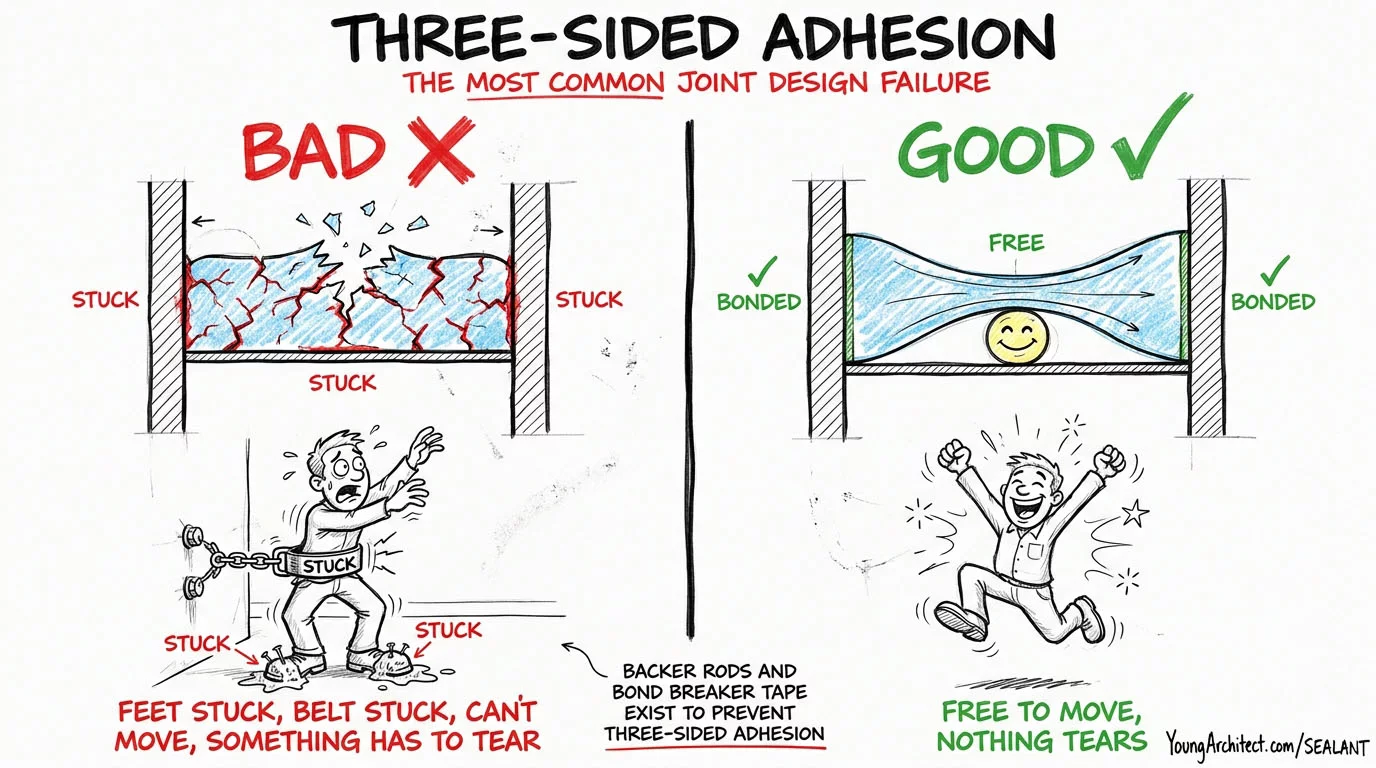
And that brings us to the single most common joint design failure. Three-sided adhesion.
In a properly designed joint, the sealant sticks to the two sides only. The backer rod or bond breaker tape keeps it off the back. That gives the sealant the freedom to stretch and compress between the two sides as the joint moves.
But if the sealant bonds to both sides and the back, it is locked in place. It has nowhere to go when the joint opens up. Something has to tear.
Picture trying to jump while someone holds both your shoes and your belt. Your feet are anchored. Your waist is anchored. You cannot move.
I know that is a weird visual, but once you picture it, you never forget it. And you will never design a three-sided joint again.
Same thing happens to sealant stuck to three surfaces. The joint opens, the sealant cannot stretch, and it rips. Either it tears internally (cohesion failure) or it peels off a surface (adhesion failure). Either way, the joint leaks.
That is the entire reason backer rods and bond breaker tape exist. Their job is to make sure the sealant only bonds to two sides.
How Sealants Show Up on the ARE
Sealants are not a one-question topic. They touch multiple objectives across two divisions.
On PDD, this content shows up under detailing architectural systems like curtain walls and windows (Objective 1.1), integrating multiple building systems where they meet at a joint (1.5), documenting expansion joints and other systems (2.3), and selecting and specifying materials (3.2).
On PPD, it connects to selecting building envelope systems and materials based on environmental conditions (Objective 3.4), which is exactly what you are doing when you match a sealant chemistry to its exposure.
Its important to understand how to match the right sealant to what is moving, what it is touching, and what it is exposed to, and then detail the joint correctly.
This also overlaps with how building construction types and assemblies come together, since every place two systems meet is a joint that needs the right seal.
Sealant Recap: Five Personalities
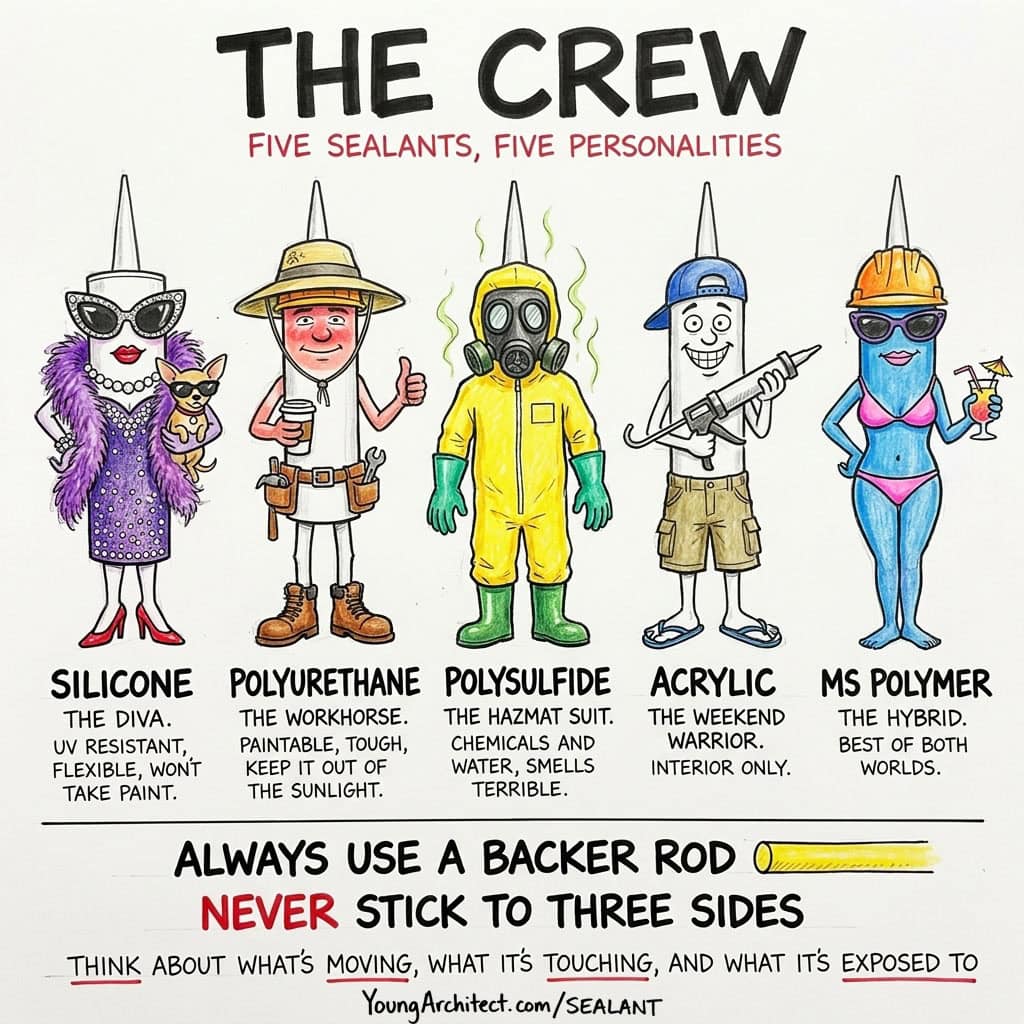
Let’s lock it in. Five sealants, five personalities:
- Silicone, the Diva. UV resistant, flexible, lasts forever, will not take paint. Specify neutral cure for metals and stone.
- Polyurethane, the Workhorse. Paintable, tough, great adhesion, but keep it out of direct sun. Your go-to for window perimeters and concrete expansion joints.
- Polysulfide, the Hazmat Suit. Chemical resistance and underwater performance, smells like rotten eggs. Airports, gas stations, pools.
- Acrylic, the Weekend Warrior. Cheap and easy, but interior only. Never on a building envelope.
- MS Polymer, the Hybrid. Paintable like polyurethane, UV stable like silicone. The best of both worlds.
And the joint design rules:
- Always use a backer rod to control depth and prevent three-sided adhesion.
- Keep depth at half the width once you are past a half inch, and cap it at a half inch.
- Tool the joint. Always.
- Never let sealant bond to three sides.
Think about what is moving, what it is touching, and what it is exposed to, and you will pick the right sealant every time.
Study Building Envelope Detailing With Young Architect
This post is a small taste of what we do at Young Architect.
If you want to go deeper on building envelope detailing and material selection, that is what our courses and programs are built for. The fastest way in is the ARE Boot Camp, our 10-week coaching program that gives you a study plan, accountability, and a community of candidates working through the exams alongside you. It is more than study materials. It is the structure that keeps you actually studying instead of trying to figure out what to study.
If you would rather go self-paced, the ARE 101 Membership gives you access to every one of our courses for one low monthly price, cancel anytime. For this topic specifically, start with:
- PDD 101, the primary course for detailing, material selection, and joint design
- PPD 101 for building envelope systems and material selection
- Building Codes 101 for the code requirements that drive material decisions
- CDT® 101 if you want to nail specifications and how products like sealants get organized in the project manual

Now go pass this exam.
Frequently Asked Questions
What is the difference between caulk and sealant?
Caulk is the consumer and hardware store term, while sealant is the professional and specification term. There is a technical difference too. Caulk traditionally refers to rigid, low-movement fillers used on interior trim and baseboards. Sealant refers to flexible, high-performance products designed to handle the real movement a building goes through. On any commercial project, the spec book says sealant.
Can you paint silicone sealant?
No. Silicone sealant cannot be painted. The paint beads up and rolls right off the silicone surface instead of adhering. If you need a paintable joint, use polyurethane or MS polymer instead. Silicone is best where the joint stays exposed and does not need to match a finish, like glass-to-glass connections, curtain walls, and structural glazing.
What is a backer rod used for?
A backer rod is a foam rod inserted into a joint before the sealant. It does two jobs. It controls the depth of the sealant so you get the correct width-to-depth ratio, and it prevents three-sided adhesion by keeping the sealant from bonding to the back of the joint. That lets the sealant bond to only the two sides, giving it the freedom to stretch and compress as the joint moves.
What is the best sealant for concrete expansion joints?
Polyurethane sealant is the standard choice for concrete expansion joints. It bonds well to concrete, resists abrasion from foot and vehicle traffic, and is paintable. For joints exposed to harsh chemicals or constant water immersion, polysulfide is the better alternative. Always pair the sealant with a properly sized backer rod to control depth and prevent three-sided adhesion.
What is the difference between silicone and polyurethane sealant?
Silicone is UV resistant and lasts 20 years or more, but it cannot be painted. Polyurethane is paintable and highly abrasion resistant, but it degrades in direct sunlight without protection. Use silicone for exposed glass and curtain wall joints. Use polyurethane for window perimeters, concrete expansion joints, and any joint that needs to be painted to match the surrounding finish.