
Every wall assembly has to manage three things: bulk water, air leakage, and vapor diffusion. A vapor barrier, an air barrier, and a weather resistive barrier each handle one of those jobs, but most people confuse them or use the wrong term entirely.
This guide breaks down how each moisture barrier type works, where it goes in your building envelope, and the critical placement rules that prevent condensation, mold, and rot inside your walls.
This podcast is also available on YouTube, Spotify, and Apple Podcasts
What is a Building Envelope?
The building envelope is everything that separates inside from outside. Walls, roof, foundation, windows, doors. It’s the boundary, and its job is to control what passes through it.
When it comes to moisture, the envelope is fighting three different battles at the same time:
- Bulk water (rain, snow, wind-driven moisture hitting the exterior)
- Air movement (uncontrolled air leaking through cracks and gaps in the assembly)
- Moisture vapor (water in gas form slowly diffusing through solid materials)
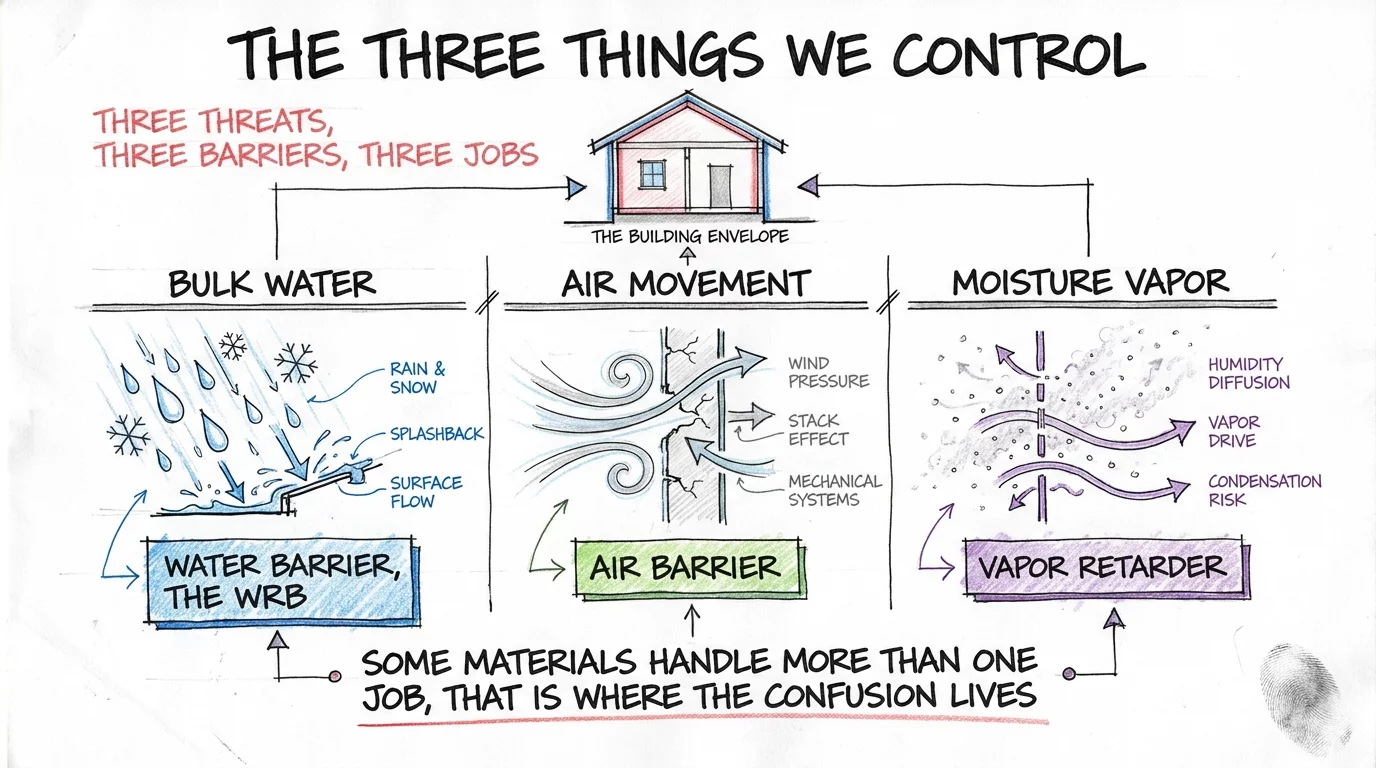
Each one has its own barrier, its own materials, and its own rules for where it goes in the wall. They’re not interchangeable. A water barrier doesn’t stop vapor. Meanwhile, a vapor barrier doesn’t stop rain. And an air barrier does something completely different from both.
Here’s where the confusion starts:
some materials handle more than one job at once.
For example, closed-cell spray foam is an air barrier, a vapor retarder, and insulation all in one. Meanwhile, house wrap is a water barrier and sometimes an air barrier, but definitely not a vapor barrier. That overlap between materials is exactly why this topic trips people up on the exam.
One more thing before we get into it. You’ll hear the term “moisture barrier” constantly in the real world. On job sites, in product marketing, even from experienced contractors.
The problem is it’s imprecise.
It could mean a vapor retarder, a water barrier, or honestly the person saying it might not know what they mean.
Throughout this post, we use the correct, specific terms so you know exactly what’s being discussed.
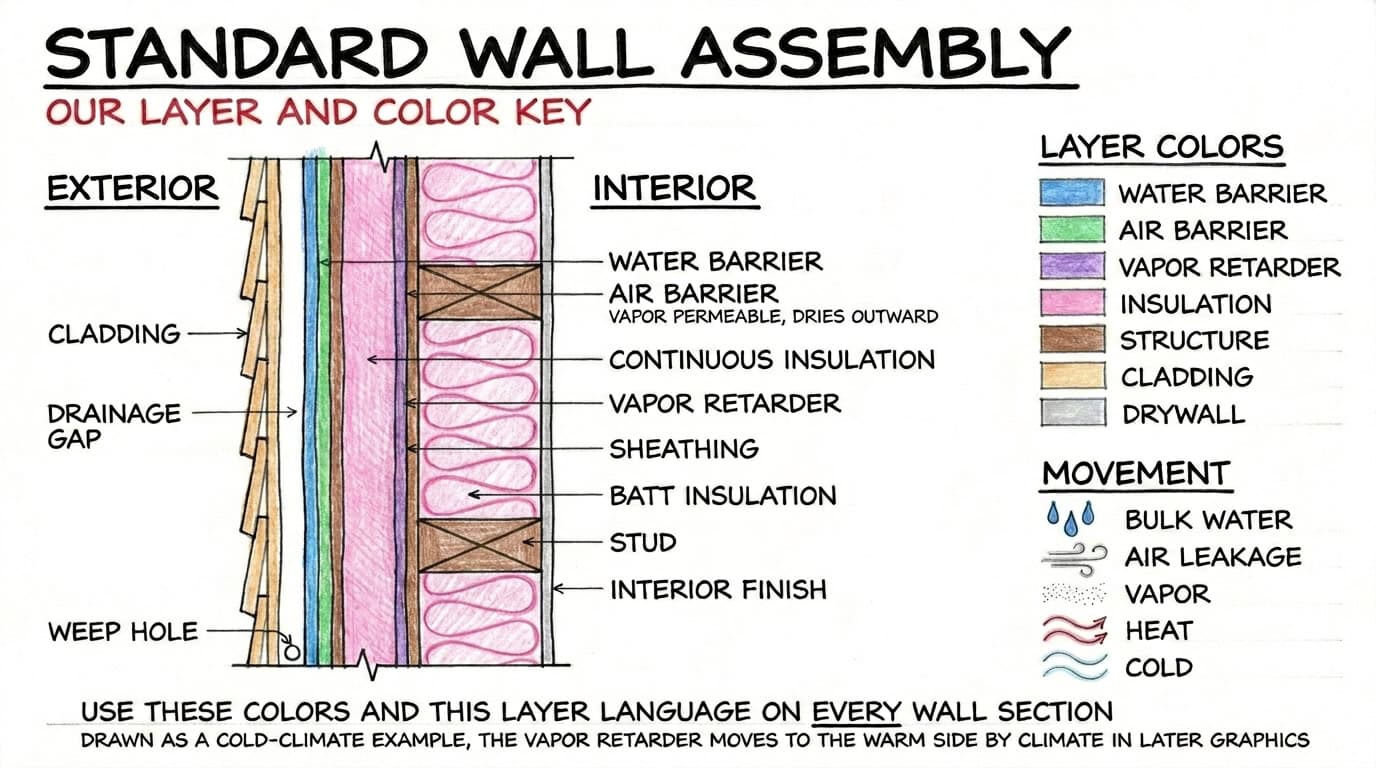
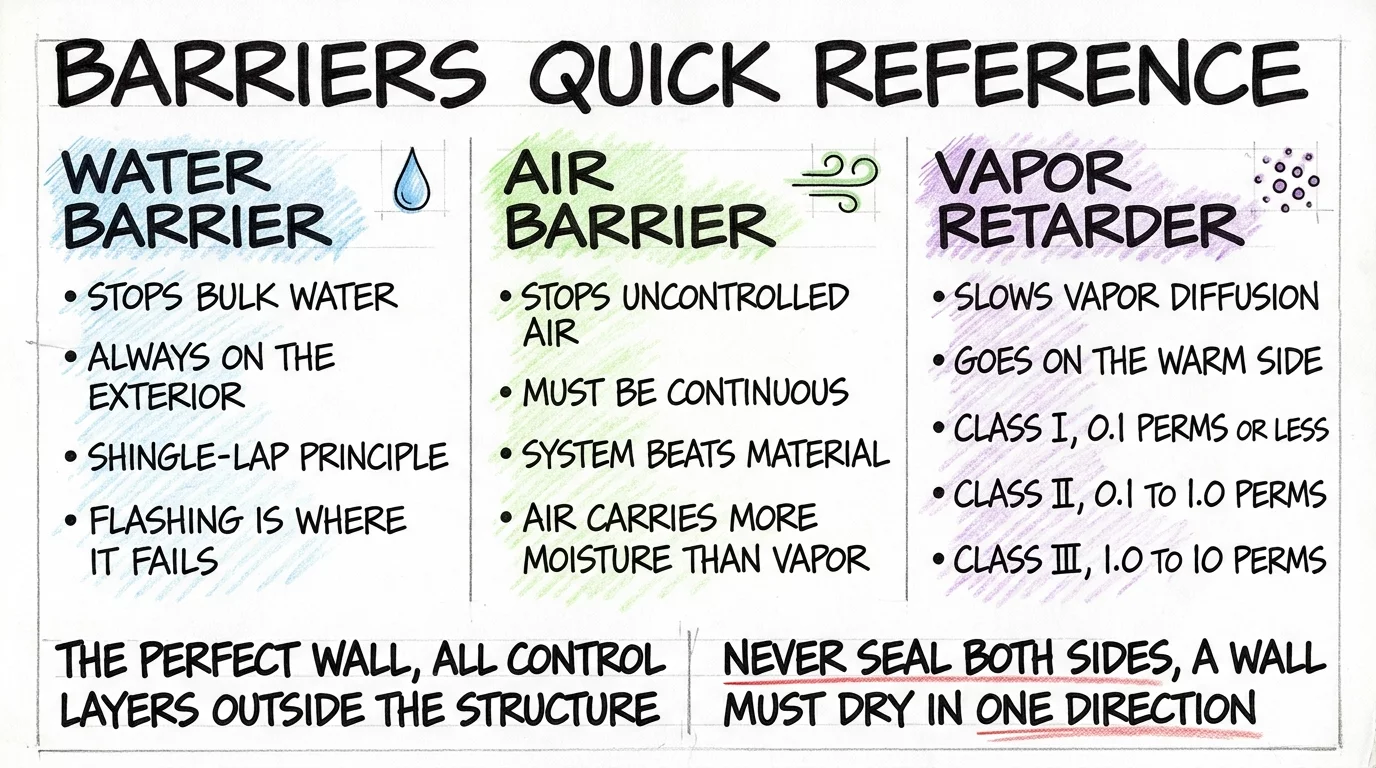
Water Barriers and Weather Resistive Barriers
A water barrier does exactly what it sounds like. It stops bulk water from getting into the wall assembly. Rain, snow, wind-driven moisture. The big, obvious stuff.
You’ll also see this called a weather resistive barrier (WRB) or water resistive barrier. Same concept, different names. Both terms show up on the ARE, so know them both.
The most common WRB materials include:
- House wrap (Tyvek is the brand name everyone knows, but it’s just one type of building wrap)
- Building paper (tar paper, asphalt-saturated felt)
- Fluid-applied membranes (liquid coatings that cure into a seamless barrier)
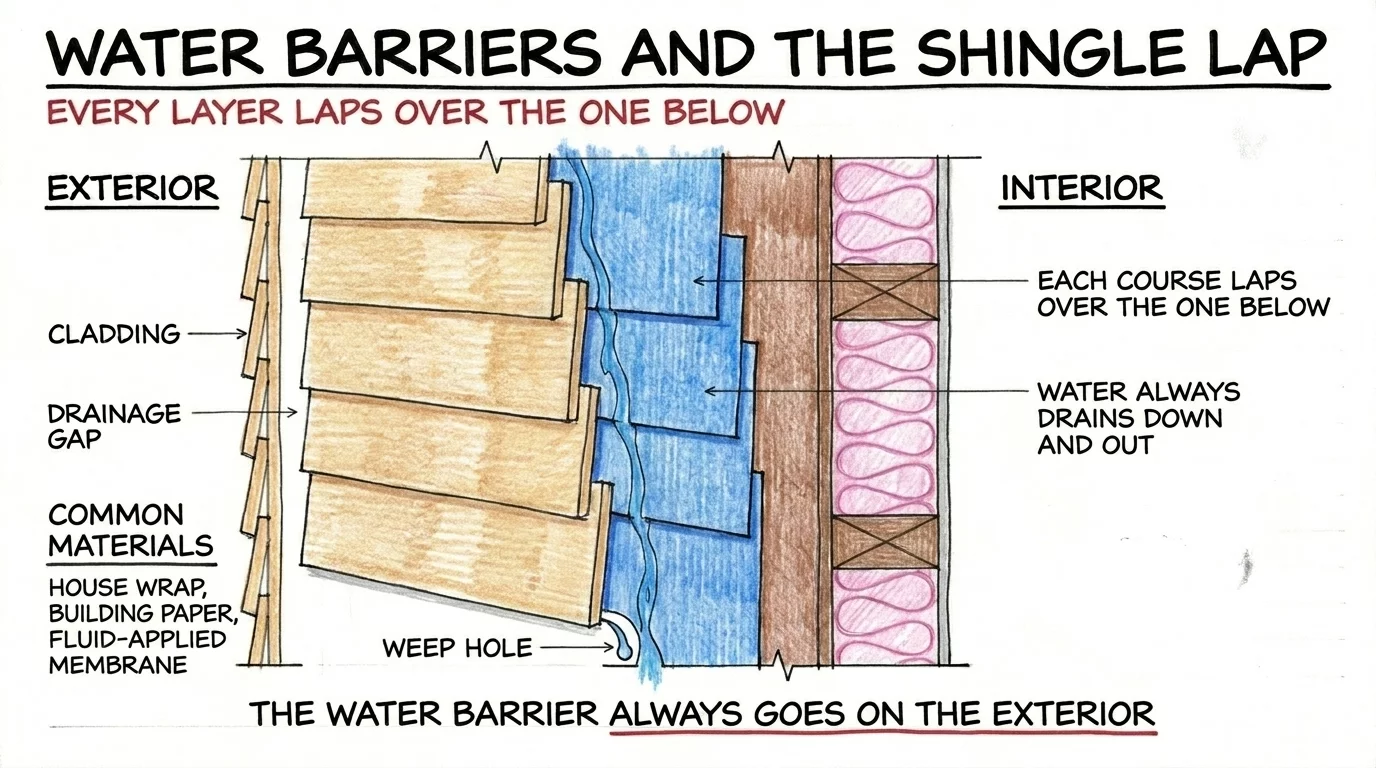
Water barriers always go on the exterior side of the wall assembly. Rain comes from outside, so the barrier goes outside. This one is straightforward.
The key principle that governs every water barrier installation is the shingle-lap principle. Every layer overlaps the one below it so water runs down and out. Think of roof shingles. Each row overlaps the row beneath it, and water follows gravity to the ground.
Every piece of house wrap, every strip of flashing, every layer of building paper follows this same rule. Water always has a downward path to the outside.
Drainage Planes and Rainscreen Systems
Between the cladding (the exterior finish material you see from outside) and the WRB, there’s typically a small gap. That gap is the drainage plane.
Water will always find a way past the cladding. Wind-driven rain gets behind siding. Moisture migrates through mortar joints in brick. The cladding is the first line of defense, but it’s not watertight. It was never designed to be.
So when water gets past the cladding, it hits the WRB and drains down by gravity through the drainage plane. It exits the wall through weep holes at the bottom. Cladding deflects most of the water, and the WRB with its drainage plane catches the rest.
That’s a two-stage system.
That air gap also serves as a capillary break. Water can defy gravity and wick itself inward through tiny cracks via capillary action, the same way water climbs up a paper towel. The air gap breaks that surface tension and stops capillary movement cold. This concept shows up on the ARE, so recognize the term when you see it.
A rainscreen takes the drainage plane concept further. Instead of just a gap, the cavity behind the cladding is ventilated. Air moves through it. As a result, water drains down AND the cavity dries through airflow. It’s a more active, more effective system. In practice, this ventilated gap is typically created using furring strips (wood or metal) installed over the WRB, with the cladding attached to those furring strips. That’s the physical detail you’d see in a PDD wall section.
For the exam, know three levels of water management:
- Face-sealed assembly – No gap. The cladding is supposed to stop everything by itself. Most vulnerable to failure because there’s no backup plan when the cladding leaks.
- Drained assembly – Gap behind the cladding. Water drains down and out through weep holes. Much better.
- Rainscreen assembly – Ventilated gap. Water drains AND the cavity dries through airflow. Most robust system.
There’s also a pressure-equalized rainscreen, where the cavity pressure is designed to match outside air pressure. This reduces the pressure difference that drives rain into the wall in the first place. Know it exists and that it’s the most effective water management strategy.

Flashing and Water Intrusion
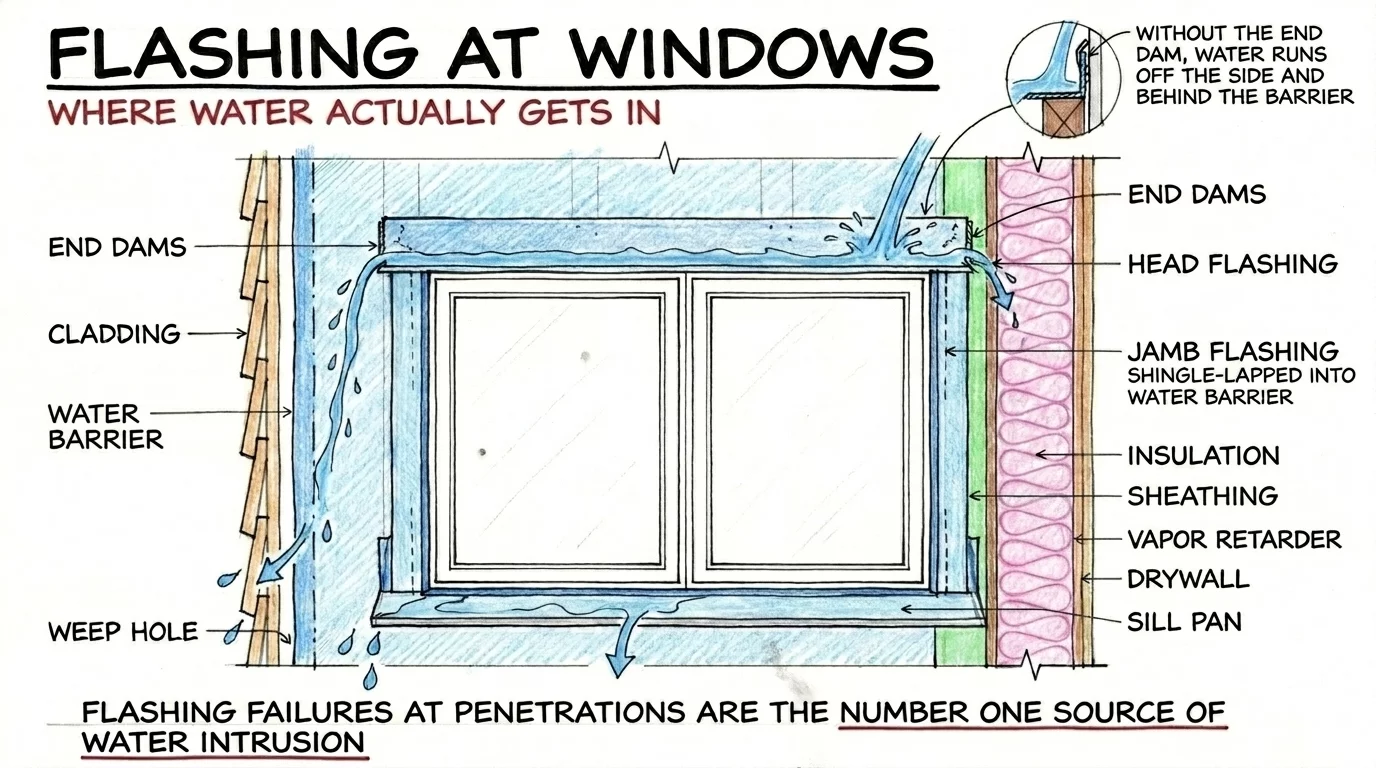
You can have the most perfect WRB installation on the planet and it can still fail. The reason is almost always flashing.
Flashing failures at penetrations are the number one source of water intrusion in buildings. Not the middle of the wall, but the transitions. Windows, doors, deck ledgers, utility penetrations.
Every hole cut in the water barrier for a window or pipe creates a potential entry point. Flashing bridges the gap between the WRB and the penetration, and it has to integrate with the shingle-lap system.
One more detail the exam loves to test: end dams. Head flashing without an end dam lets water run off the sides and behind the WRB. End dams are small upturned edges at the ends of the head flashing that force water outward instead. Small detail, big difference.
When a water barrier system fails, it almost never fails in the middle of the wall. It fails at transitions and penetrations. Remember that.
Window Flashing Installation Sequence
The installation sequence for window flashing matters, and it follows one rule: bottom up.
- Sill pan flashing goes in first (at the bottom of the window opening)
- Jamb flashing goes next, lapping over the sill pan
- Head flashing goes on top, lapping over the jambs
- Finally, the top flap of the WRB folds down over the head flashing
Each layer shingles over the one below it. That’s the shingle-lap principle applied to a real window installation. If you can remember “bottom up,” you understand the sequence.
But here’s the thing. Rain isn’t actually the biggest moisture threat to your wall. Air is.
Air Barriers Explained
Here’s the single most important fact in this entire post:
Air leakage can carry up to 100 times more moisture into a wall assembly than vapor diffusion.
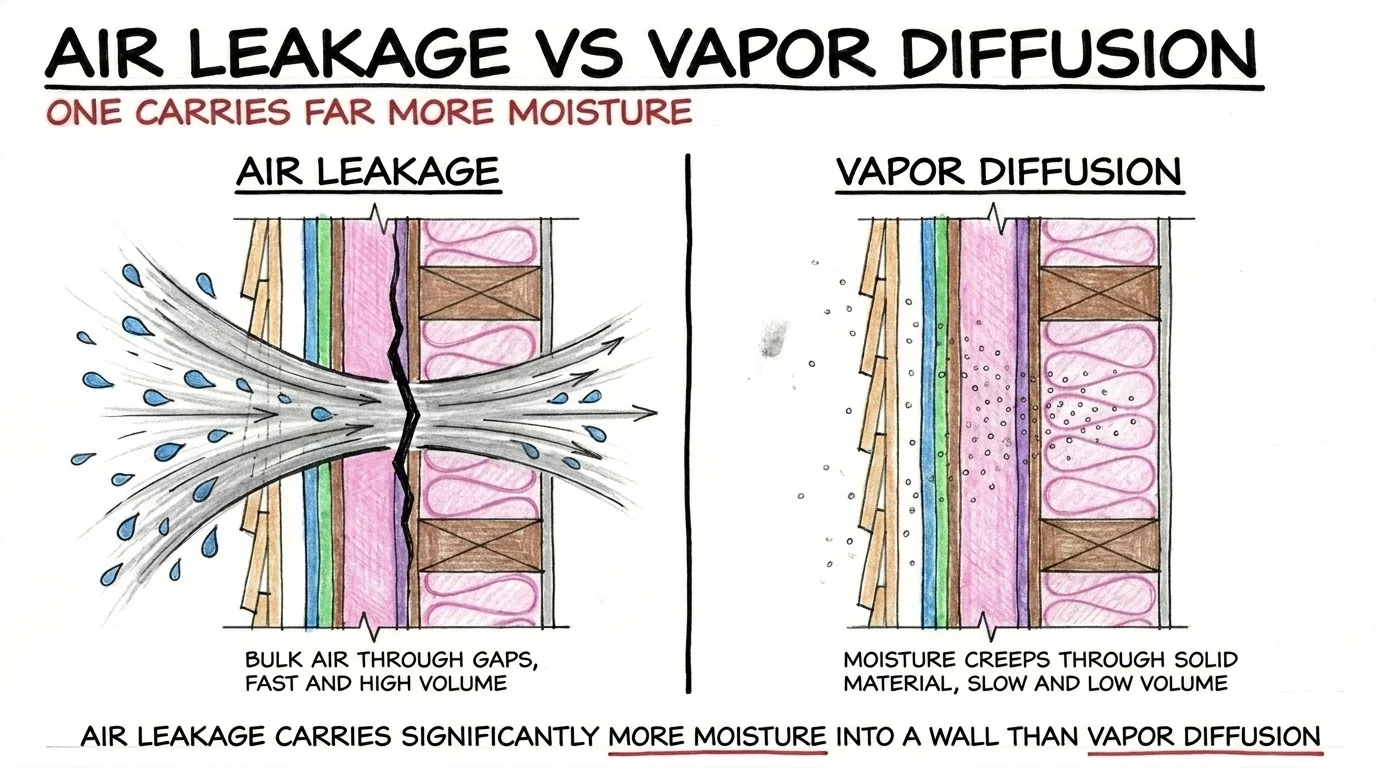
Read that again. Air leakage through the wall is a far bigger moisture problem than vapor slowly diffusing through materials.
This is heavily tested on the ARE, and it changes how you think about the entire assembly. In most wall assemblies, the air barrier is the most critical moisture control layer you have.
An air barrier stops uncontrolled air movement through the wall assembly.
Not all air movement, because buildings need ventilation and that’s handled by the mechanical system. Instead, the air barrier targets uncontrolled leakage through cracks, gaps, and unsealed penetrations.
Unlike water barriers (which always go on the exterior), air barriers can go on the interior or exterior depending on the design. Taped exterior sheathing works. A sealed interior layer works.
Both are valid approaches.
However, in practice, exterior air barriers are generally preferred for commercial construction because there are far fewer intersecting obstacles to seal around.
Interior air barriers mean sealing around every partition wall intersection, every floor joist, and hundreds of electrical outlets. Regardless of location, the priority is always continuity.
Common air barrier materials include:
- Taped sheathing (plywood or OSB with all joints taped)
- Spray foam insulation
- Membranes (sheet or fluid-applied)
- Drywall (yes, drywall, if every joint, outlet box, and penetration is properly sealed)
The material itself isn’t the hard part. A lot of common building materials resist air movement just fine. The hard part is sealing every single connection, transition, and penetration. Which brings us to the most important distinction in this section.
Air Barrier Material vs Air Barrier System
A sheet of material might resist air movement perfectly when you test it on a table in a lab. But that doesn’t make it an air barrier system.
The system is the material plus all the tape at seams, sealant around penetrations, gaskets at electrical outlets, and detailing at every window, door, and transition. Specifically, every single connection has to be addressed.
Think of a swimming pool. You can build the pool out of the most waterproof concrete on earth, but if you leave a one-inch crack around the drain, the pool empties. The material didn’t fail. The system failed.
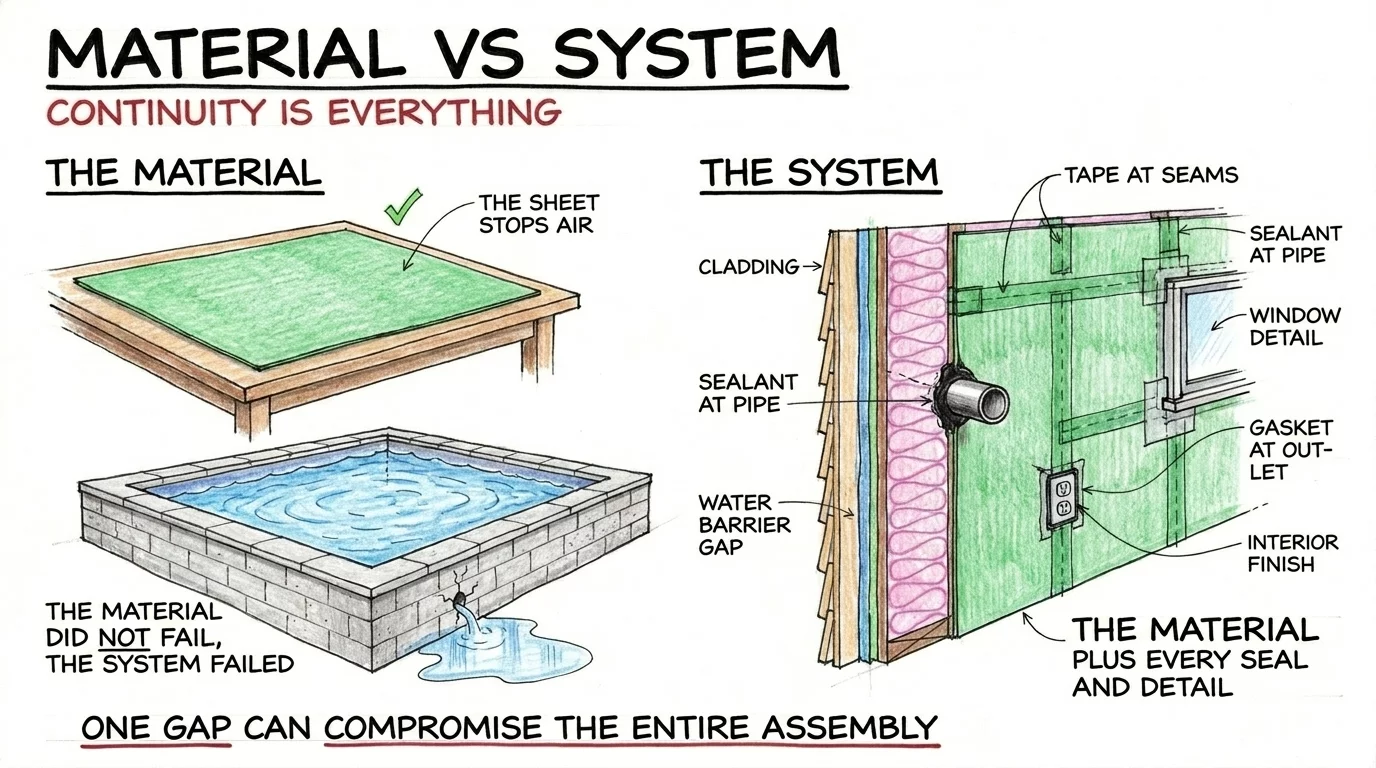
Continuity is the number one priority for air barriers. The air barrier must be continuous across the entire building envelope. It doesn’t stop at the floor line. There’s no gap at the roof transition. Every penetration is sealed and integrated into the system.
One gap can compromise the entire assembly. Air finds the path of least resistance, and it only takes one unsealed penetration to create a moisture pathway through the wall.
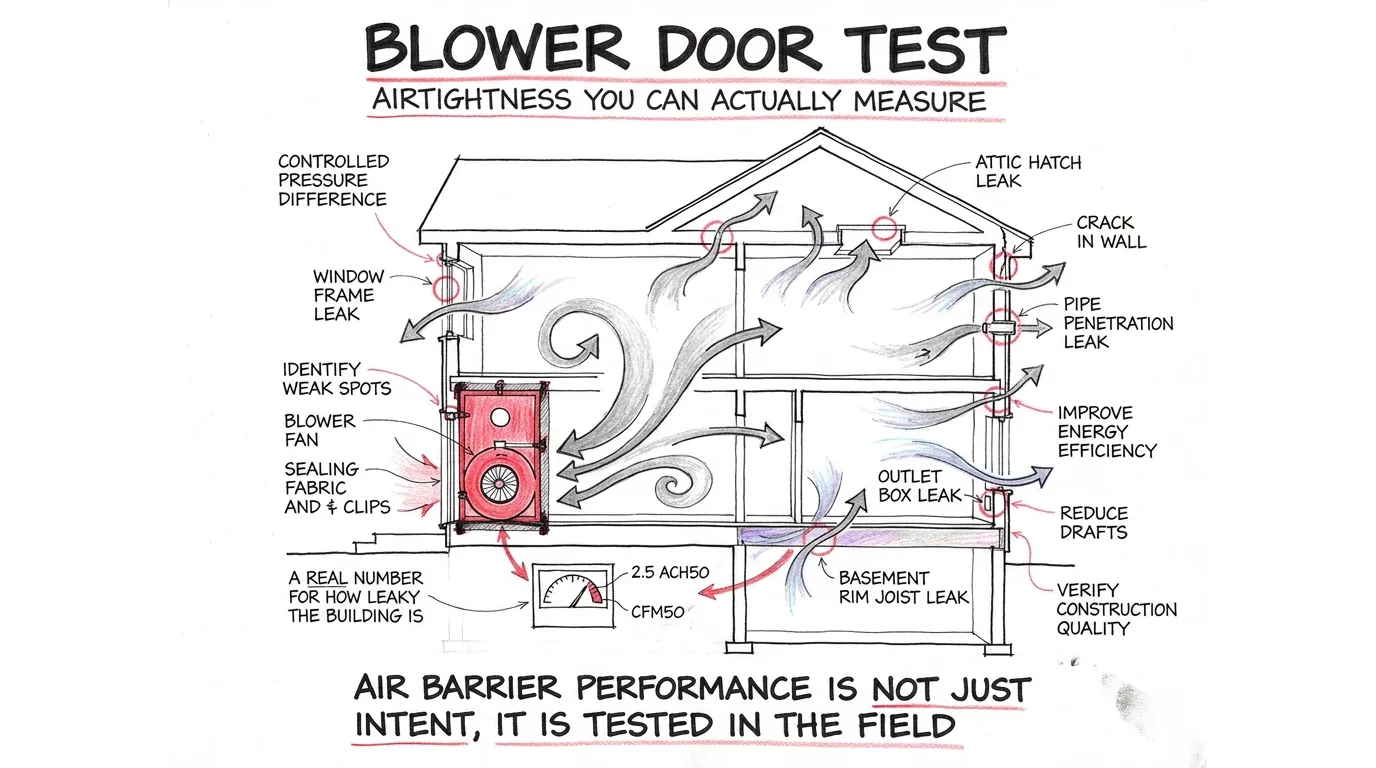
Blower Door Testing
So how do you actually verify that an air barrier system is working?
A blower door test pressurizes or depressurizes the building and measures how much air leaks through the envelope. It gives you a real, measurable number for how airtight the building actually is.
The standard metric is ACH50 (Air Changes per Hour at 50 Pascals of pressure). If you see ACH50 in a case study or exam question, recognize it as the measurement for air barrier performance.
This matters because air barrier performance isn’t just a design intention or a line on the drawings. It’s something you can test and verify in the field. A blower door test tells you whether the air barrier system was installed correctly, or whether there are gaps that need to be found and sealed.
Air Barrier vs Vapor Barrier
Now that you understand both air barriers and water barriers, there’s a critical overlap to sort out before we get to vapor.
Some air barriers are vapor-permeable. They stop air movement but let moisture vapor pass right through. Certain building wrap products work this way. They block air but breathe.
On the other hand, some air barriers are vapor-impermeable.
They stop air AND stop vapor. Polyethylene sheet is a common example. It blocks both.
This distinction matters when you’re designing the complete wall assembly. A great air barrier that also traps vapor on the wrong side of the wall creates a completely different moisture problem. You’ve solved one issue and accidentally created another.
The key takeaway: air barrier vs vapor barrier is not an either-or question. Every wall needs both functions. The real question is whether they come from the same material or different ones, and whether the vapor control is in the right location for the climate.
Vapor Barriers and Vapor Retarders
Let’s start with a terminology fix that will save you on the exam.
“Vapor retarder” is the technically correct umbrella term. Almost no material is 100% impermeable to moisture vapor. “Barrier” implies it stops vapor completely, which isn’t quite accurate.
In reality, a vapor barrier is a specific type of vapor retarder, the most impermeable classification (Class I, 0.1 perms or less).
All vapor barriers are vapor retarders, but not all vapor retarders are vapor barriers.
NCARB has used both terms on the ARE. “Vapor retarder” is broader and more precise. “Vapor barrier” refers specifically to Class I materials.
When the exam says “vapor retarder,” it could mean any class. When it says “vapor barrier,” it means the most restrictive category.
People also say “moisture barrier” when they mean vapor retarder. That term is even less precise because it could refer to a water barrier, a vapor retarder, or the speaker might just be guessing. For exam purposes, stick with the specific terms.
How Vapor Diffusion Works
So what does a vapor retarder actually do? It slows the diffusion of moisture vapor through building materials.
This is fundamentally different from what an air barrier does.
Air leakage is bulk air physically moving through gaps and cracks.
Vapor diffusion, on the other hand, is a slow, molecular process where moisture migrates through solid materials from areas of high concentration to low concentration. No gaps needed. No cracks needed. Vapor pushes through the material itself. The scientific term for this driving force is vapor pressure differential. If you see that phrase in an exam question, it’s referring to the pressure difference that causes vapor to move through materials.
Here’s a simple rule of thumb for exam day:
moisture always moves from MORE to LESS.
High pressure to low pressure.
High temperature to low temperature.
High humidity to low humidity.
If a question asks which direction vapor drive is moving in January in Chicago, ask yourself: “Where is it warmer and more humid?” Inside. That’s the direction of vapor drive. Warm, humid indoor air pushes outward toward the cold, dry exterior.
Even with a perfect air barrier that eliminates all air leakage, vapor can still slowly work its way through the wall through the materials themselves. That’s why you need both an air barrier and a vapor retarder. They solve different problems.
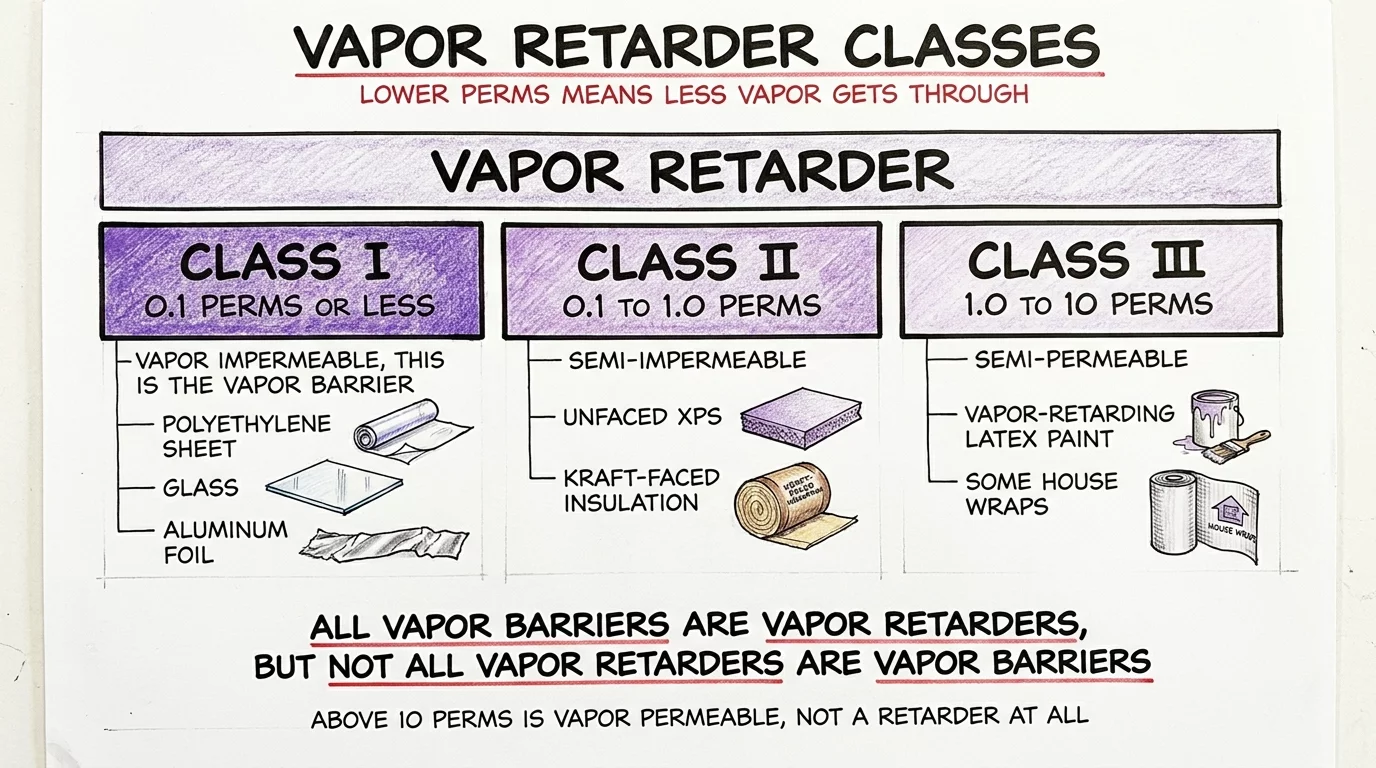
Perm Ratings and Vapor Retarder Classes
A perm rating measures how much moisture vapor a material allows to pass through it. A lower number means less vapor gets through, while a higher number means the material breathes more.
There are three classes of vapor retarders, plus one category above them:
Class I: 0.1 perms or less. Vapor impermeable. This is the closest thing to a true “vapor barrier.” These materials essentially stop vapor movement. Examples include polyethylene sheet, glass, aluminum foil, and foil-faced polyisocyanurate insulation.
Class II: 0.1 to 1.0 perms. Vapor semi-impermeable. Materials in this range slow vapor significantly but don’t stop it completely. Examples include unfaced XPS insulation board at typical thicknesses and kraft-faced insulation (the paper facing on fiberglass batts).
Class III: 1.0 to 10 perms. Vapor semi-permeable. Materials here slow vapor modestly. One example is vapor-retarding latex paint or primer. Important distinction: not just any standard interior latex paint qualifies. It needs to be a product specifically rated for vapor retarding.
Above 10 perms: Vapor permeable. No longer classified as a retarder at all. Standard house wrap, unpainted drywall, and similar materials fall into this range. Because these don’t meaningfully slow vapor movement, they let the wall breathe. That’s often by design.
One note on rigid foam facings that trips people up: foil-faced polyiso is a Class I vapor retarder (vapor impermeable). However, unfaced EPS or XPS varies by thickness and can fall into Class II or Class III. The facing makes a significant difference in how the material performs.
For the exam: three classes plus vapor permeable. Impermeable, semi-impermeable, semi-permeable, and permeable. Know the perm rating ranges and be able to recognize common materials in each class.
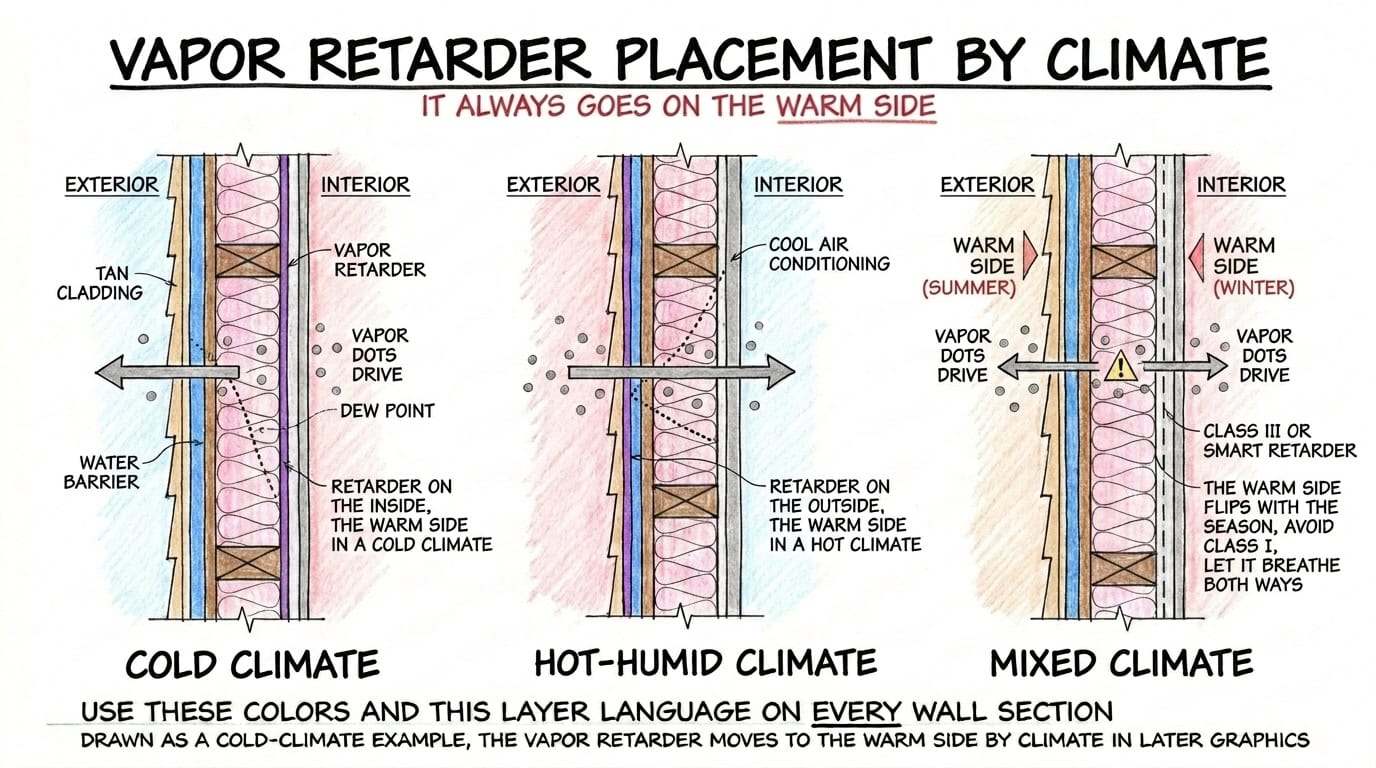
Vapor Retarder Placement by Climate
This is where most of the exam questions live. The warm-side rule: the vapor retarder goes on the warm side of the insulation. Why?
Because moisture vapor moves from warm, humid air toward cool, dry air.
The vapor retarder intercepts that movement before the vapor reaches a surface at or below the dew point.
The dew point is the temperature at which air can no longer hold its moisture, and vapor condenses back into liquid water. It’s not a fixed number, because it changes with humidity levels. If any surface inside the wall drops to or below the dew point, that’s where condensation forms. That condensation is the enemy, because it causes mold, rot, and long-term structural damage.
Cold climates: The warm side is the interior. The vapor retarder goes inside, between the drywall and the insulation. You’re stopping warm, moist indoor air from pushing outward through the wall toward the cold exterior.
Hot-humid climates: The warm side is the exterior. The vapor retarder goes outside, or you design a breathable assembly that allows moisture in walls to dry inward. You’re stopping hot, humid outdoor air from pushing inward toward the air-conditioned interior.
Mixed climates: This is where it gets tricky. The warm side changes with the seasons. In winter, vapor drive pushes outward. In summer, it pushes inward. A Class I retarder on either side solves one season’s problem while creating the other’s. As a result, the best approach in mixed climates is to avoid Class I entirely and let the assembly breathe in both directions.
Drying Potential and Building Codes
The International Energy Conservation Code (IECC) divides the US into climate zones, and the building code uses those specific zones to dictate whether a Class I, II, or III vapor retarder is required and where it goes. This is the code reference that connects building science to legal requirements. If the exam asks where to look it up, the IECC climate zone map is the answer.
The U.S. Department of Energy’s insulation guide includes a climate zone map and R-value recommendations by zone if you want to see exactly where your project falls. You can also reference the actual code language for vapor retarder requirements in IBC Section 1404.3 on the ICC’s free digital codes platform. It breaks down which vapor retarder class is required by climate zone.
Here’s the bigger principle behind all of this: drying potential. The golden rule of building envelope design isn’t just about stopping moisture from getting in. Moisture WILL get in.
Every wall gets some moisture eventually. Therefore, the wall must have the drying potential to let it out. A well-designed assembly can dry in at least one direction, either to the interior or the exterior. Design for drying, not just blocking.
Think of it like a winter jacket.
A jacket that traps all your sweat with zero breathability makes you wet first, then cold.
A good jacket blocks cold wind but has enough breathability to let moisture escape.
A wall works the same way. Slow vapor from the warm side, but let the wall dry in at least one direction.
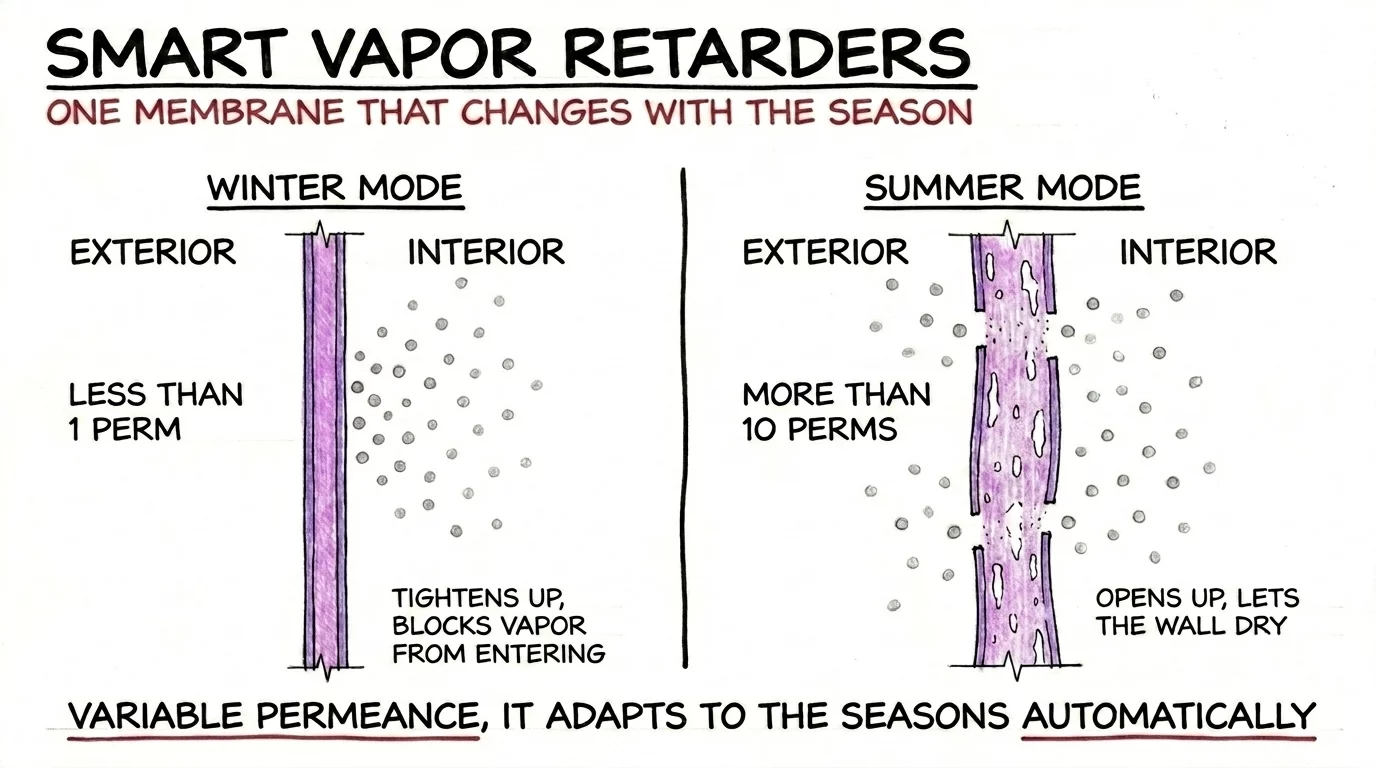
Smart Vapor Retarders
A smart vapor retarder is a variable permeance membrane that changes its perm rating based on the humidity level around it.
In winter, when indoor humidity is relatively higher and you need to keep vapor from pushing outward, the membrane tightens up and becomes more impermeable.
In summer, when the wall needs to dry and humidity conditions reverse, the membrane opens up and becomes more permeable.
It adapts to the seasons automatically. No one has to swap it out or adjust it. This makes it a clever solution for mixed climates where a fixed perm rating on either side of the insulation causes problems in one season or the other.
For the exam, know that the technology exists and why it was developed. You don’t need deep product knowledge or brand names. The concept is what matters: variable permeance solves the mixed-climate vapor retarder problem.
How Wall Assemblies Work Together
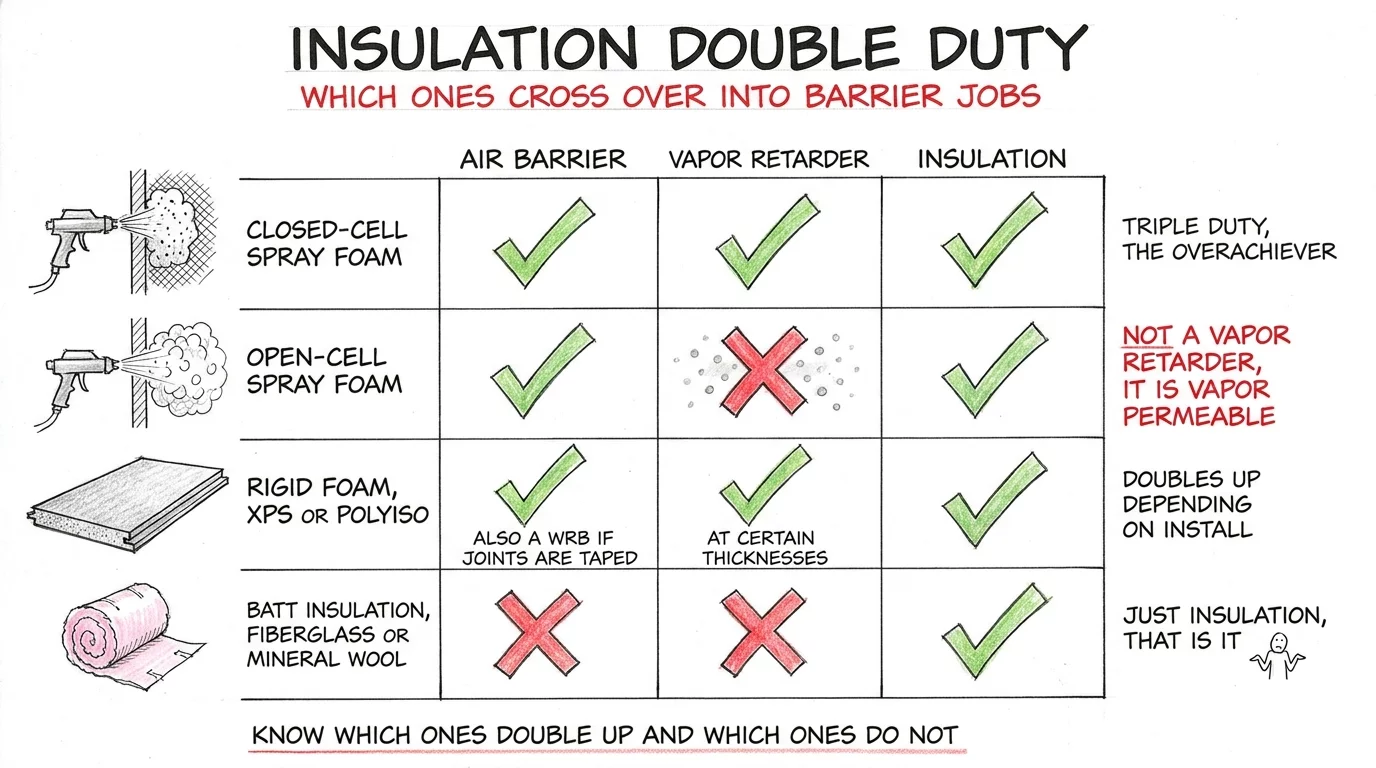
All three barrier functions (water, air, and vapor) have to work together in the same wall assembly. But they don’t always come from three separate layers. Some materials pull double or triple duty, and knowing which ones cross over is key for the exam.
Here’s a quick breakdown of how common insulation types perform across barrier functions:
Closed-cell spray foam: Air barrier + vapor retarder + insulation. Triple duty. This is the overachiever of building materials. It seals air, resists vapor, and insulates all in one application.
Open-cell spray foam: Air barrier + insulation. NOT a vapor retarder. Open-cell foam is vapor-permeable, and that’s a critical distinction for exam day.
Also important: open-cell spray foam only qualifies as an air barrier at adequate thickness, typically 3.5 to 5.5 inches depending on the manufacturer. A thin application won’t get the job done.
Rigid foam boards (XPS, polyiso): Can function as a WRB if joints are taped. Also a vapor retarder at certain thicknesses. Foil-faced polyiso is Class I (vapor impermeable), while unfaced EPS or XPS varies by thickness and can fall into Class II or Class III. Potentially a water barrier, vapor retarder, and insulation in one material.
Batt insulation (fiberglass, mineral wool): Just insulation. Not an air barrier. Not a vapor retarder. It resists heat flow and that’s it. Every other barrier function has to come from somewhere else in the assembly.
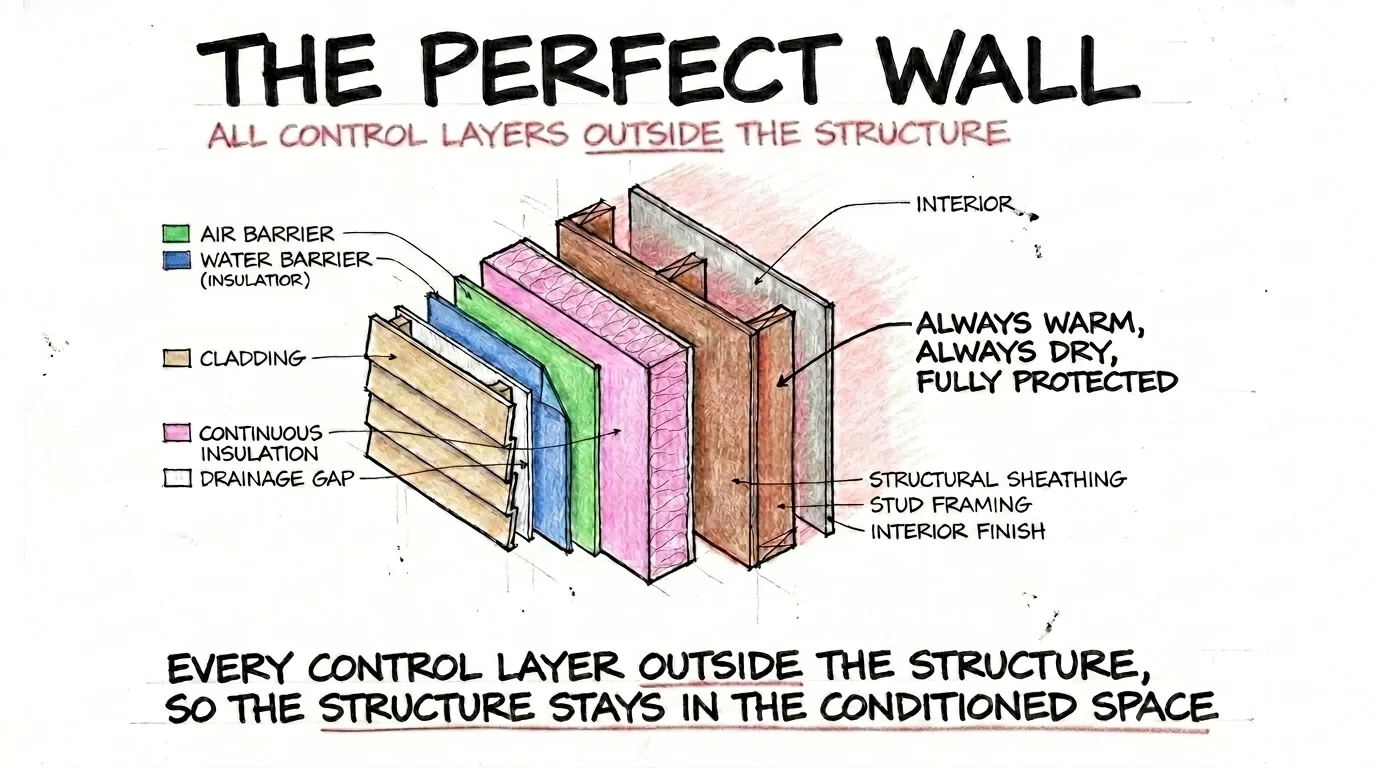
The Perfect Wall Concept
The ideal wall assembly puts all four control layers on the exterior side of the structure. Water barrier, air barrier, vapor retarder, and continuous insulation. All outside the structural framing.
The sequence matters. The control layers (water, air, vapor) go directly on the exterior sheathing. Then the continuous insulation goes outboard of those control layers. This order is intentional.
Placing the control layers behind the insulation keeps those membranes at the same temperature as the interior conditioned space. If the membranes never get cold enough to reach the dew point, condensation never forms on them.
In practice, those first three control layers (water, air, vapor) are often achieved with a single product, like a fluid-applied membrane sprayed or rolled directly onto the exterior sheathing.
In other words, the “perfect wall” doesn’t necessarily mean installing three separate physical sheets. One product can handle all three barrier functions, and then continuous insulation goes outboard of that.
Inside: the structure and interior finishes. The structural members sit inside the conditioned space, always warm and dry. Fully protected from temperature swings, moisture, and condensation.
That’s the concept behind the “perfect wall.” Structure stays conditioned. Control layers stay warm. Moisture problems get eliminated at the source.
For a deeper dive into the building science behind this concept, the original Perfect Wall paper by Joe Lstiburek at Building Science Corporation is the definitive resource on why this approach works in every climate zone.
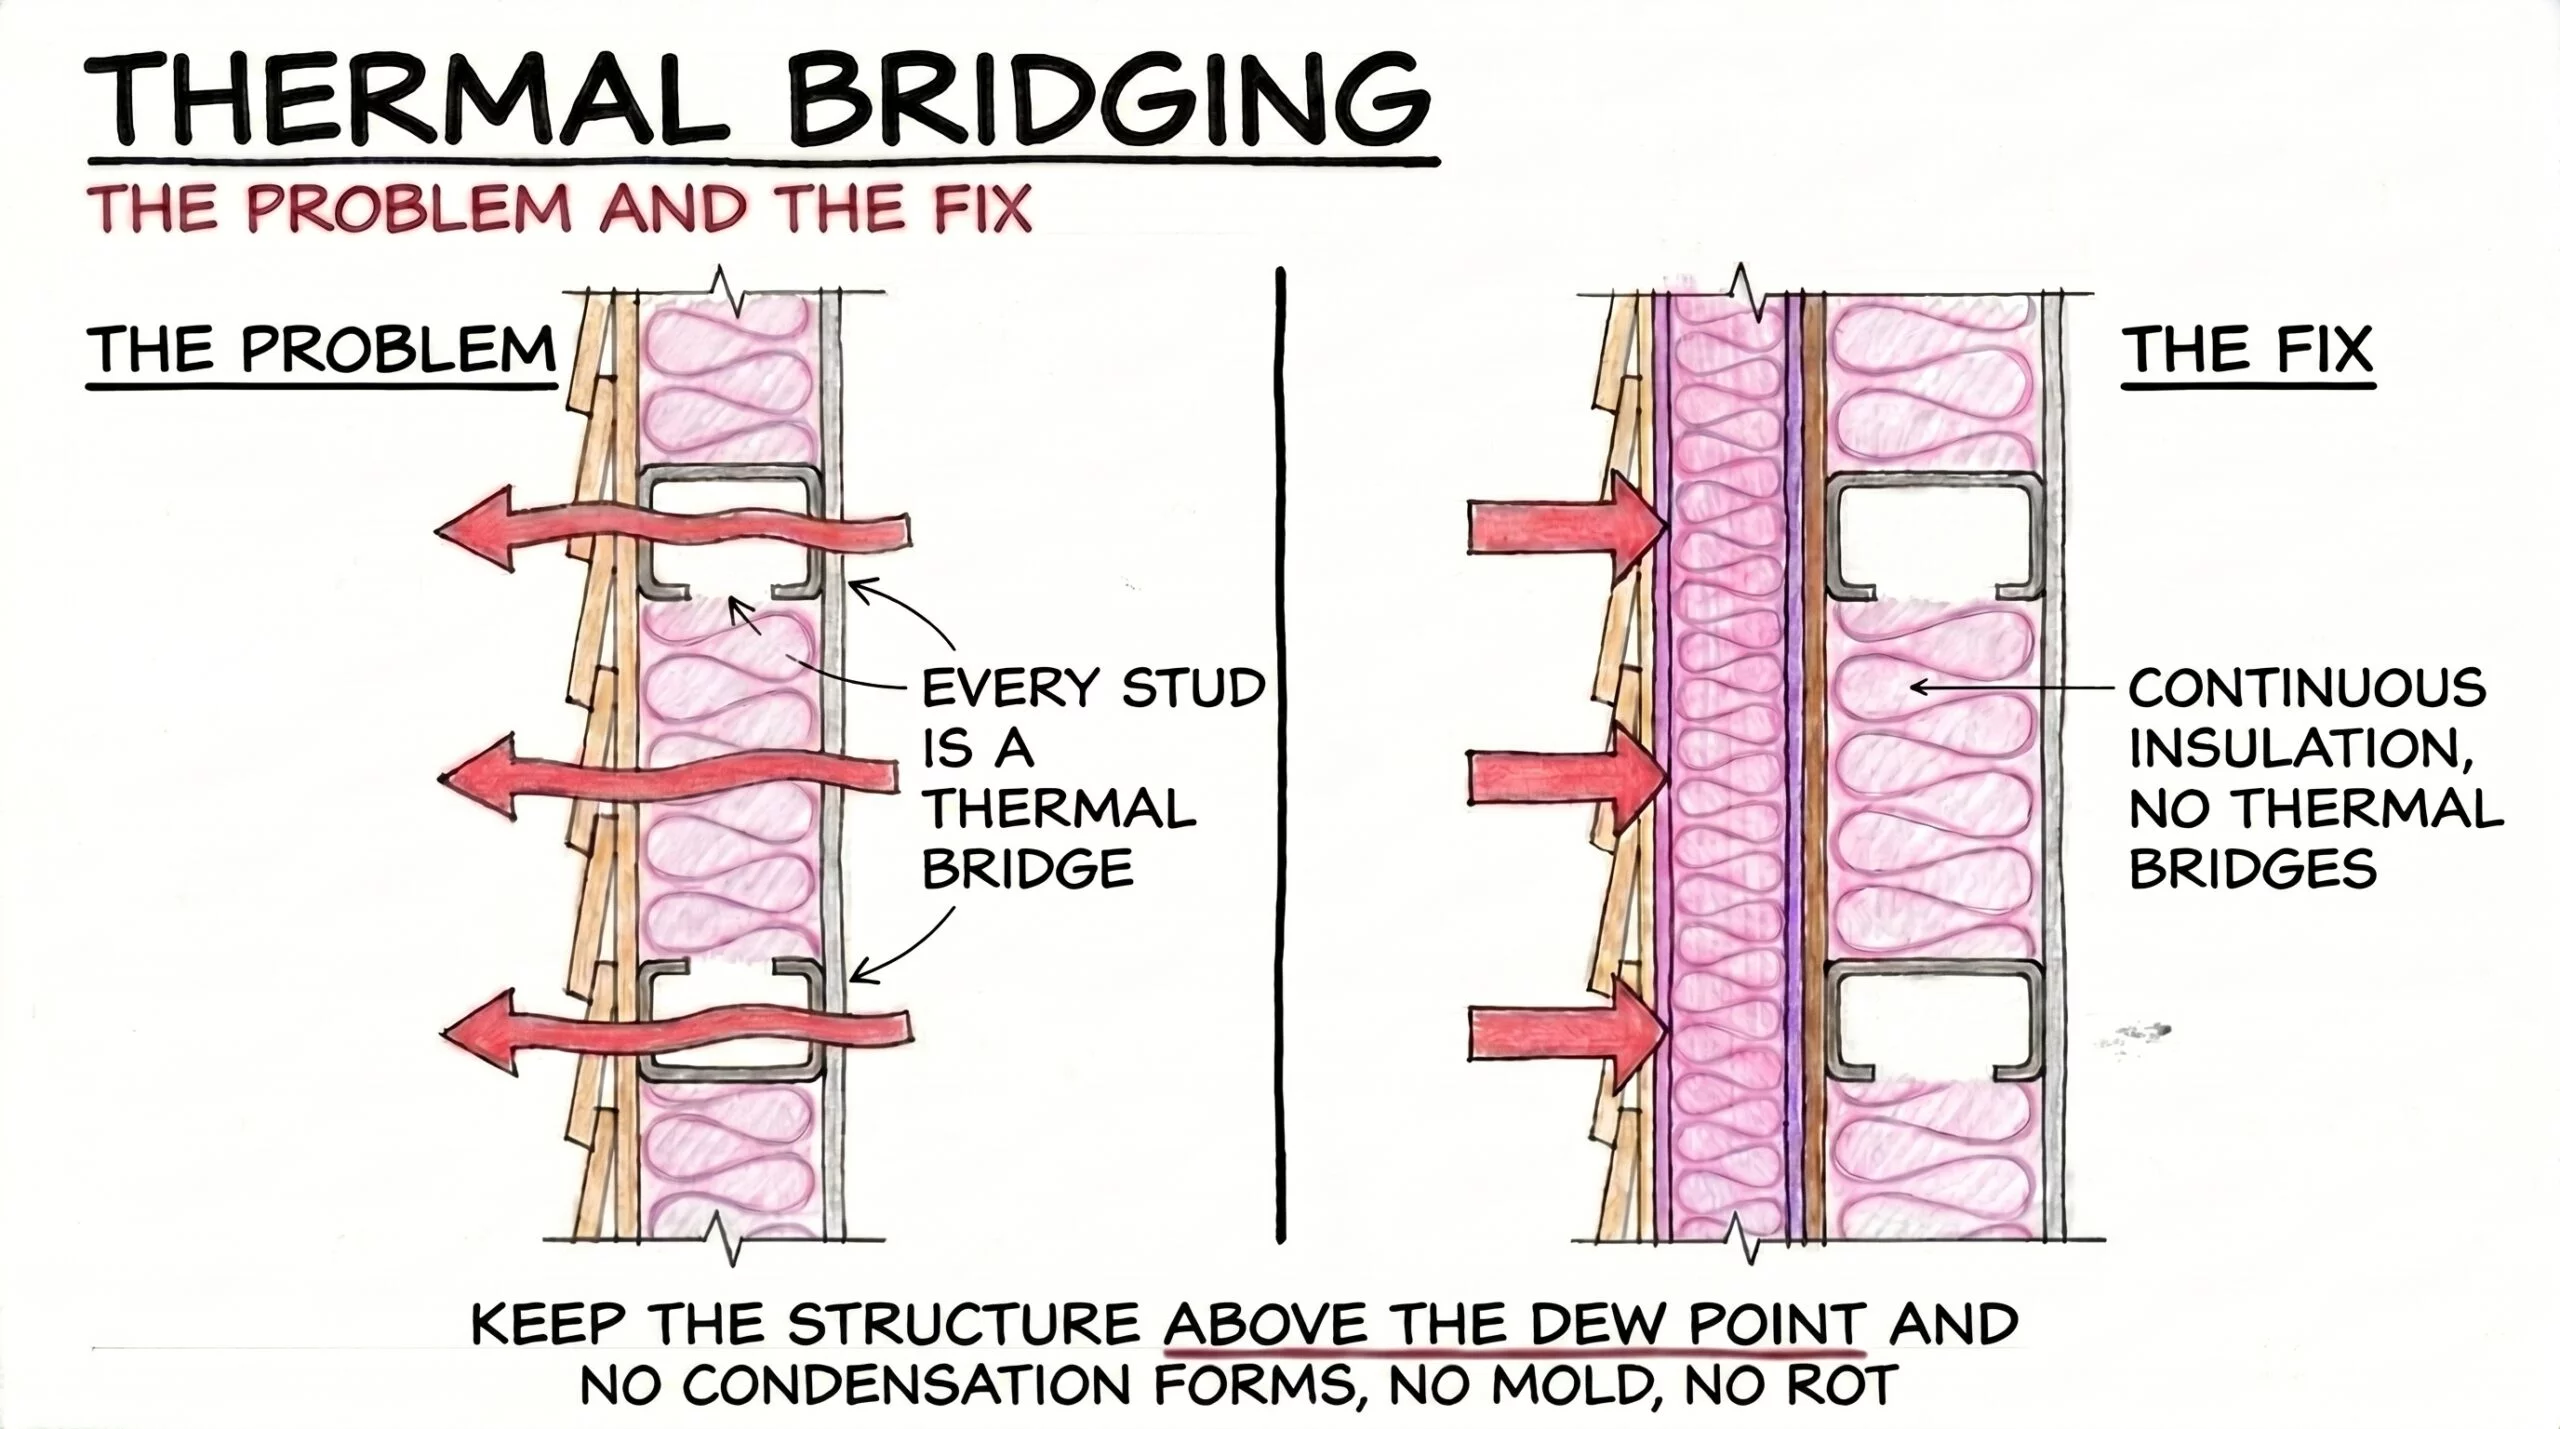
Thermal Bridging and Continuous Insulation
Thermal bridging happens when a structural element, like a wood stud or steel beam, passes through the insulation layer. That structural member becomes a direct path for heat to bypass the insulation entirely.
Imagine wearing a warm coat with a metal rod running from inside to outside. The rod conducts heat right through the coat, no matter how thick the insulation is. That’s thermal bridging.
In a traditional wall with insulation stuffed between studs, every stud is a thermal bridge. Heat escapes through every stud, every header, every bottom plate. The insulation only works in the cavities between framing members.
Continuous insulation outboard of the sheathing solves this problem. It wraps the entire structure in an unbroken insulation layer. No studs poking through. No thermal bridges. The insulation is continuous across the entire exterior.
Here’s the critical connection back to moisture:
if structural members never get cold enough to reach the dew point, no condensation forms inside the wall. No condensation means no moisture damage, no mold, no rot. The structure stays dry because it stays warm.
That’s the magic of the perfect wall concept. Every control layer outside the structure, the structure stays conditioned, and moisture problems get eliminated at the source instead of managed after the fact.
Common Vapor Barrier Mistakes
These are the five mistakes that trip up ARE candidates and practicing architects alike. If you walk into the exam knowing these, you’ll dodge some of the trickiest questions.
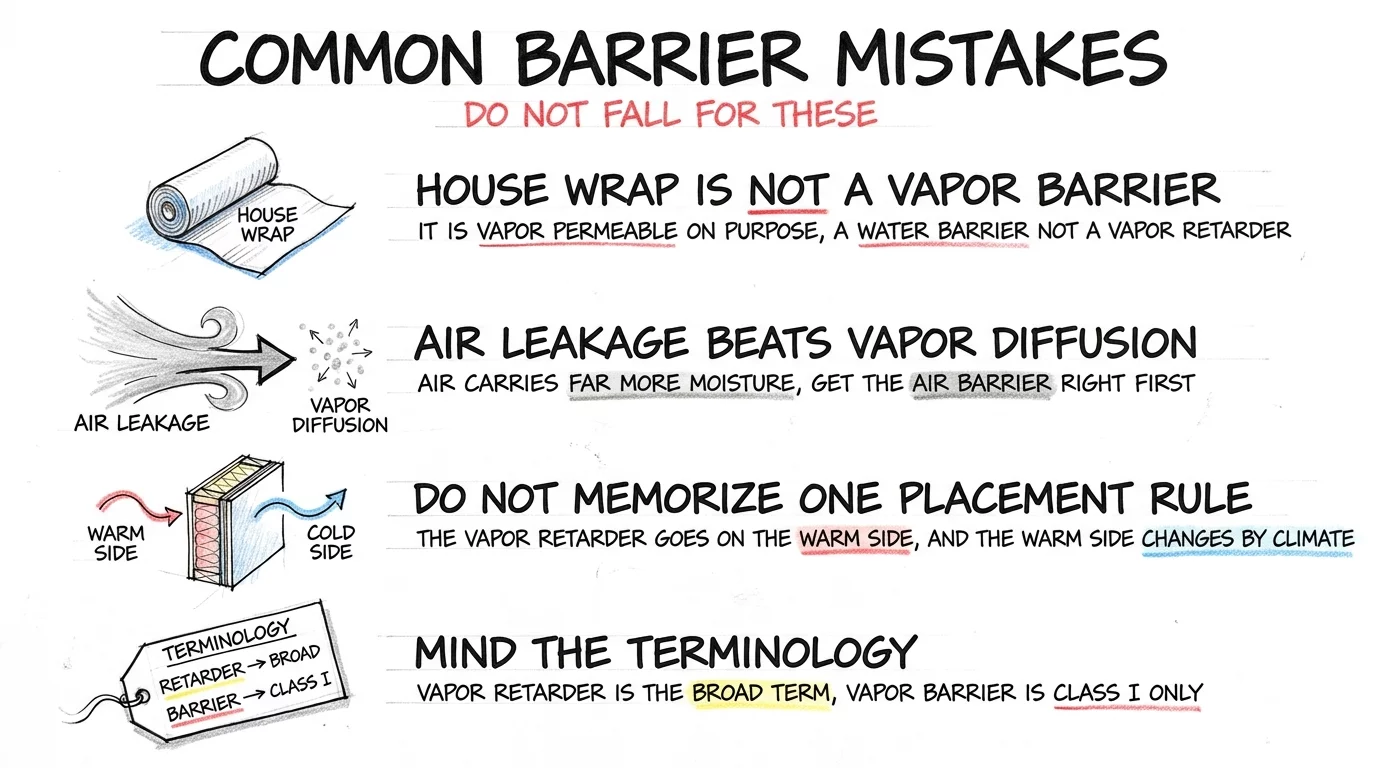
1. Thinking house wrap is a vapor barrier.
House wrap (like Tyvek) is vapor-permeable on purpose. That’s a feature, not a flaw. The wall needs to dry to the exterior, and a vapor-permeable WRB lets that happen.
House wrap is a water barrier and sometimes an air barrier, but it is NOT a vapor retarder. If you see an exam question asking whether house wrap stops vapor diffusion, the answer is no.
2. Underestimating air leakage.
Air leaking through a wall can carry up to 100 times more moisture than vapor diffusing through materials.
Because of this, air barrier continuity matters more than vapor retarder placement in most assemblies. Get the air barrier right first. A perfect vapor retarder with a leaky air barrier still has a moisture problem.
3. Memorizing one rule for vapor retarder placement.
“Vapor retarder goes on the inside” is only true in cold climates.
The correct rule is the warm-side rule. The vapor retarder goes on the warm side of the insulation. In cold climates, the warm side is the interior. In hot-humid climates, it’s the exterior. In mixed climates, think twice before using a Class I retarder on either side.
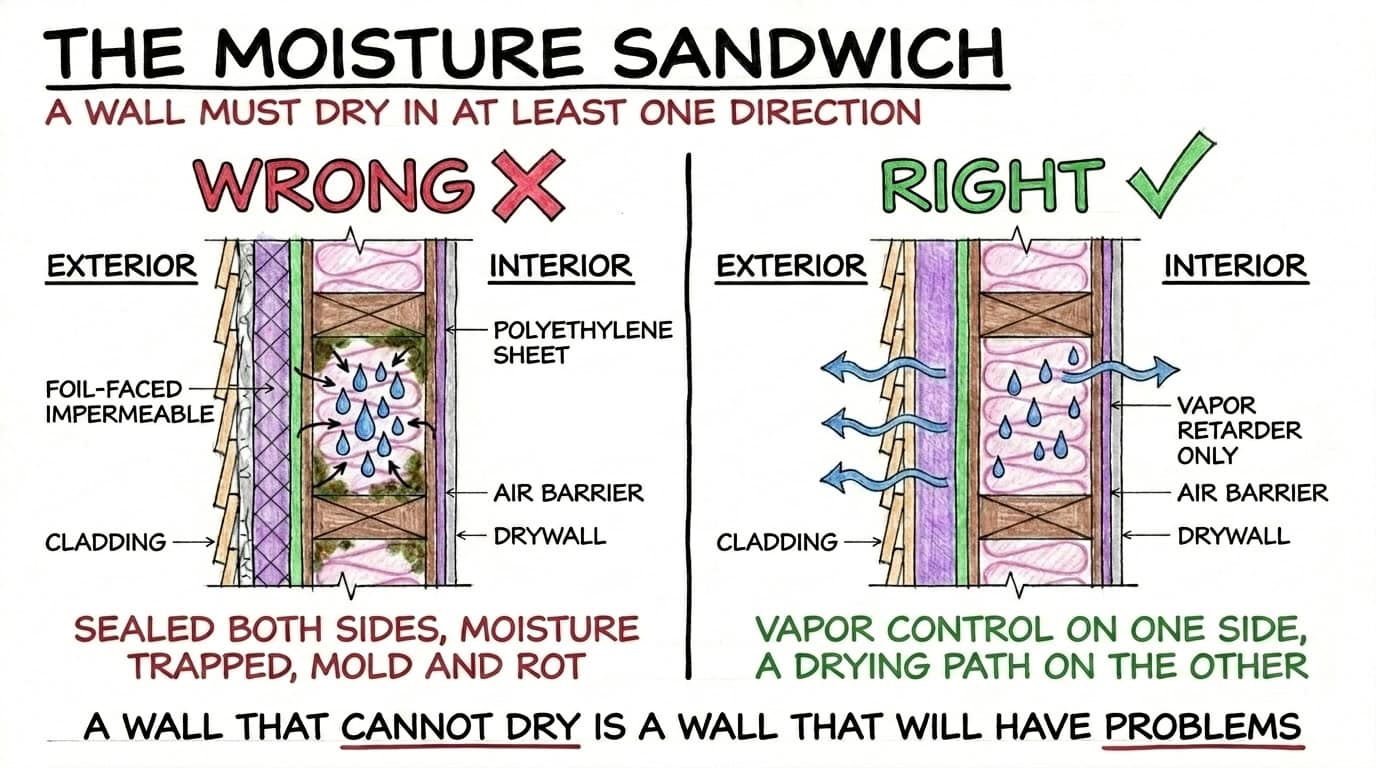
4. The moisture sandwich.
A vapor retarder on both sides of the wall traps moisture with nowhere to dry. Poly on the inside plus vinyl wallpaper or foil-faced insulation on the outside creates a moisture sandwich.
The wall has zero drying potential in either direction. Trapped moisture leads to mold and rot.
The classic real-world example is a hotel built in a hot-humid climate. The AC is cranking inside, making the drywall cold. The interior designer puts heavy vinyl wallpaper (a Class I vapor retarder) on the inside face of the exterior walls. Hot, humid outdoor air pushes into the wall, hits the cold vinyl wallpaper, reaches the dew point, and condenses into liquid water inside the wall cavity.
Result: a hotel that smells like mold within months.
That’s why in hot-humid climates, the wall needs to be able to dry to the interior. The vinyl wallpaper killed the wall’s ability to do that. The fix? Skip the vinyl wallpaper, use a highly permeable latex paint instead, and let the wall dry safely to the air-conditioned interior.
5. Getting tripped up on terminology.
“Vapor retarder” is the broad, correct term covering all three classes. “Vapor barrier” is specifically Class I, 0.1 perms or less. Above 10 perms isn’t a retarder at all. It’s vapor permeable. Know the vocabulary and you won’t get confused when the exam switches between terms.
Study This Topic for the ARE
Water barriers, air barriers, and vapor barriers show up across multiple ARE divisions, but they hit hardest on two exams.
PPD (Project Planning and Design): Building systems selection, envelope design decisions, structural integration with thermal performance. PPD wants you to select the right systems and understand how they work together.
Expect questions about rainscreen assemblies, continuous insulation strategies, and which barrier goes where based on climate.
PDD (Project Development and Documentation): Specifications, construction documentation, material detailing, wall section assemblies. PDD wants you to document it correctly.
Expect questions about perm ratings, material specifications, flashing details, and how barrier systems get shown in construction documents.
This topic also touches PA (site analysis and environmental factors), CE (construction submittals for barrier products and quality assurance during installation), and PjM (coordinating with consultants on fire-rated envelope assemblies).
Understanding the “why” behind each barrier layer makes exam questions significantly easier than trying to memorize isolated rules.
For example, if you know why the vapor retarder goes on the warm side, you can figure out the answer for any climate. Similarly, if you know why air leakage matters more than vapor diffusion, you’ll prioritize correctly when a question forces you to choose.
If you’re studying for PPD, our PPD 101 course covers building envelope design, structural systems, and building systems integration.
For PDD, PDD 101 walks through specifications, construction documentation, and wall assembly detailing. Building Codes 101 covers the code requirements that drive barrier placement decisions, and Mechanical Systems 101 covers thermal performance, HVAC, and how the building envelope connects to mechanical design.
All of these courses are included in the ARE 101 Membership. One monthly subscription, cancel anytime, and you get access to everything.
If you want more than study materials, if you want a structured plan, weekly accountability, and a community of people going through the same process, check out ARE Boot Camp. It’s a 10-week coaching program that gives you a clear roadmap to get licensed, and we support you until you pass every single exam.
Frequently Asked Questions
What is the difference between a vapor barrier and a vapor retarder?
“Vapor retarder” is the umbrella term for any material that slows moisture vapor diffusion through a wall assembly. A vapor barrier is a specific type of vapor retarder, classified as Class I with a perm rating of 0.1 or less. Materials like polyethylene sheet and aluminum foil fall into this category. All vapor barriers are vapor retarders, but not all vapor retarders are vapor barriers. Class II and Class III materials slow vapor to varying degrees without stopping it entirely.
What is the difference between an air barrier and a vapor barrier?
An air barrier stops uncontrolled air movement through the wall assembly. A vapor barrier slows moisture vapor from diffusing through solid materials. They solve different problems. Air leakage can carry up to 100 times more moisture into a wall than vapor diffusion, which is why the air barrier is often the more critical layer. Some materials do both jobs (like polyethylene sheet), while others handle only one (like house wrap, which blocks air but not vapor).
Is house wrap a vapor barrier?
No. House wrap is designed to be vapor-permeable. It functions as a water barrier (WRB) and sometimes as an air barrier, but it intentionally lets moisture vapor pass through so the wall can dry to the exterior. With a perm rating well above 10, house wrap is classified as vapor permeable, not a vapor retarder. This is a feature, not a limitation, because the wall needs to breathe in at least one direction.
What side of insulation does a vapor barrier go on?
The warm side. In cold climates, the warm side is the interior, so the vapor barrier goes between the drywall and the insulation. In hot-humid climates, the warm side is the exterior. For mixed climates where the warm side changes with the seasons, avoid using a Class I vapor barrier on either side. Instead, use a Class III retarder or a smart vapor retarder that adapts to humidity conditions automatically.
What is a Class 1 vapor retarder?
A Class I vapor retarder is a material with a perm rating of 0.1 or less. It’s the most impermeable classification and what most people mean when they say “vapor barrier.” Common examples include polyethylene sheet, glass, aluminum foil, and foil-faced polyisocyanurate insulation. These retarders are effective at stopping vapor movement, but they must be placed on the correct side of the wall based on climate to avoid trapping moisture.
What is a moisture barrier?
“Moisture barrier” is an imprecise term that gets used loosely in the construction industry. It could refer to a vapor retarder (which slows vapor diffusion), a water barrier or WRB (which stops bulk water), or something else entirely depending on who’s using it. For clarity and accuracy, use the specific term for what you’re describing: “vapor retarder” for vapor control and “water barrier” or “WRB” for bulk water control.
What is a blower door test?
A blower door test is a diagnostic test that pressurizes or depressurizes a building and measures how much air leaks through the building envelope. Results are typically reported as ACH50 (Air Changes per Hour at 50 Pascals). It verifies whether the air barrier system was installed correctly and is performing as designed. Essentially, it’s the field verification that confirms your air barrier system actually works in the real building.