


Understanding foundation types can save your project from budget-busting surprises. This guide breaks down 7 essential foundation systems, explaining when to use each based on soil conditions, building loads, and site constraints, so you can make smarter decisions during site analysis and on the ARE.
This podcast is also available on YouTube, Spotify, and Apple Podcasts
Everything was going great!
It was supposed to be a straightforward project. A three-story office building on what looked like a perfectly normal site. The architect had the preliminary drawings ready, budget discussions were going well, and everyone was excited to break ground in a few months.
Then the geotechnical report came back.
Twenty feet of soft clay sat beneath the surface before hitting anything remotely stable. Those simple spread footings they’d been planning? Not going to work.
Now they were looking at deep foundations, pile driving equipment, a construction schedule that just got extended by two months, and a foundation budget that tripled overnight. The client’s first question: “Why didn’t we know about this sooner?”
This is exactly why understanding foundation types isn’t just about passing the ARE. It’s about making informed decisions during site analysis that prevent expensive surprises later. Whether you’re dealing with shallow foundations on competent soil or deep foundations that need to bypass weak layers, knowing your options early in the design process saves time, money, and a lot of difficult conversations.
Let’s break down the seven most common building foundations you’ll encounter as an architect, when to use each one, and what you need to know for both the ARE and real-world practice.
What Are Foundation Types?
Foundation systems refer to the different structural approaches used to transfer building loads from the structure down into the earth. Every building needs a foundation, but not every building needs the same kind.
The foundation you choose affects everything: your structural system, your construction cost estimates, and your schedule. Pick the wrong one and you’re looking at settlement issues, cracking, structural problems, or worst case, complete failure.
Foundation selection comes down to three main factors:
- Soil bearing capacity
- Building loads
- Site constraints
That’s why the geotechnical report is so critical. It tells you what you’re working with below the surface and guides your decisions. This investigation typically happens during the pre-design phase, before design even begins.
There are two main categories: shallow foundations and deep foundations.
Shallow foundations sit near the surface and spread loads across the soil. You use these when you’ve got good, competent soil within a few feet of grade. They’re the most economical option when site conditions allow for them.
Deep foundations bypass weak surface soil entirely and transfer loads down to stronger soil or rock layers far below. They’re more expensive and take longer to construct, but when surface conditions are poor, they’re your only option.
Understanding when to use each type is essential knowledge for the Programming & Analysis (PA) exam, where site analysis questions frequently appear, and it’s critical for making smart decisions during schematic design.
Shallow Foundation Types
Shallow foundations work when you’ve got solid, competent soil near the surface. These are your most economical options because they don’t require specialized equipment or deep excavation.
The term “shallow” doesn’t mean weak. It just means the foundation bears on soil relatively close to the finished grade, typically within 6 to 8 feet of the surface.
There are four main shallow foundation options:
- Spread footings
- Continuous footings
- Combined footings
- Mat foundations
Each one solves a specific problem based on your building configuration and soil conditions. Let’s look at each one.
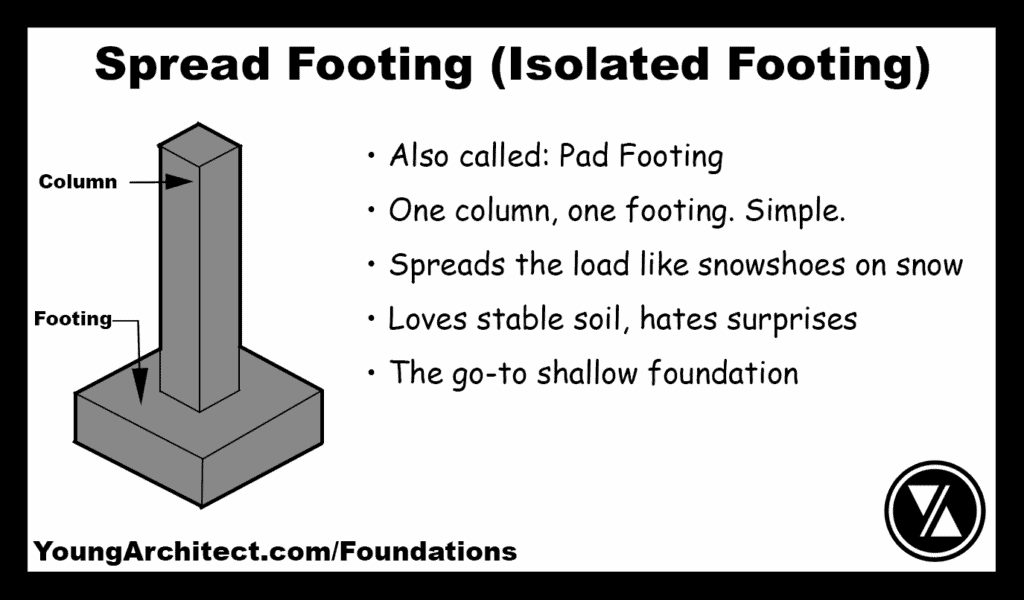
Spread Footings (Isolated Footings)
Think of spread footings like snowshoes. When you’re walking through deep snow, regular boots punch right through. But snowshoes spread your weight over a larger surface area, so you stay on top. That’s exactly what a spread footing does.
A spread footing is an individual concrete pad that sits under a single column. The footing takes that concentrated column load and spreads it out over a larger area of soil so the soil can actually support it. Without the footing, a heavy column would just punch through the ground like your boot in fresh powder. And trust me, punching through the ground with a building load is a very bad look.
These are the most common foundation types you’ll encounter.
When do you use spread footings?
You use them when you’ve got relatively light to moderate building loads and your soil is strong and stable near the surface. We’re talking about low- to mid-rise buildings:
- Office buildings
- Parking structures
- Warehouses
- Anything with a grid of columns and decent spacing between them
The soil requirements are specific:
- Soil needs to be uniform and competent
- You can’t use spread footings if your soil report shows weak, compressible, or highly variable soil conditions
- Your footings need to be spaced far enough apart that they don’t interfere with each other
Here’s a real-world example:
A typical three-story office building with a steel frame, columns on a 30-foot grid, and the geotechnical report shows dense sand with good bearing capacity. Spread footings are the obvious choice. They’re economical, straightforward to construct, and they work.
The cost is reasonable compared to other options because foundation construction is simple: excavate, form, pour concrete, backfill. No specialized equipment, no deep drilling, no dealing with your neighbor’s complaints about jackhammer noise at 7 AM.
The biggest mistake architects make with spread footings is assuming they’ll work without actually checking the soil report. Just because the site looks fine on the surface doesn’t mean the soil can support your building loads. I’ve seen this problem discovered three weeks into construction, which is approximately three weeks too late.
ARE Exam Tip: Spread footings are the most commonly tested foundation type on the ARE. Remember this phrase: Spread = spread out the load. If you see an exam question with column grids and good soil conditions, spread footings are probably your answer.
This shows up frequently on the Project Planning & Design (PPD) exam when you’re selecting structural systems.
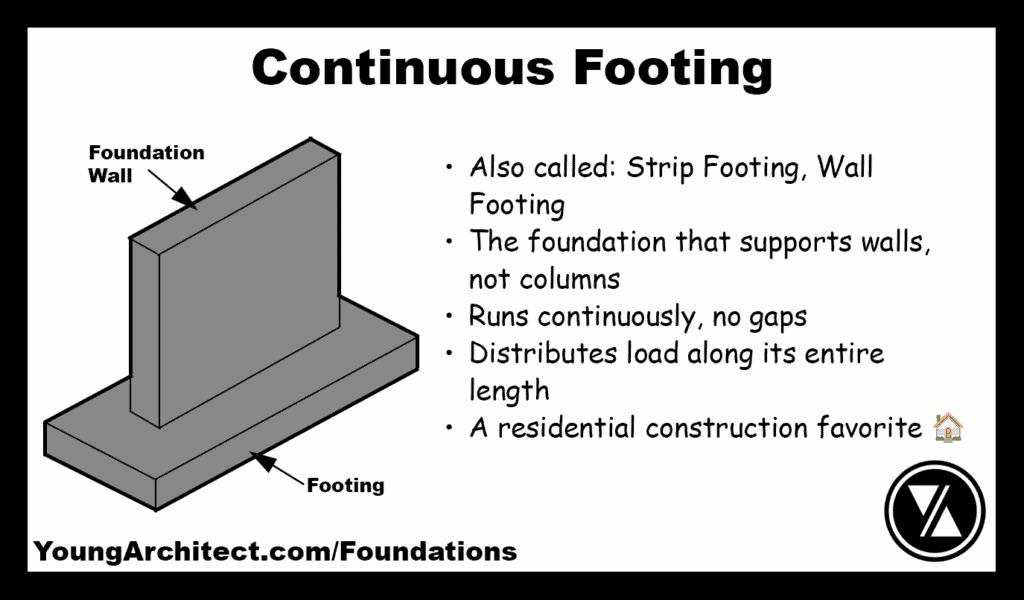
Continuous Footings (Wall Footings)
If spread footings are for columns, continuous footings are for walls.
A continuous footing is exactly what it sounds like: a continuous strip of concrete that runs the entire length of a load-bearing wall. Instead of individual pads under each column, you’ve got one long foundation element supporting a linear load.
When do you use continuous footings?
Anytime you’re supporting a load-bearing wall instead of a column grid. Common applications include:
- Residential construction where perimeter walls and interior bearing walls sit on continuous concrete footings
- Retaining walls
- Buildings with masonry bearing walls
The key thing to understand: the load is distributed linearly along the entire wall, not concentrated at specific points like with columns. That’s why you need a continuous foundation element rather than isolated pads.
Here’s where it gets tricky: if your soil strength varies significantly along the length of the wall, you can run into differential settlement problems. One section of the wall settles more than another section, and you get cracking and structural issues. That’s why soil uniformity matters even more with continuous footings than with spread footings.
Real-world example:
A single-family house with wood-framed load-bearing walls. The perimeter walls and center bearing wall all sit on continuous concrete footings. Simple, cost-effective, and appropriate for residential loads.
Continuous footings are often paired with slab-on-grade construction in residential and light commercial projects. The walls sit on the footings, and the slab sits inside, bearing directly on the soil. It’s the bread and butter of residential construction.
ARE Exam Tip: Here’s the simple rule for the exam: Wall = continuous, Column = spread.
This distinction shows up frequently in Programming & Analysis (PA) questions when you’re determining structure type and foundation requirements. If you see load-bearing walls in a question stem, think continuous footings.

Combined Footings
Up until now, we’ve been talking about straightforward situations: columns on good soil, walls on good soil. But what happens when site constraints make those simple solutions impossible?
That’s where combined footings come in.
A combined footing is a single footing that supports two or more columns. Instead of each column getting its own pad, you’ve got one larger footing that connects adjacent columns.
When do you use combined footings?
- When columns are too close together and individual spread footings would overlap. You can’t have two footings fighting for the same piece of soil like siblings arguing over the last slice of pizza. You combine them into one.
- When you’ve got a column right near a property line. You can’t extend the footing beyond your property line (your neighbor’s attorney gets involved when you do that), but the load still needs to be centered on the footing for stability. So you combine that edge column with an interior column, creating a footing that balances the loads while keeping everything on your property.
The footing is sized and shaped to keep the resultant load centered. Sometimes that means a rectangular footing, sometimes it’s trapezoidal. The shape depends entirely on the column loads and spacing. Your structural engineer figures this out during foundation design.
Real-world example:
You’re designing an urban infill project with a column positioned right at the property line. A trapezoidal combined footing connects that edge column with an interior column 20 feet away, balancing the loads while respecting the property boundary.
Combined footings are more expensive than individual spread footings because they use more concrete and require more complex formwork. But when site constraints demand them, cost becomes secondary to making the project work.
ARE Exam Tip: Look for site constraints in exam questions, especially property lines, tight column spacing, or urban sites with limited setbacks.
Those are all hints that you might need a combined footing solution. This is less common on the exam than spread or continuous footings, but it does appear in site planning scenarios, particularly on the PPD exam.

Mat Foundations (Raft Foundations)
What happens when your building loads are so heavy, or your soil is so weak, that even large individual footings aren’t enough?
You spread the load over the absolute maximum area possible. That’s what a mat foundation does.
A mat foundation, also called a raft foundation, is a thick reinforced concrete slab that covers the entire building footprint. Instead of individual footings under columns, the whole building sits on one giant slab. Think of it like a concrete raft that keeps everything floating together instead of sinking unevenly.
Here’s an important distinction: mat foundations are still shallow foundations. They spread loads over a large area, but they don’t bypass weak soil layers like deep foundations do. The mat sits near the surface and bears directly on the soil below it.
When do you use a mat foundation?
- Heavy building loads. High-rise buildings, heavy industrial facilities, anything where the building loads are so massive that individual footings would need to be enormous anyway.
- Weak or compressible soil. If the soil bearing capacity is low and the soil can’t support concentrated loads, you spread the load over the maximum possible area to reduce the pressure on the soil.
- Need to minimize differential settlement. Because the entire building is tied together on one slab, if settlement occurs, the whole building settles uniformly instead of having one column settle more than another. This is especially important on compressible clay soils where settlement is inevitable but at least you want it to be even.
- Individual footings would cover more than 50% of the building area anyway. At that point, you might as well just pour one continuous mat and call it a day.
- High water table. The thick slab helps resist hydrostatic pressure and keeps water out of the building.
Real-world example:
A 15-story residential tower on compressible clay. The bearing capacity is low, spread footings would be massive and closely spaced, and the owner is concerned about differential settlement causing cracks in the facade. A mat foundation solves all of these problems. It spreads the load, moves as a unit, and provides a continuous barrier against groundwater.
The downside? Mat foundations are expensive. You’re pouring a massive amount of heavily reinforced concrete over the entire building footprint. But when soil conditions or building loads demand it, cost becomes less important than structural performance. Your client will complain about the price until you show them what foundation failure looks like. Then they stop complaining.
ARE Exam Tip: Key phrase for the exam: Weak soil = mat foundation. This shows up frequently in PPD and PA questions about site response and feasibility. Pay close attention to soil reports in exam questions. If they mention low bearing capacity, compressible soil, or concerns about settlement, mat foundation should be on your radar immediately.
Understanding the Shift: Shallow to Deep Foundations
Everything we’ve covered so far works when you’ve got reasonably good soil near the surface: spread footings, continuous footings, combined footings, and mat foundations.
But what happens when the surface soil is weak, unstable, or just not strong enough to support your building, even with a mat foundation?
That’s when you go deep.
Shallow foundations spread loads across the surface. Deep foundations act like stilts, reaching down through weak surface layers until they hit something strong enough to support the building loads.
Deep foundations bypass the problem entirely. Instead of trying to make the weak surface soil work, you go around it and bear on stronger soil or rock that’s way below the surface.
This is more expensive. It’s more complex. It takes longer to construct. But when the geotechnical report shows 20, 30, or 50 feet of weak soil before you hit anything competent, deep systems are your only option.
There are three main approaches in this category: pile foundations, caissons, and grade beams. Let’s look at each one.
Deep Foundation Types
Deep systems transfer building loads through weak or unstable surface soil down to stronger layers below. These are essential when shallow options simply won’t work because the soil near the surface can’t support the building.
The three main deep foundation types are:
- Pile foundations
- Caissons (also called drilled piers)
- Grade beams that tie the deep elements together
These systems are more expensive than shallow foundations, they require specialized equipment and expertise, and they add time to the construction schedule. But when the soil conditions demand them, there’s no alternative. You can’t argue with geology.
Let’s break down how each type works.

Pile Foundations
Pile foundations are long, slender elements that are driven or drilled deep into the ground to transfer building loads through weak surface soil down to stronger layers below.
Picture a dock on a lake. The dock platform sits on wooden posts that go through the water and mud down to solid ground. That’s essentially what piles do for buildings. Except with more math and fewer fish.
Piles can be made of concrete, steel, or timber, depending on the loads and soil conditions. They’re installed by driving them into the ground with hammers or vibrators (which is exactly as loud as it sounds), or sometimes by drilling a hole and then filling it with concrete.
Piles support loads in two ways:
- Friction piles get their support from friction along the shaft as the pile grips the surrounding soil
- End-bearing piles act like table legs, bearing on solid soil or rock at the bottom of the pile
Many pile systems use a combination of both friction and end bearing.
When do you use pile foundations?
- Poor surface soil conditions. Soft clay, loose sand, fill material, anything that can’t support building loads near the surface.
- Very heavy structures. High-rise buildings, bridges, industrial facilities with massive loads.
- High water table. Piles can go right through water-saturated soil and reach stable layers below.
- Need to resist lateral loads. Piles handle horizontal forces from wind or seismic activity better than shallow foundations because they’re anchored deep in the ground.
You don’t usually use just one pile. You group multiple piles under each column with a pile cap, which is a thick concrete block that ties the piles together and distributes the column load across the pile group. A typical pile group might have 4, 6, 8, or more piles depending on the loads.
Real-world example:
A waterfront building site with 15 feet of soft marine clay before you hit dense sand. You drive concrete piles through the clay down to the sand layer, grouping six to eight piles under each column. The piles transfer the building loads through the unusable clay down to competent bearing soil.
Pile foundation systems add significant cost and time to foundation construction. You need specialized pile driving equipment, and the process is noisy and causes vibration. Your neighbors will definitely know you’re there. If you’re building in an urban area next to existing structures, that vibration can be a real problem. Nothing says “bad relationship with adjacent property owner” like cracking their foundation with your pile driving operation.
But when the soil bearing capacity near the surface is inadequate, pile systems are often the most practical solution.
ARE Exam Tip: Remember this phrase: Poor surface soil = go deep. This shows up in PPD and Project Development & Documentation (PDD) questions about site conditions and structural systems. If you see a geotechnical report that mentions weak surface layers, high water table, or poor bearing capacity near the surface, think pile foundations immediately.

Caissons (Drilled Piers)
Caissons, also called drilled piers, are similar to piles in concept but different in execution and scale.
If piles are like needles, caissons are like giant drilled cylinders designed for enormous loads.
A caisson is a large-diameter foundation element formed by drilling a hole in the ground and then filling it with reinforced concrete. The diameter is much bigger than a typical pile, usually 2 to 10 feet in diameter, sometimes even larger for massive structures like bridge piers.
Caissons can be belled at the bottom, meaning the hole is wider at the base than at the shaft. That bell shape dramatically increases the bearing area, which allows a single caisson to carry tremendous loads. It’s like the foundation equivalent of elephant feet, spreading the load at the bottom.
When do you use caissons?
- Large-diameter deep foundation needs. Bridge piers, tall buildings, any structure with very heavy concentrated point loads.
- Rock layer at depth. Caissons are often drilled down to bedrock and bear directly on it, which gives you incredibly high load capacity.
- Vibration is a concern. If you’re building next to an existing structure and you can’t risk damaging it with pile driving equipment, drilled piers are your solution.
Driven piles are noisy and cause significant vibration. Drilled piers are quiet and produce minimal vibration, which makes them ideal for tight urban sites where existing buildings are nearby. Your neighbors still won’t love the construction activity, but at least you’re not shaking their buildings apart.
The other major advantage: you can inspect the bearing surface before pouring concrete. With driven piles, you’re trusting the calculations and driving records. With drilled caissons, you can lower a camera or even send an engineer down into the hole to visually verify that you’ve reached solid rock or competent soil before you pour. It’s like getting to check your work before committing.
Caissons are often designed to be primarily end-bearing when drilled down to bedrock, but they also derive substantial support from the side friction along the shaft in suitable soils.
Real-world example:
A 30-story office tower where bedrock is 60 feet below the surface. You drill 4-foot diameter caissons with belled bases down to solid rock. Each caisson can support multiple floors worth of load, reducing the total number of foundation elements needed.
The cost of caissons is high because you need specialized drilling equipment and the foundation construction process is slow and careful. But for heavy loads on sites where you can reach rock, they’re often the best solution. Think of it as expensive insurance against foundation failure, which is significantly more expensive than expensive insurance.
ARE Exam Tip: Here’s a general rule for the exam: Caissons = drilled, Piles = driven. That’s not always true in practice, but it’s a good rule of thumb for exam questions. Caissons are associated with heavy loads, reaching rock, and situations where low vibration matters. This is less common on the exam than other foundation types, but it does appear occasionally in PPD and PDD questions. When you see “drilled pier” in a question, think caisson.
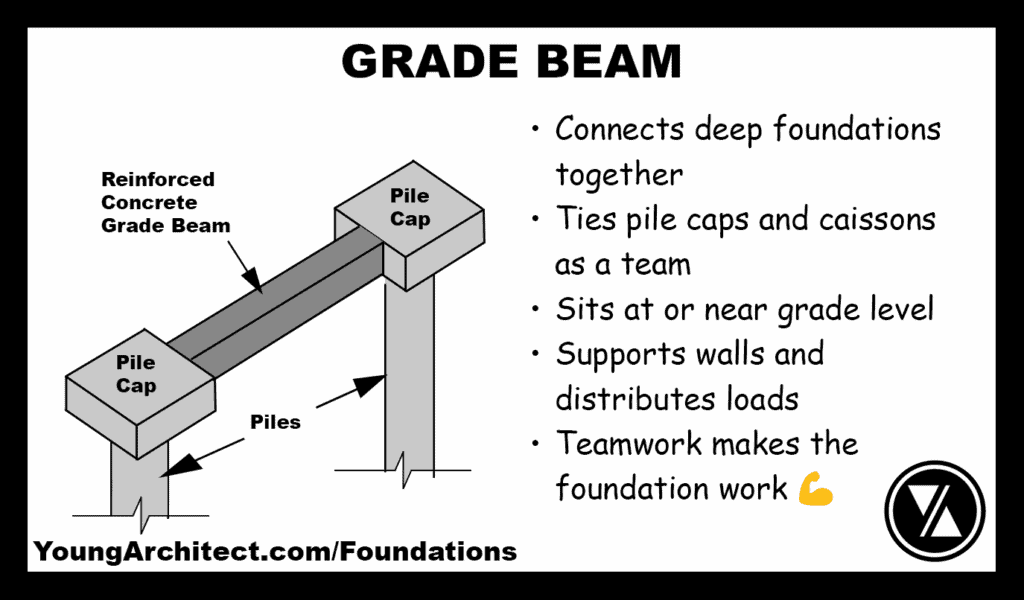
Grade Beams
Grade beams are the structural element that links individual deep foundations (piles and caissons) together at grade level.
A grade beam is a reinforced concrete beam that connects pile caps or caissons together at or near grade level. It’s called a grade beam because it runs at grade, not because it bears on grade.
And that’s the critical thing to understand: grade beams are NOT bearing on the soil. They’re supported by the piles or caissons at each end. The grade beam acts as a structural beam spanning between supports, just like a beam in a building.
When do you use grade beams?
- To connect isolated pile groups or caissons together. Instead of having each pile cap sitting there independently, you tie them together with beams.
- To help distribute loads between foundation elements. If one pile group settles slightly more than another, the grade beams help even that out and prevent cracking.
- To provide lateral stability and buckling restraint. Piles are excellent at carrying vertical loads, but grade beams help resist horizontal forces and keep the deep elements from shifting or buckling.
- To support perimeter walls between the deep foundation points. Instead of needing separate footings for every wall, you just run a grade beam between the pile caps and the wall sits on the beam.
Real-world example:
That waterfront building on pile foundations we talked about earlier. You run reinforced concrete grade beams between the pile caps to support the exterior walls, tie the whole foundation system together, and help resist lateral loads from wind and waves.
Grade beams add cost to deep foundation systems, but they’re often necessary to make the system work properly and to support walls and other elements between the primary foundation points.
ARE Exam Tip: Grade beams work with piles or caissons, not alone. Think of them as the tie in a deep foundation system. They’re less likely to be the main focus of an exam question, but understanding their role shows that you comprehend system thinking, which is important for PPD and PDD. If you see a question about connecting foundation elements or supporting walls in a deep foundation system, grade beams are part of the answer.
How to Choose the Right Foundation Type
So you’ve got seven options to choose from. How do you know which one to use?
It comes down to three key questions:
- How strong is the soil near the surface?
This is the most important question. If you’ve got good, competent soil within a few feet of grade, you can use shallow foundations. If the surface soil is weak and you need to go deep to find stability, you need deep foundations.
The geotechnical report tells you everything you need to know:
- Soil bearing capacity
- Depth to competent soil
- Groundwater levels
- Any special conditions like expansive clay or loose fill
- How heavy is the building?
- Light buildings on good soil: spread footings or continuous footings work fine
- Heavy buildings on good soil: you might need larger footings or a mat foundation
- Heavy buildings on poor soil: you’re definitely looking at deep foundations
The relationship between building loads and soil capacity determines your foundation approach. It’s basic physics, which is good news because physics doesn’t argue back like clients do.
- What site constraints limit your options?
Property lines, adjacent buildings, high water table, rock near the surface, existing utilities. All of these can push you toward specific solutions even if other options would theoretically work.
Quick Reference: When to Use Each Foundation Type
- Spread Footings: Good soil, column grids, light to moderate loads, most economical option
- Continuous Footings: Good soil, load-bearing walls, residential construction
- Combined Footings: Good soil but site constraints like property lines or tight column spacing
- Mat Foundation: Weak soil, heavy loads, need to minimize differential settlement, high water table
- Pile Foundations: Poor surface soil, need to reach deeper stable layers, high water table, lateral load resistance
- Caissons: Very heavy loads, reaching rock, avoiding vibration near existing structures
- Grade Beams: Connecting deep foundation elements, supporting walls between piles or caissons
Foundation design is structural engineer territory. As an architect, you’re not calculating footing sizes or determining pile lengths. But you absolutely need to understand the options so you can coordinate with your structural engineer and make informed decisions during programming and schematic design.
Foundation choice also affects your construction type selection. Type I construction with its fire-resistive requirements might require different foundation approaches than Type V construction. Understanding how foundations integrate with the overall building system is critical.
Cost varies dramatically between approaches. Shallow foundations are always less expensive than deep foundations when both are viable options. But when the soil conditions demand deep foundations, cost becomes secondary to structural performance. Understanding these construction cost estimates early helps set realistic client expectations.
The geotechnical report is your roadmap. Never make assumptions about soil conditions based on what you see on the surface. Get the soil testing done early in the design process so foundation decisions are based on data, not guesses.
And remember: foundation choice drives structural system decisions. If you’re on piles, that affects your column grid, your floor systems, your construction sequencing, everything. Foundation selection happens early because it affects everything that comes after.
Foundation Types and ARE Exam Strategy
Understanding building foundations is essential for three ARE exams: Programming & Analysis (PA), Project Planning & Design (PPD), and Project Development & Documentation (PDD).
Programming & Analysis (PA) tests your ability to analyze site conditions and determine project feasibility. Foundation questions on PA focus on reading geotechnical reports, understanding soil limitations, and selecting appropriate foundation strategies during the programming phase.
Project Planning & Design (PPD) tests your understanding of structural systems and how they integrate with the overall building design. Foundation questions on PPD focus on selecting foundation approaches that work with your structural system and site constraints.
Project Development & Documentation (PDD) tests your knowledge of construction documentation and technical coordination. Foundation questions on PDD focus on detailing foundations properly and coordinating them with other building systems.
The most commonly tested systems are spread footings, continuous footings, and mat foundations. These show up most frequently because they’re the most common in practice.
Deep foundations appear less frequently on the exam, but when they do appear, the questions usually involve reading a soil report and recognizing when surface soil conditions require deep foundations.
How foundation questions typically appear:
- PA exam: You get a geotechnical report showing soil conditions, bearing capacity, and depth to competent soil. The question asks you to recommend an appropriate foundation type based on the site conditions and building program.
- PPD exam: You’re selecting a structural system for a building and need to choose a foundation approach that works with your structural strategy and site conditions.
- PDD exam: You’re coordinating foundation details with other building systems or selecting appropriate foundation construction methods.
The key to answering foundation questions correctly: read the soil report information carefully. NCARB includes that information for a reason. They’re giving you the clues you need to select the right solution.
Also pay attention to what they’re NOT telling you. If a question mentions column grids and good soil but doesn’t mention any site constraints or poor soil conditions, the answer is probably spread footings. Don’t overcomplicate it.
Understanding when NOT to use certain approaches is just as important as knowing when to use them:
- Spread footings don’t work on weak soil
- Mat foundations don’t bypass weak soil layers
- Piles and caissons are expensive overkill when shallow foundations would work fine
System thinking matters on the ARE. Foundations don’t exist in isolation. They connect to structural systems, site conditions, construction methods, and building performance. The exam rewards candidates who understand those connections.
For deeper coverage of foundations and how they integrate with building systems, check out our PA 101 course, where we cover site analysis and foundation selection in detail, and our PDD 101 course, which covers foundation detailing and coordination with other systems.
Frequently Asked Questions
What is the cheapest foundation type?
Spread footings are typically the least expensive option when soil conditions allow for them. They require minimal excavation, no specialized equipment, and straightforward construction. Continuous footings are similarly economical for residential and light commercial construction. Deep foundations like piles and caissons are significantly more expensive due to specialized equipment, deeper excavation, and longer construction time.
What’s the difference between shallow and deep foundations?
Shallow foundations bear on soil near the surface, typically within 6 to 8 feet of grade. They spread building loads across the soil. Deep foundations extend much deeper, sometimes 50 feet or more, to reach stronger soil or rock layers below. Deep foundations bypass weak surface soil entirely and transfer loads to competent bearing material at depth.
When do you need a geotechnical report?
You need a geotechnical report for virtually every building project. The report provides soil boring data, bearing capacity recommendations, groundwater levels, and foundation recommendations based on site-specific conditions. Architects and engineers rely on this report to make foundation decisions. Skipping soil testing is one of the biggest mistakes you can make in design because you’re guessing about conditions underground.
How deep do pile foundations go?
Pile foundations typically extend 20 to 60 feet deep, but they can go much deeper depending on where competent bearing soil or rock is located. The depth is determined by the geotechnical report, which identifies where stable bearing material exists. In some cases, particularly for bridges or structures on very poor soil, piles can extend 100 feet or more to reach adequate support.
What’s the difference between piles and caissons?
Pile foundations are typically driven into the ground using hammers or vibrators, they’re smaller in diameter (usually 12 to 24 inches), and they’re often installed in groups under each column. Caissons are drilled rather than driven, they’re much larger in diameter (2 to 10 feet or more), and each caisson can carry much heavier loads. Caissons produce minimal vibration during installation, which makes them preferable on urban sites near existing buildings.
How does foundation type affect building cost?
Foundation costs can represent 5% to 15% of total building cost depending on the type and soil conditions. Shallow foundations on good soil are the least expensive. Mat foundations are more expensive due to the large amount of concrete required. Deep foundations are the most expensive, potentially doubling or tripling foundation costs compared to shallow foundations. When poor soil conditions require deep foundations, that cost is unavoidable, but understanding the cost implications early helps with budget planning and client expectations.
Conclusion
Understanding building foundations is about more than memorizing definitions for the ARE. It’s about making smart decisions during site analysis that prevent problems later in design and construction.
The seven systems we covered each solve specific problems based on soil conditions, building loads, and site constraints:
- Spread footings
- Continuous footings
- Combined footings
- Mat foundations
- Pile foundations
- Caissons
- Grade beams
Shallow foundations work when you’ve got good soil near the surface. Deep foundations are necessary when surface soil can’t support your building and you need to go deep to find stability.
Foundation selection happens early in the design process because it affects everything that comes after: structural systems, building costs, construction schedules, and site work requirements.
As an architect, you’re not doing the structural calculations, but you need to understand the options well enough to coordinate effectively with your structural engineer and make informed recommendations during programming and schematic design. The structural engineer handles the math, but you own the decision. Understanding these systems turns you from someone who just draws pretty pictures into someone who solves real problems, which is a much better position to be in when the geotechnical report arrives.
For the ARE, focus on recognizing which systems are appropriate for different soil conditions and building scenarios. Read the soil report information carefully in exam questions. They’re giving you the clues you need.
And remember: the geotechnical report is your roadmap. Never make assumptions about what’s underground. Get the soil testing done early so your foundation decisions are based on real data.
If you want to dive deeper into foundations and site analysis strategies, check out our PA 101 course, which covers site evaluation and foundation selection in detail. We also cover foundation coordination and detailing in our PDD 101 course. And if you’re looking for comprehensive exam prep with coaching and accountability, join us in ARE Boot Camp.
Now you understand the foundation options. Use that knowledge to make better design decisions and ace those ARE questions.